Supplier
Vendor
Display vendor list
When to use:
Use this when you want to check a list of Vendor information managed by Orion.
Users:
Manager
Screen Images:
Detail Specifications:
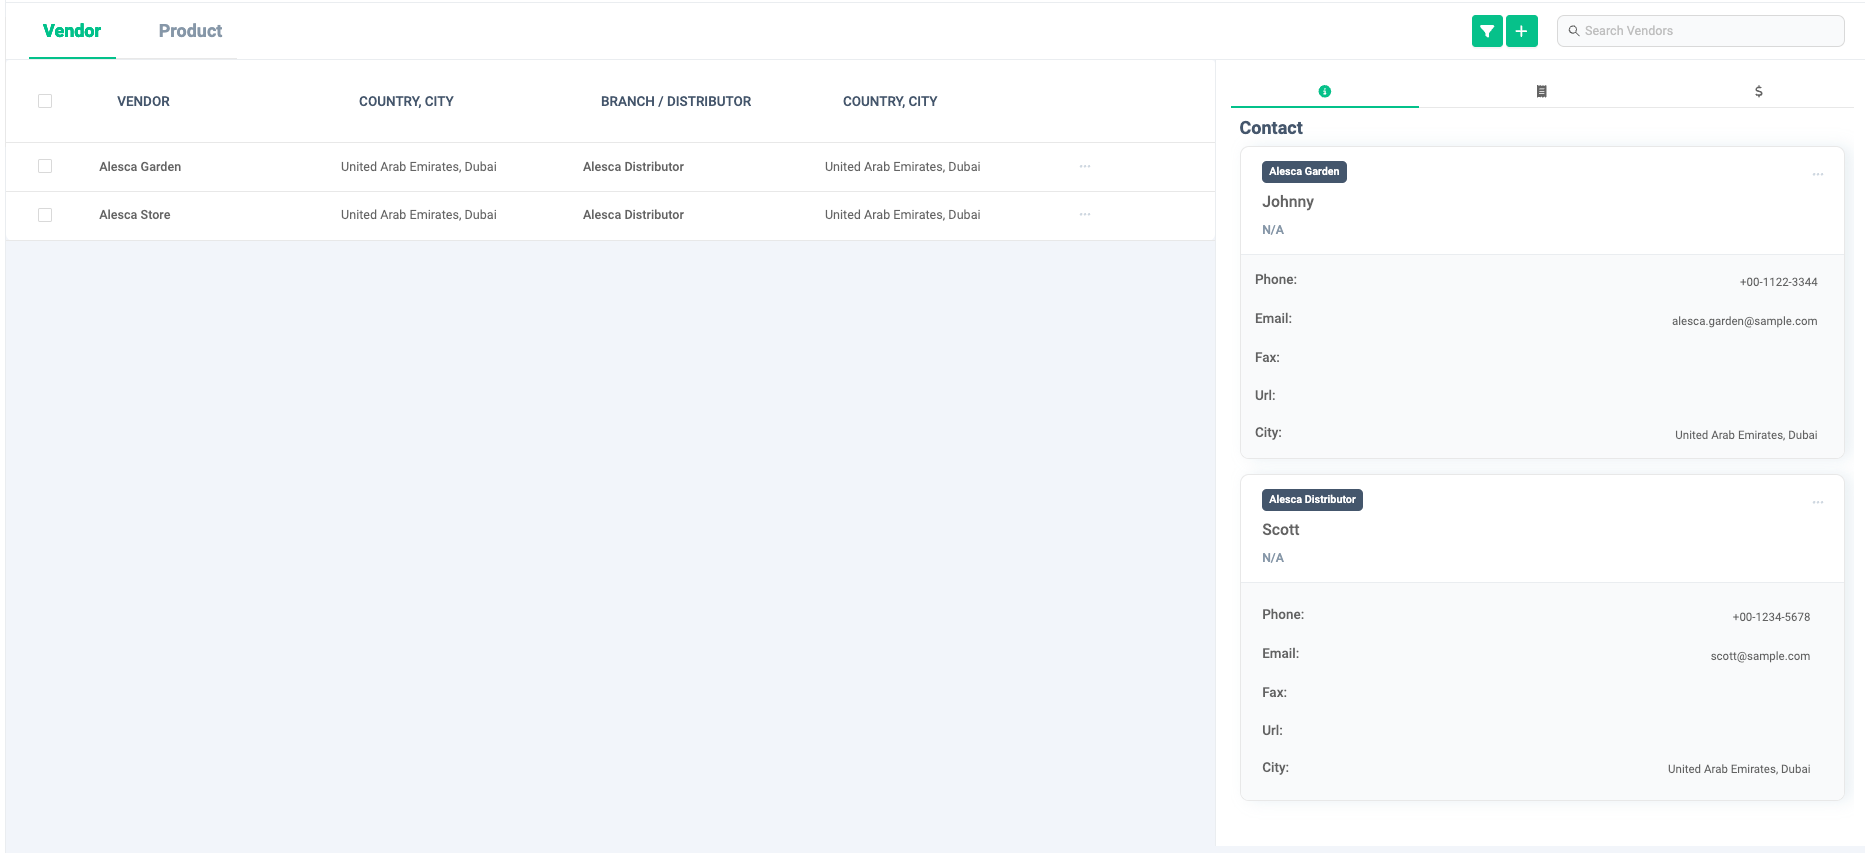
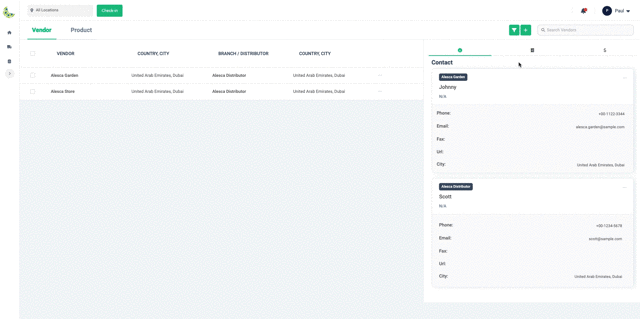
- You can check the list of vendors. A list of Vendors is displayed on the left side of the screen, and Vendor details are displayed on the right side of the screen.
- The Vendor name, Vendor address, Branch/Distributor name, and Branch/Distributor address are displayed as Vendor information.
- On the right side of the screen, details of the Vendor selected in the table are displayed. The items that can be checked differ depending on the tab. I will explain the tabs in order from the left.

Contact information: You can check the vendor's contact information.Contract: You can manage contract-related documents used when making a contract with a vendor.Payment history: You can manage the payment status and history to vendors.
Add Vendor
When to use:
Used when registering a new vendor, such as a place to purchase equipment.
Users:
Manager
Screen Images:

Detail Specifications:
- Click the "+" button at the top right of the screen and click "Add Vendor".
- You must enter values in each of the following four steps to register a vendor. Let's check them in order.

- Name & Address
- Vendor Contact
- Distributor Contact
- Payment
Name & Address
- Enter your name, country and city.
Vendor Contact
- Enter the Vendor's phone number, contact name, contact person's title, contact phone number, and contact email address. Vendor's FAX and Vendor's URL are optional items. You can select "http://" or "https://" for the URL.
- If there is information you would like to register other than the default fields, you can click "+Custom Contact Field" and freely add fields and values.
- If you want to delete an added field, click the "-" button to the right of the item.
- If you need to register more than one contact, click "+ Another Contact" to register another contact. You can also delete contacts added using "- Another Contact".
Distributor Contact
- Enter the branch/Distributor name, country, city, address, postal code, Distributor phone number, contact name, contact person title, contact phone number, and contact email address. Distributor FAX and Distributor URL are optional items.
- If you want to use the same information for the branch/distributor as the vendor, click "Same as the vendor". Items other than address and postal code will be set.
- If there is information you would like to register other than the default fields, you can click "+Custom Contact Field" and freely add fields and values.
- If you want to delete an added field, click the "-" button to the right of the item.
- If you need to register more than one contact, click "+ Another Contact" to register another contact. You can also delete contacts added using "- Another Contact".
- If you want to clear all information entered in an item at once, click "Clear" at the bottom of the screen.
- To register multiple branches/Distributors, click "+ Create a new Distributor".
- If you want to modify the branch/Distributor that has already been entered, click the "Edit" button to the right of the branch/Distributor name and modify the information. After fixing, click "Apply the Fix".
- If you want to delete a branch/Distributor that has already been entered, click the "-" button to the right of the branch/Distributor name.
Payment
- If necessary, register the branch/Distributor payment address. Please note that account name, bank name, branch name, account number, and memo are optional fields.
When all input is complete, click the "Save" button. Vendor information is saved in Orion.
- Vendor information can be temporarily saved during input.
- To save temporarily, click the "Temporarily Save" button.
- If you save temporarily, when you add the next Vendor, you can choose whether to create Vendor information from the continuation of the temporarily saved contents, or to discard the temporarily saved contents and create a new one.
Add Distributor
When to use:
Use this when you want to add Distributor information to Vendor.
Users:
Manager
Screen Images:

Detail Specifications:
- Click the "+" button at the top right of the screen and click "Add Distributors".
- Select the Vendor to which you want to add Distributor information.
- Enter the Distributor information and click the "Save" button.
For information on Distributor input items, see Adding a Vendor and entering Distributor information.
Archive Vendor
When to use:
Use this when you want to change the Vendor to active status.
Users:
Manager
Screen Images:
Detail Specifications:
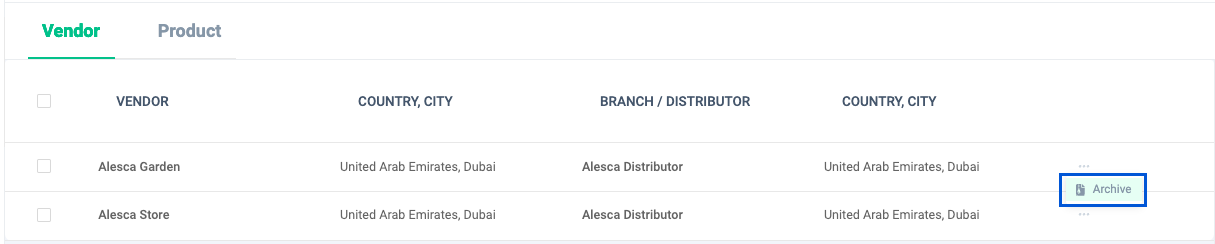
- Click "Archive" from the menu on the right side of the Vendor record to be archived.
- If you archive a Vendor, you will no longer be able to use functions such as editing that Vendor, uploading contract-related documents, and creating payment requests.
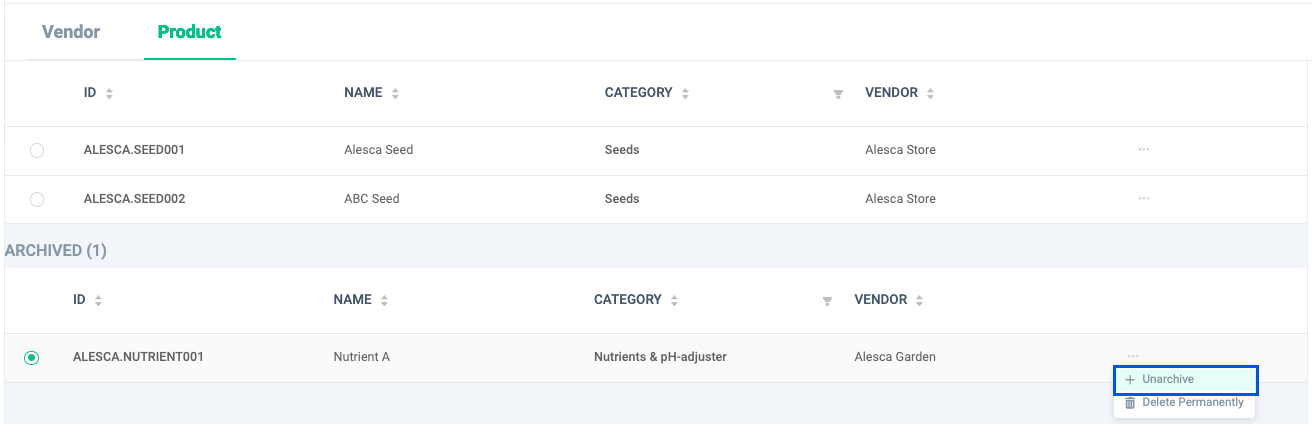
Unarchive Vendor
When to use:
Use this when you want to unarchive Vendor.
Users:
Manager
Screen Images:
Detail Specifications:
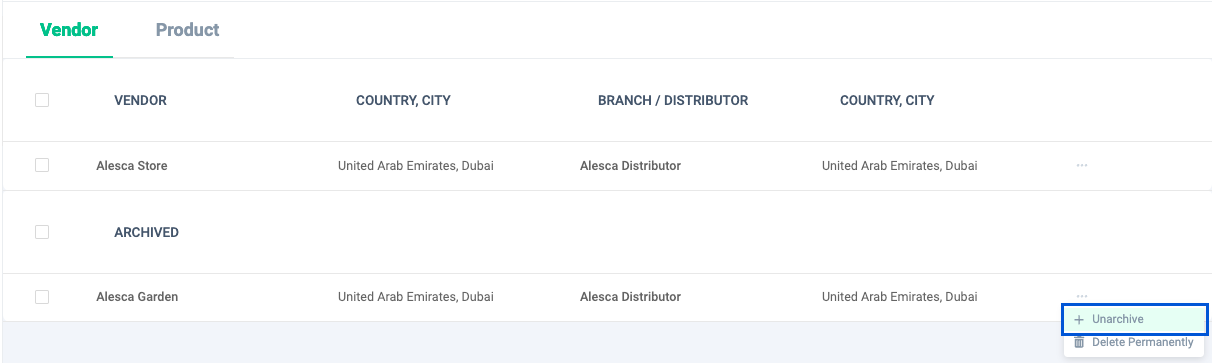
- Click "Unarchive" from the menu on the right side of the Vendor record to be unarchived.
- Unarchiving a Vendor will make it active and you can resume using all its features.
Delete Vendor
When to use:
Use this when you want to delete a Vendor.
Users:
Manager
Screen Images:
Detail Specifications:
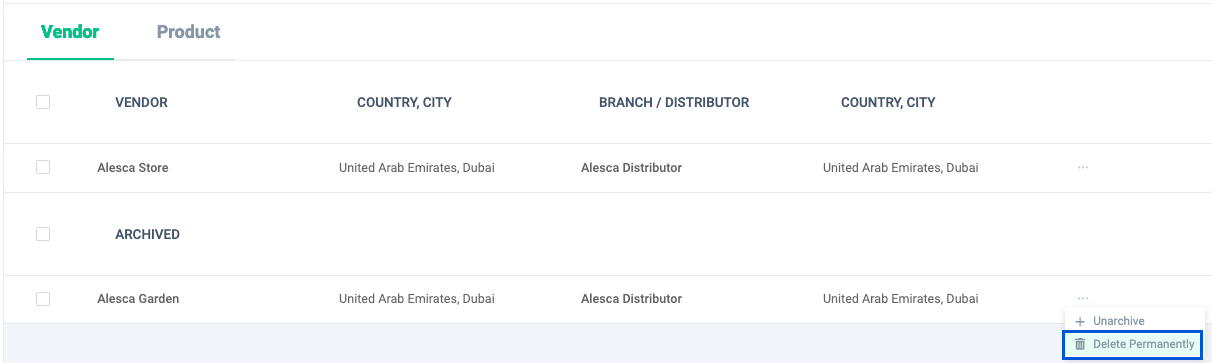
- Click "Delete Permanently" from the menu on the right side of the Vendor record to be deleted. *A warning about vendor deletion will be displayed. Check the contents and click "OK". Vendor information deletion is complete.
- Deleted Vendors cannot be restored. If you want to preserve Vendor information, use the Archive function.
Batch Edit Vendors
When to use:
Use this when you want to edit Vendor information in bulk.
Users:
Manager
Screen Images:


Detail Specifications:
- Put a checkmark to the left of the Vendors you want to edit in batches, and click the "Batch Edit" button displayed at the top right of the screen.
- If the selected Vendors include a Vendor that you want to remove from editing, you can remove it by clicking the "X" button to the left of the Vendor's name.
- Click the "Delete" button to delete all at once, and the "Archive" button to archive all at once.
Vendor filtering
When to use:
Use this when you want to filter the Vendor list.
Users:
Manager
Screen Images:

Detail Specifications:
- Click the "Filter" button at the top right of the screen.
- Vendor/Distributor name and country (Vendor/Distributor) can be used at the same time as filter conditions.
- Check the conditions you want to display and click the "Save" button to apply the filter.
- Click the "Clear" button to reset the conditions.
Vendor sorting
When to use:
Use this when you want to sort the Vendor list.
Users:
Manager
Screen Images:
Detail Specifications:
- Click the "Filter" button at the top right of the screen.
- Vendor/Distributor name and country (Vendor/Distributor) can be used at the same time as sorting conditions.
- Click once on the condition you want to sort, and the condition will be sorted in "ascending order," the second click will return it to "descending order," and the third click will return to "no sort condition."
- Click the "Clear" button to reset the conditions.
- Click the "Save" button to apply the sort.
Contact address
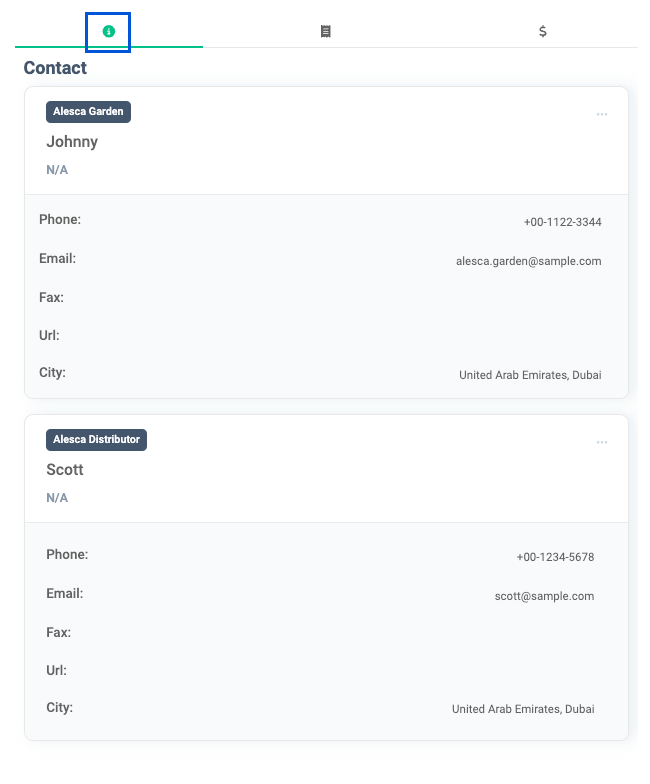
Display Vendor/Distributor contact information
When to use:
Use this when you want to check the contact information of Vendors and Distributors.
Users:
Manager
Screen Images:
Detail Specifications:
- You can check the contact information for the Vendor record selected in the list on the left side of the screen.
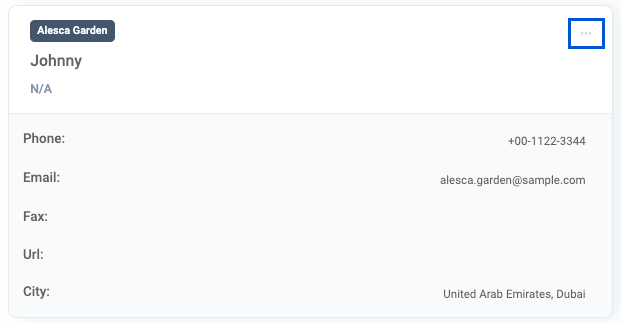
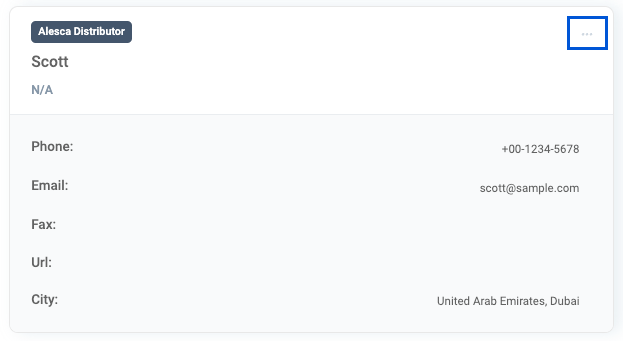
Edit Vendor/Distributor contact information
When to use:
Use this when you want to edit Vendor/Distributor contact information.
Users:
Manager
Screen Images:
-
Vendor contact information
-
Distributor contact information
Detail Specifications:
- Click Edit to the right of the Vendor or Distributor contact. The contact editing screen will be displayed.
- Change the values to the contents you want to edit, and click "Save" when finished.
For details on the input contents for each item, please refer to the contents of Vendor Contact or Distributor Contact in the Vendor additional function.
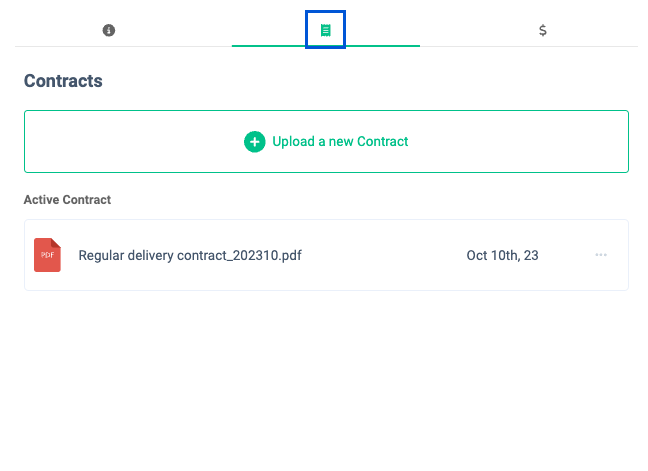
Contract management
View contract
When to use:
Use this when you want to check documents related to contracts with Vendors and Distributors.
Users:
Manager
Screen Images:�
Detail Specifications:
- You can check the contract-related documents for the selected Vendor in the list on the left side of the screen.
- Contract documents display valid contract documents and invalid contract documents.
Upload contract
When to use:
Use this when you want to upload a contract.
Users:
Manager
Screen Images:

Detail Specifications:
- Click "Upload a new Contract". The contract document upload screen will be displayed.
- Drag and drop the contract file into the dotted frame, or click inside the frame to select the file. The upload will begin.
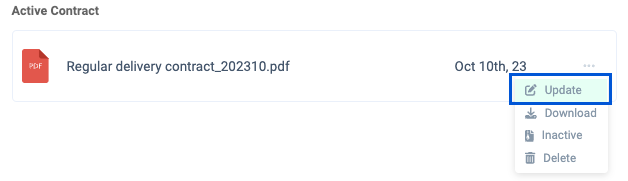
Update contract
When to use:
Use this when you want to update the contents of a contract, such as when renewing a contract with a vendor.
Users:
Manager
Screen Images:
Detail Specifications:
- Click the menu to the right of the contract you want to update and click "Update."
For file upload specifications, see [Uploading a contract] (#Uploading a contract).
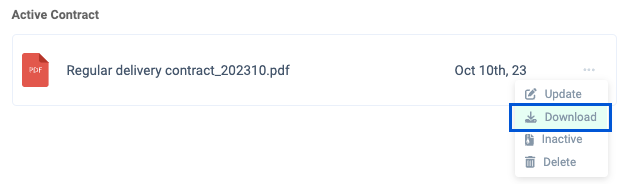
Download contract
When to use:
Used when downloading an uploaded contract.
Users:
Manager
Screen Images:
Detail Specifications:
- Click the menu to the right of the contract you want to download and click "Download." The file will begin downloading.
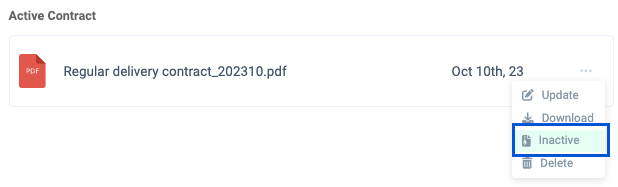
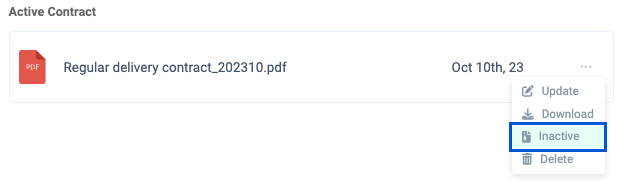
Deactivation of contract
When to use:
Use this when you want to change the status of a contract to invalid, such as when the contract period expires or the contract contents are stopped from being renewed.
Users:
Manager
Screen Images:
Detail Specifications:
- Click the menu to the right of the contract you want to invalidate and click "Inactive."
- Once you change the status of a contract to invalid, it will no longer be possible to renew the contract.
- Even if the contract status is invalidated, the contract information will remain.
Activation of contract
When to use:
Use this when you want to change the status of an invalid contract to a valid status, such as when restarting a contract.
Users:
Manager
Screen Images:
Detail Specifications:
- Click on the menu to the right of the row of the contract you want to activate and click "Activate".
Delete contract
When to use:
Use this when you want to delete a contract, such as canceling the contract contents.
Users:
Manager
Screen Images:

Detail Specifications:
- Click the menu to the right of the contract you want to delete and click "Delete". A confirmation screen will be displayed, so follow the confirmation screen to delete.
- Deleted agreements cannot be restored. If you want to keep the contract information, please use the Deactivation of contract function.
Payment request
View payment request
When to use:
Use this when you want to check the payment request status of Vendors and Distributors in a list.
Users:
Manager
Screen Images:
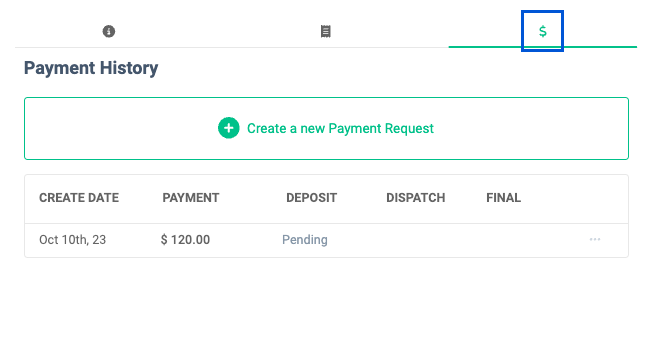
Detail Specifications:
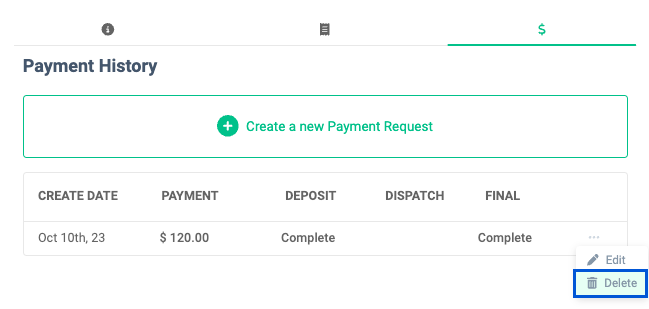
- You can check the payment request status for the Vendor selected in the list on the left side of the screen.
Create payment request
When to use:
Use this when you want to create a payment request for a vendor for the person in charge of payment.
Users:
Manager
Screen Images:
Detail Specifications:
- Click on “Create a new Payment Request”.
- Enter company name, account name, bank name, branch, account number, payment amount and currency, and deposit/remittance/confirmation ratio.
- Enter the percentage and the amount will be automatically calculated. Please enter the percentages so that the total sum is 100%.
- Entering the due date, person in charge, and status is optional.
- Click the "Save" button to complete creating your payment request.
- If you want to upload contracts at the same time, click the "Upload Contract" button and drag and drop the contract file into the dotted frame, or click inside the frame and select the file to open. The file will be uploaded.
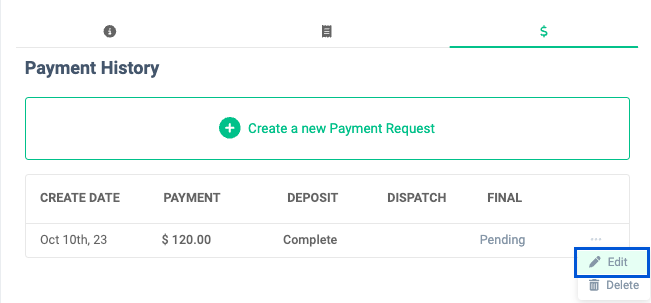
Edit payment request
When to use:
Use this when you want to update the payment status, such as when the person in charge of payment completes the payment process.
Users:
Manager
Screen Images:
Detail Specifications:
- Click the menu to the right of the bill you want to update and click "Update."
- Registered billing information will be entered by default in each input field, so edit it as you wish.
- If the payment status is changed to
Complete, a notification will be sent to the person in charge that the payment has been completed.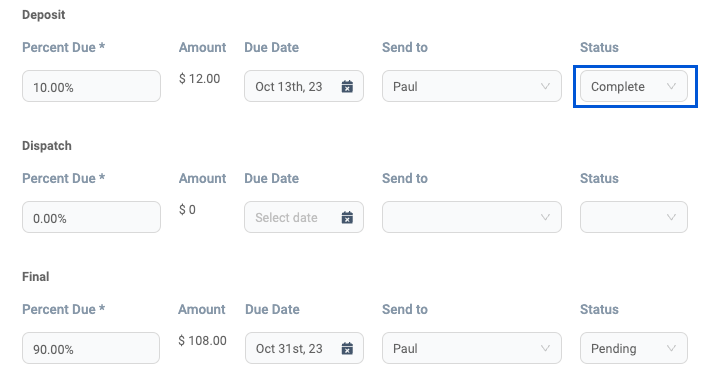

Delete payment request
When to use:
Use this when you want to delete a payment request.
Users:
Manager
Screen Images:
Detail Specifications:
- Click the menu to the right of the charge you want to delete and click "Delete".
Product
View Products
When to use:
Use this to check a list of tools such as liquid fertilizer and products such as seeds.
Users:
Manager
Screen Images:
Detail Specifications:
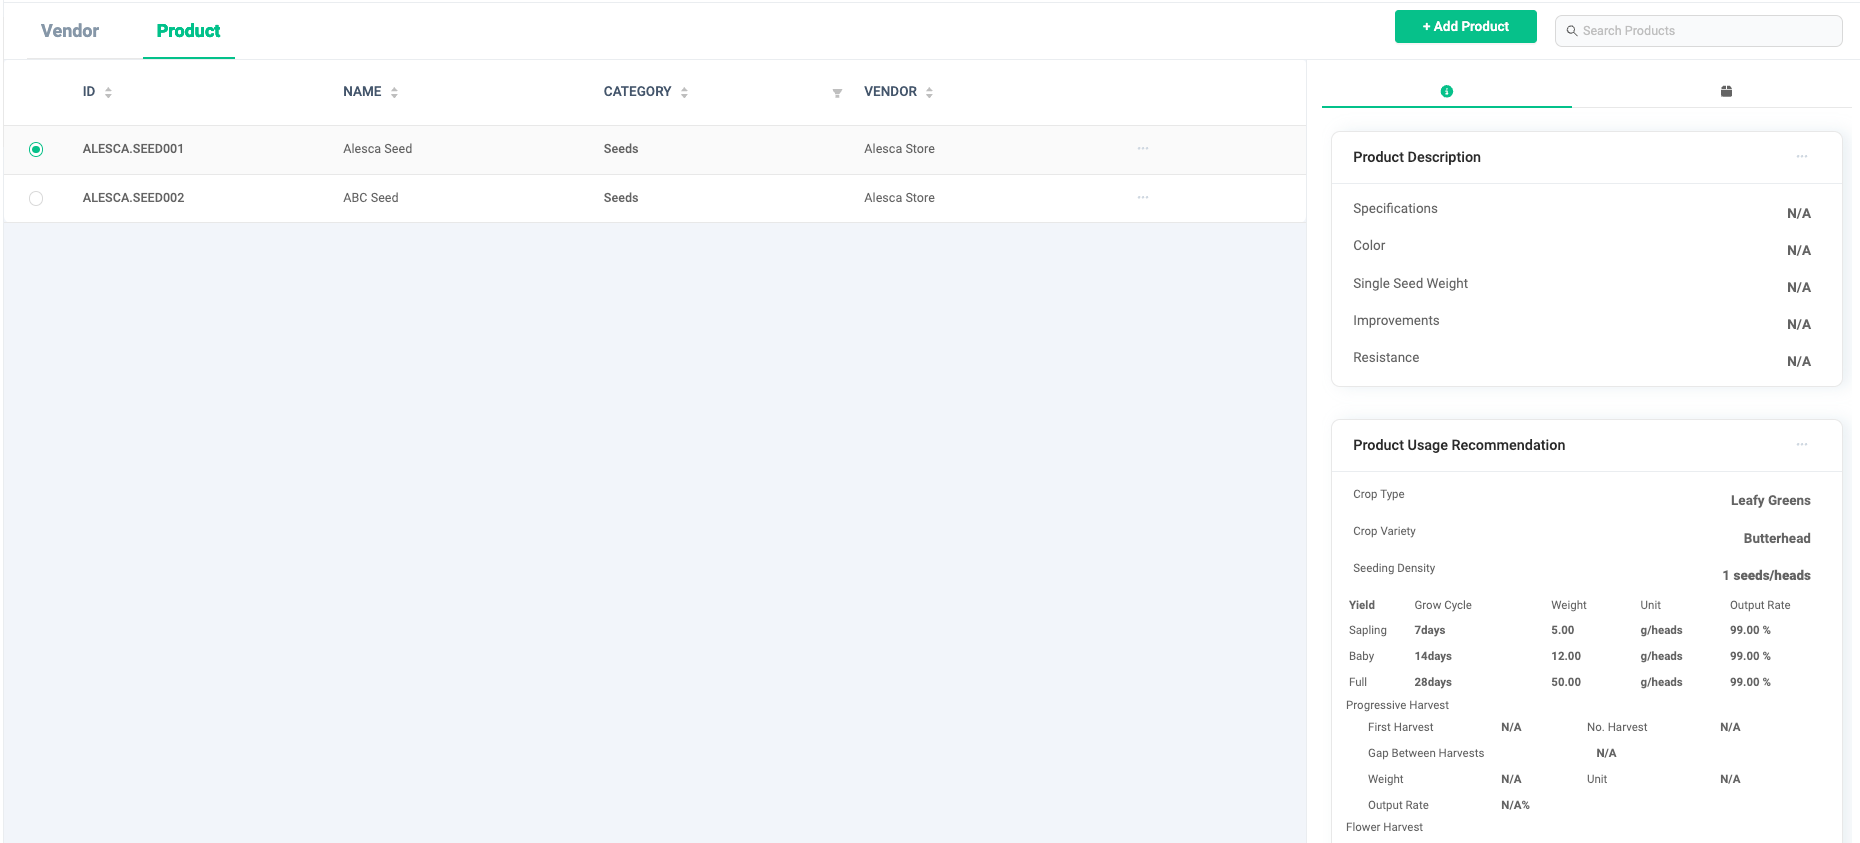
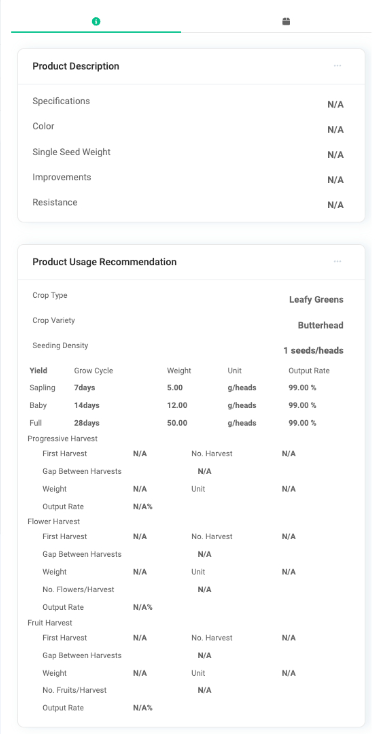
- You can check a list of tools such as liquid fertilizer and products such as seeds. A list of products is displayed on the left side of the screen, and product details are displayed on the right side of the screen.
- Product information such as ID, name, category, and vendor will be displayed.
- The right side of the screen displays details for the product selected in the table. The items that can be checked differ depending on the tab. I will explain the tabs in order from the left.

Product Description & Recommendations for Product Use: You can check the product description and recommendations for use.Product procurement information: You can check information regarding product procurement.
Add product
When to use:
Use this when you want to add product information.
Users:
Manager
Screen Images:

Detail Specifications:
- Click the "+ Add Product" button at the top right of the screen.
- You must enter values in each of the following four steps to register your product. Let's check them in order.

- Details
- Description
- Procurement Info
- Usage Recommendation
Details
- Enter your product's name, product category, vendor, product ID or custom ID.
- Product IDs and custom IDs must be assigned unique values, so the same ID cannot be assigned between products.
Products are broadly classified into "seeds" and "other products." Please note that the registration details that follow will differ depending on the product category you select in this step. From now on, we will explain the differences between "seeds" and "other products."
Description
Please note that the input contents are different for "seeds" and "other products."
- For "seed"
- In addition to the product description, you can enter information about the seeds, such as their weight and how durable they are. Input is optional.
- For "other products"
- Enter a product description. Input is optional.
Procurement Info
- Enter product procurement information. Enter the number of packages, unit, packaging price, and tax rate. Required time, expiration date, warranty period, and notes are optional items.
Usage Recommendation
Please note that the input contents are different for "seeds" and "other products."
- For "seed"
- Enter the crop type, variety, and number of seeds per plant. Yield is an optional item.
Entering the yield is optional, but is required when registering a customer order. Please enter as much information as possible. Please refer to the next page for the relationship with other functions and examples of input contents.
- For "other products"
- If there are any special notes, please write them down in your notes.
When all input is complete, click the "Save" button. Product information is stored in Orion.
- Product information can be temporarily saved during input.
- To save temporarily, click the "Temporarily Save" button.
- If you temporarily save, when adding the next product, you can choose to create product information from the continuation of the temporarily saved content, or to discard the temporarily saved content and create a new one.
View product description/product usage recommendations
When to use:
Use this when you want to check the product description and product usage recommendations entered during product registration.
Users:
Manager
Screen Images:
- For "seed"
- For "other products"
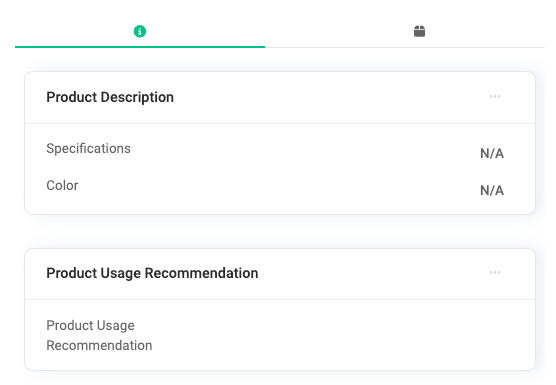
Detail Specifications:
- You can check the description/product usage recommendations for the selected product in the list on the left side of the screen.
- The displayed content differs depending on the product category: "Seeds" or "Others."
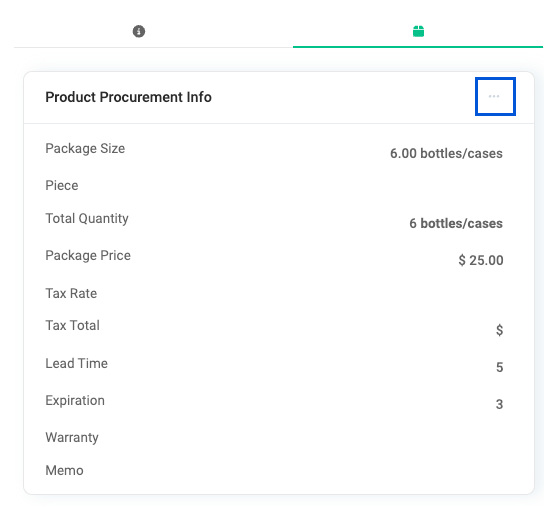
Display product sourcing information
When to use:
Use this when you want to check the product procurement information that you entered when registering the product.
Users:
Manager
Screen Images:
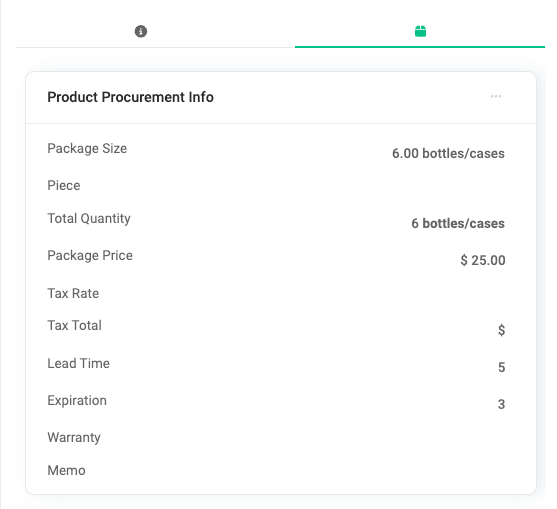
Detail Specifications:
- You can check the procurement information for the selected product in the list on the left side of the screen.
Edit products
When to use:
Use this when you want to edit product details.
Users:
Manager
Screen Images:
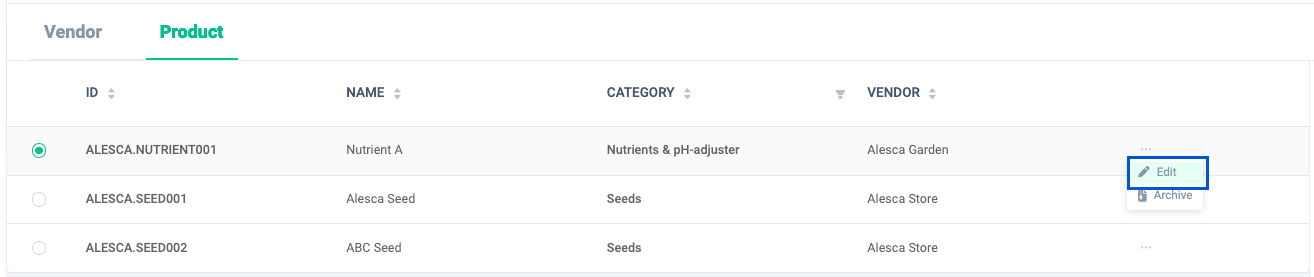
Detail Specifications:
- Click "Edit" from the menu on the right side of the product record you want to edit. The product details editing screen will be displayed.
- When you have finished entering the edited content, click the "Save Changes" button.
For information on entering product details, please refer to the contents of Add product.
Edit product description/product usage recommendations
When to use:
Use this when you want to edit product descriptions and product usage recommendations.
Users:
Manager
Screen Images:
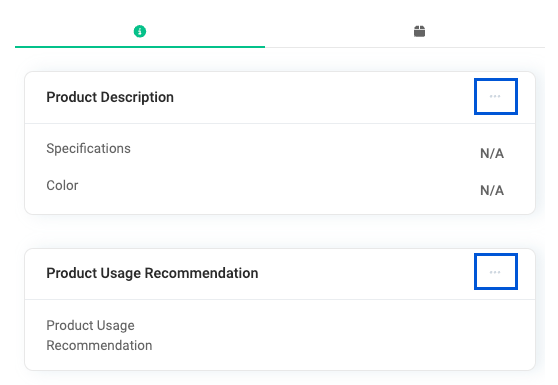
Detail Specifications:
- Click the menu to the right of the product description/product usage recommendations and click Edit.
- The already registered contents will be entered as default values for each item. Change the content to what you want to edit.
For information on entering product description/product usage recommendations, please refer to Add product.
Edit product sourcing information
When to use:
Use this when you want to edit product procurement information.
Users:
Manager
Screen Images:
Detail Specifications:
- Click the menu to the right of the product sourcing information and click Edit.
- The already registered contents will be entered as default values for each item. Change the content to what you want to edit.
For information on entering product procurement information, please refer to the contents of Add product.
Archive product
When to use:
Use this when you want to change the product to archive status for reasons such as stopping use of the product.
Users:
Manager
Screen Images:

Detail Specifications:
- Click "Archive" from the menu on the right side of the product record to be archived.
- Once you archive a product, you will no longer be able to edit the product description, etc.
Unarchive product
When to use:
Use this when you want to change the product to active status for reasons such as resuming use of the product.
Users:
Manager
Screen Images:
Detail Specifications:
- Click "Unarchive" from the menu on the right side of the product record to be unarchived.
- When you unarchive a product, it becomes active and you can resume using all its features.
Delete product
When to use:
Use this when you want to delete a product.
Users:
Manager
Screen Images:
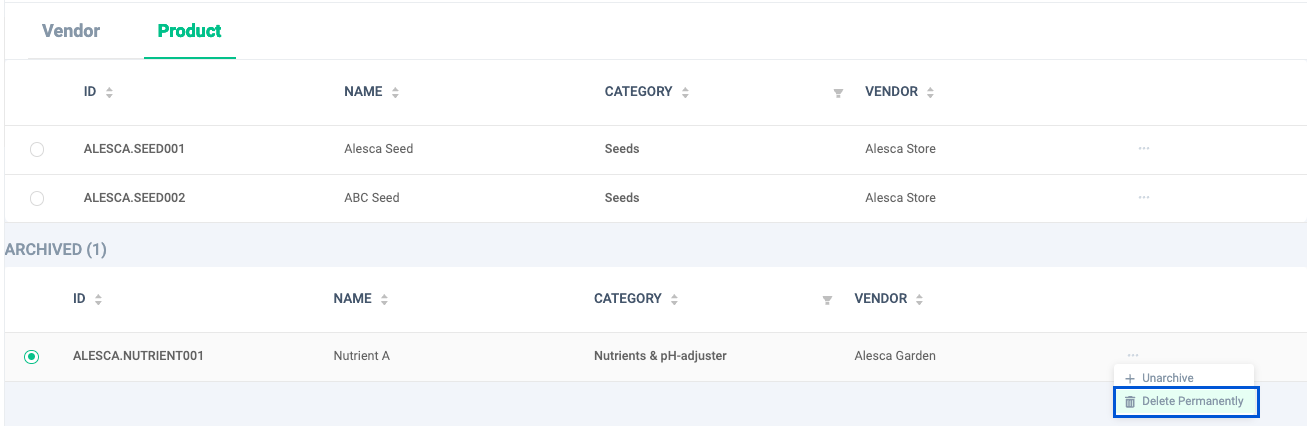
Detail Specifications:
- Click "Delete Permanently" from the menu on the far right of the product record you want to delete.
- A warning about product removal will be displayed. Check the contents and click "OK". Product removal is complete.
- Deleted products cannot be restored. If you want to preserve product information, please use the Archive function.