Plan to grow vegetables
If this is your first time opening this page, please make sure you have completed all the steps below. This page assumes that all of these tasks have been completed.
Up to this point, you have completed Registering operators working at the farm, Farm profile settings, and Registering seeds. Let's finally start creating a grow plan, which is one of Orion's main functions!
What is a grow plan?
Before we start creating it, let's briefly explain what a grow plan is and what happens after you create a plan.
A grow plan is a plan that treats each step from planting vegetables to harvesting (or shipping) as a task, and arranges the series of tasks leading up to harvest by date. During the planning process, you can decide where to plant seeds (Farm Profile) and who to assign tasks to (User Management).
After creating a grow plan, operators working at each farm will actually carry out tasks based on the grow plan.
 This is a sample of the grow plan after it has been created. Through the explanations on this page, you too will be able to create a grow plan like this!
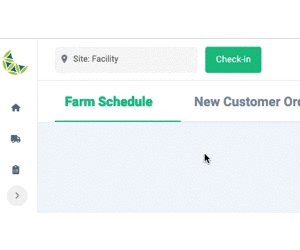
Now, click on the “Farm Management” section from the left menu, then click on “Farm Schedule.”
Grow plans are divided into two types depending on whether they are based on orders from customers or not.
- Grow plan
- Grow plan based on customer orders
Although there is a distinction, there is no major difference in how to create a grow plan. More details on the differences will be provided later.
Creating a grow plan
There are many terms you may have heard for the first time related to creating a grow plan. We've also included explanations in our glossary, so we highly recommend checking it out before or while reading!
A grow plan should include the following steps in sequence. Let's first check the steps and overview to understand the overall picture of the work!
| Step | Detail |
|---|---|
| Seed selection | Select the seeds to be used in the grow plan. |
| Grow plan template selection | Select to use a template to create a grow plan. |
| Building a timeline | Build a timeline by determining the implementation date of the task, the quantity of crops to be grown, etc. |
| Apply locations | Check the available space in the location and allocate the location to each task. |
| Assign operators | Assign an operator in charge of each task. |
| Publish timeline | Publish the completed grow plan. |
This page also explains each step.
To create a grow plan, you must first select an area. Select the farm where you want to create a grow plan from the area selection at the top left of the screen.
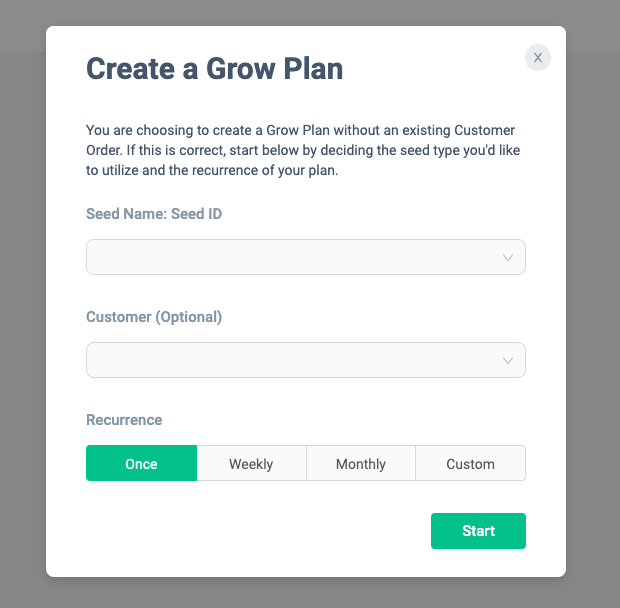
Once you select an area, an "Add" button will appear at the top right of the screen, so click it. Click "+ Grow Plan" from the menu that appears. We will now begin the "Seed selection" step.

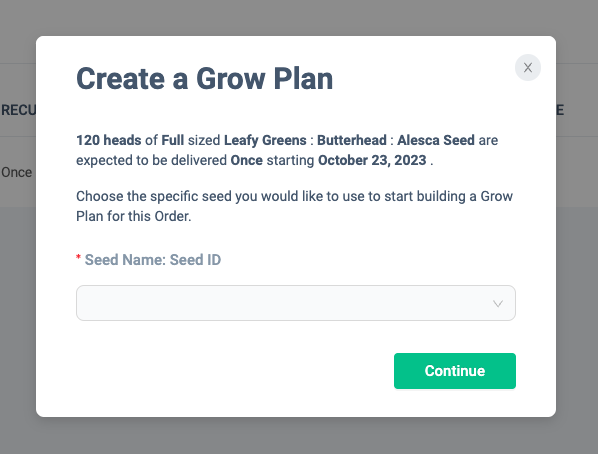
Seed selection
Choose the seeds you want to use in your grow plan. You can select seeds registered in Orion from the list. Seed Name: Seed ID is a required field.
By setting Recurrence, it is also possible to create a regular grow plan including future ones. By default, Once is selected. This is a one-time grow plan.
For information on how to set up a regular grow plan, please check here.
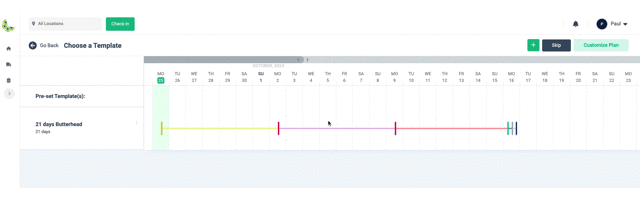
Grow plan template selection
For grow plans, frequently used timeline configurations can be saved as templates. In this step, select the timeline template to use. Of course, it is also possible to assemble a timeline from scratch without using a template. If you have a timeline structure that you use often, save it as a template.
This time, we would like to introduce the subsequent steps without using a template, so let's click "Skip".
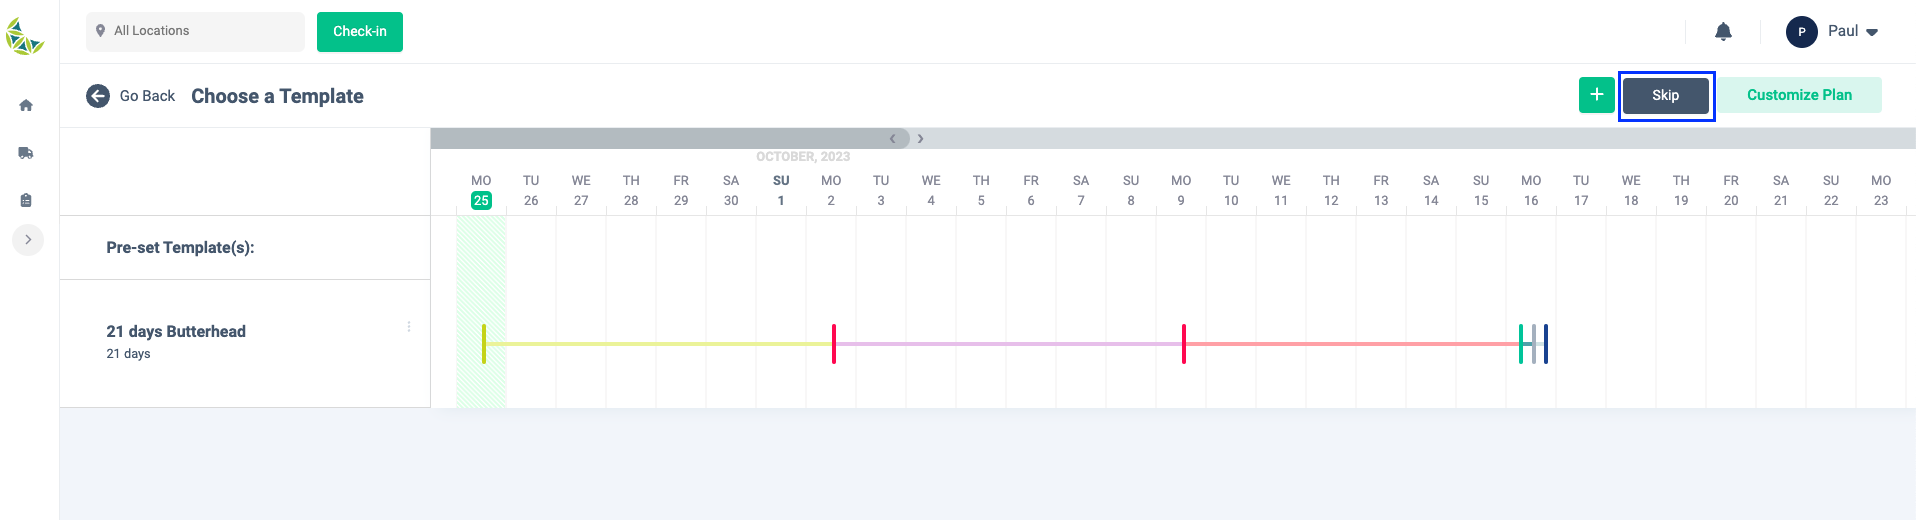
What if I use a template...?
If you want to use a template, select the template you want to use this time and click the "Customize Plan" button.
For information on how to create a template, please check here .
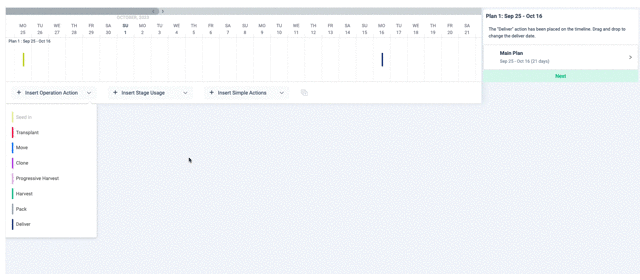
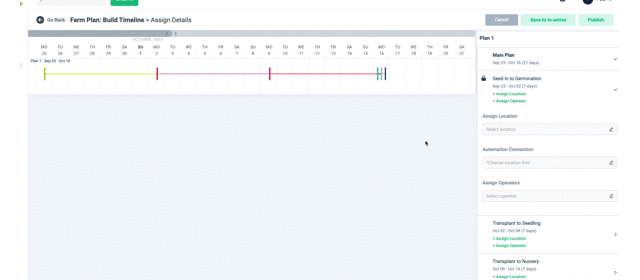
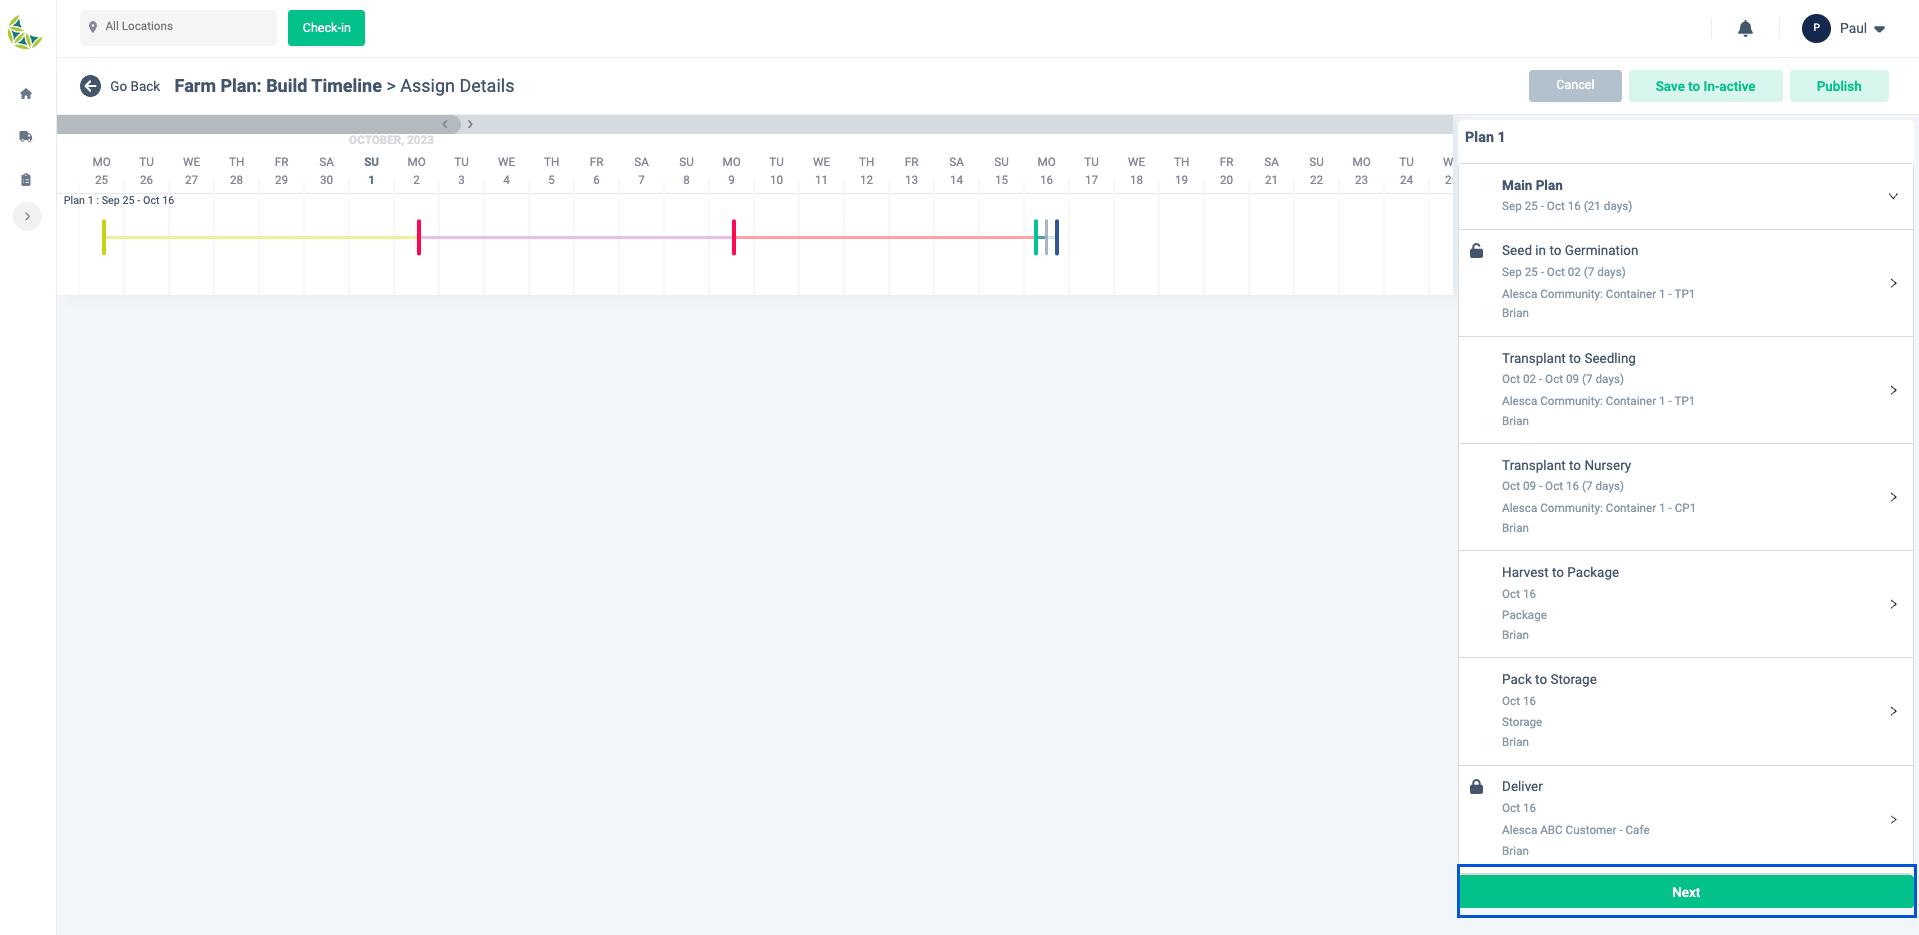
Building a timeline
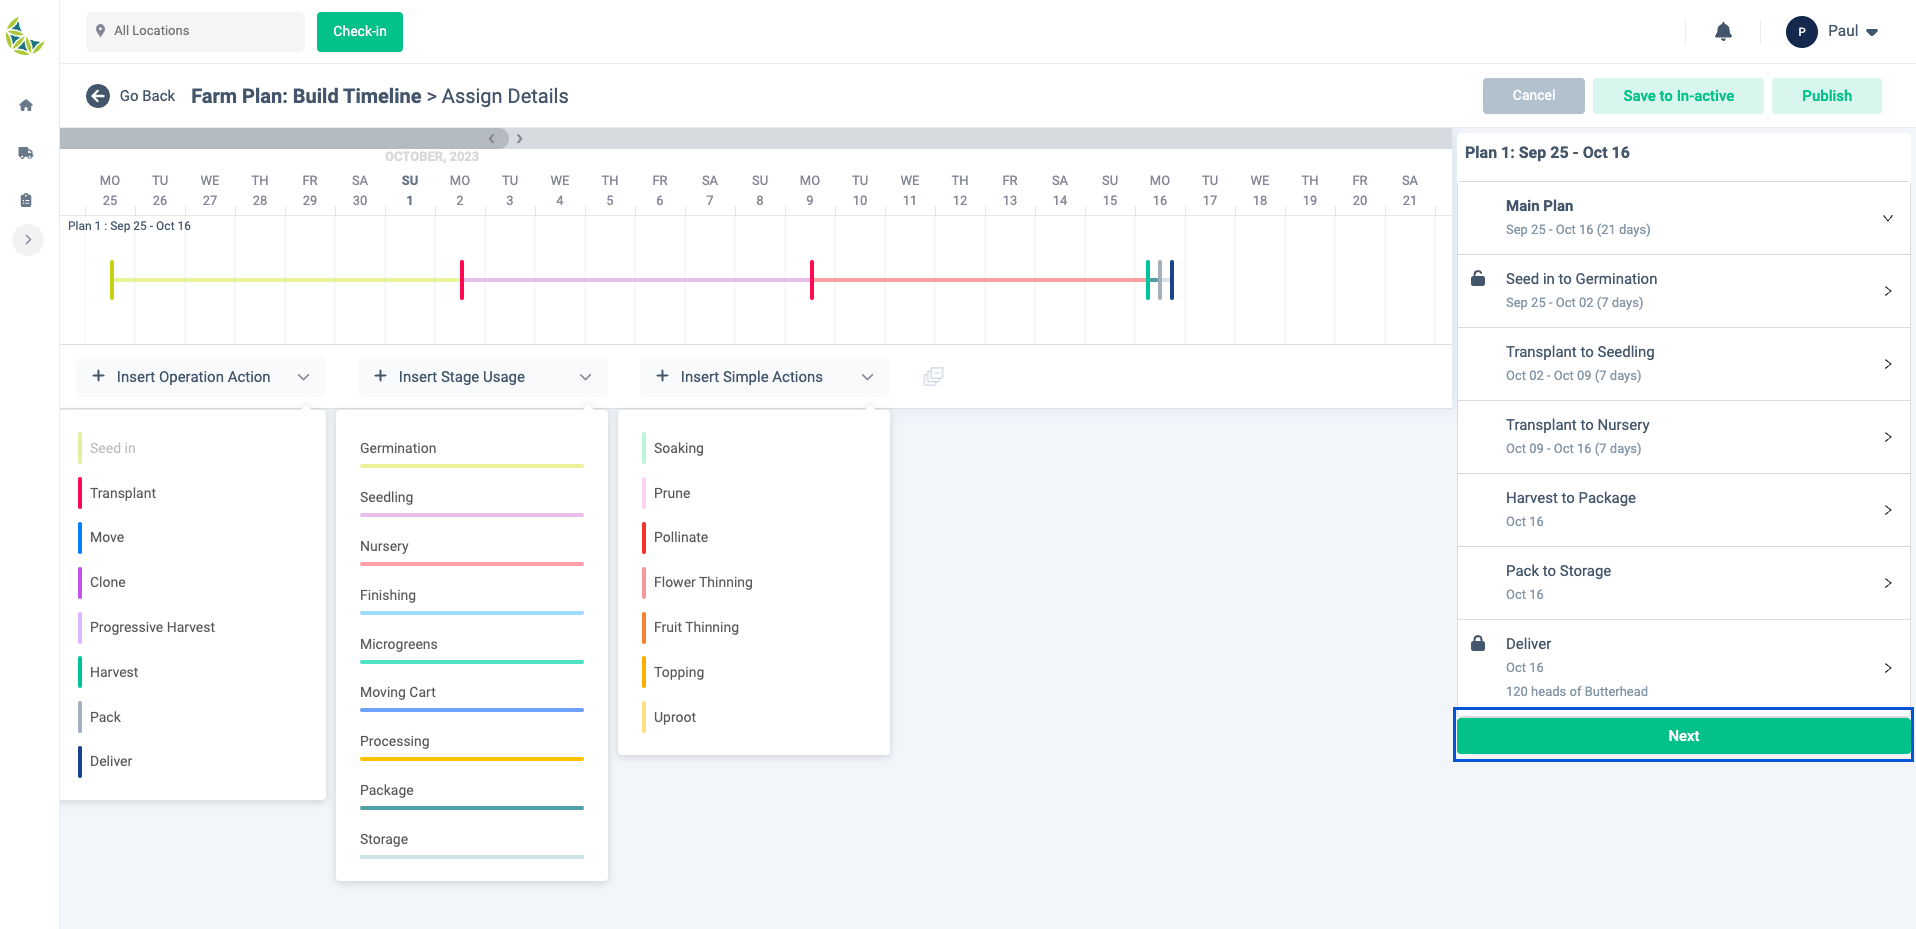
The full-scale creation of the grow plan begins from this step! The screen used in this step can be divided into two for each major task. Please check the following screen image. We will explain how to use each, with the left side of the screen as ① and the right side of the screen as ②.
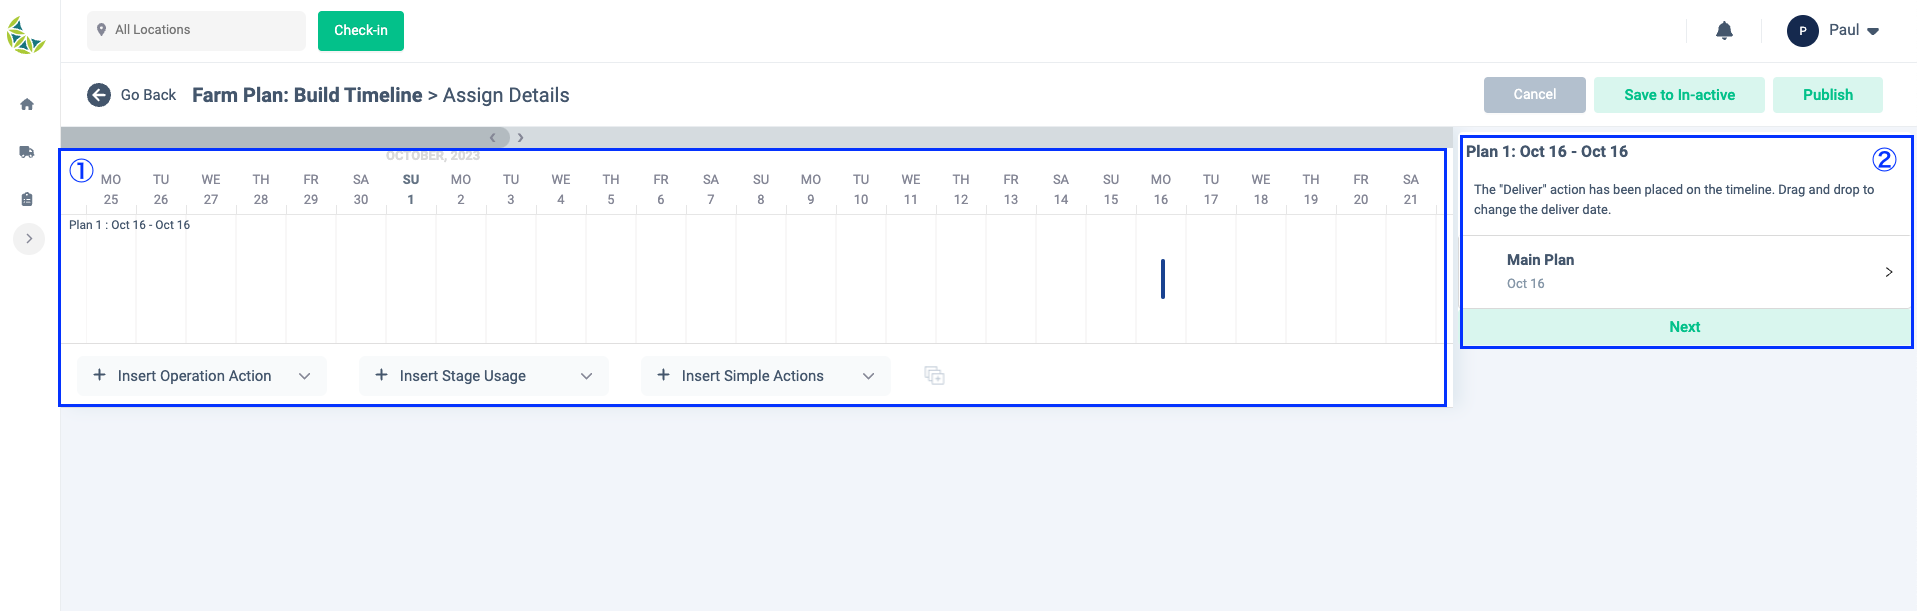
① Timeline
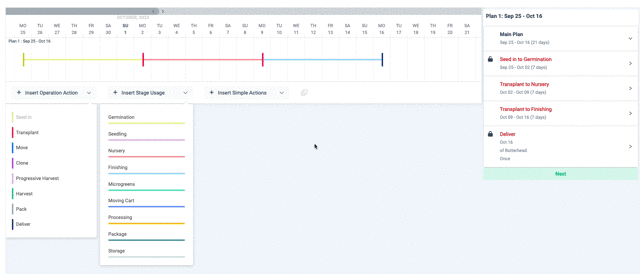
In ① on the left side of the screen, you can place tasks on the timeline. This area allows you to arrange tasks by date. The tasks are called "Insert Operation Action" and "Insert Simple Action". There is an arrow down icon on the right end of each item, so click on it. Then, a list of the tasks that are actually scheduled for the farm will be displayed. Drag and drop tasks from this list to the date on the timeline.
Tasks and stages can be added to the timeline by drag and drop like this.
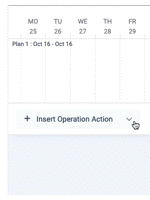
Once placed, the date of a task can be changed by dragging it left or right.
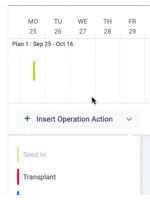
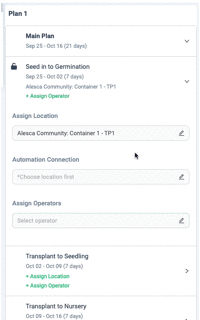
When placing an "Insert Operation Action" task on the timeline, it must be combined with a stage that can be added from "Insert Stage Usage". This combination of tasks and stages completes the task as a single work, and the task is displayed on the ② task details input screen on the right side of the screen.
The "Insert Simple Action" task does not need to be combined with a stage. It stands alone as a task.
- If you place a task by mistake, you can delete it from ② Task details input on the right side of the screen. Please note that tasks cannot be deleted by performing operations on the timeline.
- Regarding the placement of tasks and stages on the timeline, rules have been established for the order and combinations so that you can create a grow plan correctly. If you place tasks or stages in a combination that is outside the rules, a message will be displayed when placing them. Correct the timeline according to the message!
Once you have finished arranging tasks and stages based on the timeline you want to build following the explanations so far, proceed to enter the task details on the right side of the screen!
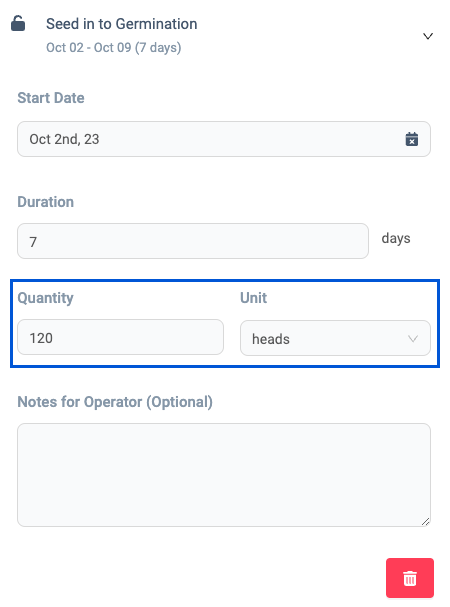
② Enter task details
On the task details input screen, you can change the start date and period of tasks placed on the timeline, set the number of seeds to be planted, the number of vegetable plants to be worked on, etc. You can also leave notes for people working on tasks. All items other than "Notes for Operator (Optional)" are required, so be sure to fill them in.
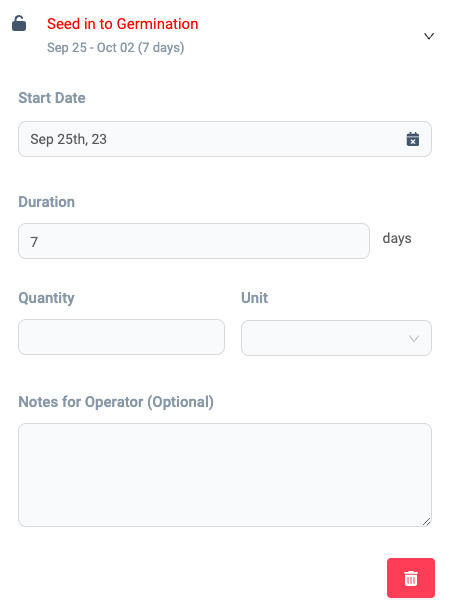
Quantities must be set for all tasks placed on the timeline. If the content to be registered has not yet been entered, the task name will be displayed in red.

Once the input is complete, the task name will change to black. Let's finish entering the tasks that are in red.
Tasks that have been placed on the timeline by mistake can be deleted from this screen. A "trash can" button is placed at the bottom of the task details input screen.
Click on the Trash can of the task you want to delete. It will be deleted from both the timeline and task details input screen.

Once you have completed entering the task details for all tasks, you will be able to click the "Next" button at the bottom of the right screen. Make sure there are no errors in the entered information and click "Next"!
Apply locations
Next, let's allocate an area to each task. The areas you allocate in this step refer to subzones. Assign each task to the subzones registered during farm profile setup. When allocating an area, the subzones displayed as candidates for allocation will be areas that meet all of the following conditions: If the subzone you expected to be assigned does not appear, it may be because some conditions are not met.
- Subzone with "CROP TYPE" that matches the Crop Type of the seeds selected in "Seed Selection"
- When constructing the timeline, a subzone with "STAGE USAGE" that matches the stage combined with the task
- Subzones with free space at the time of area selection. The subzone's
MAX QTYis used to calculate the free space.
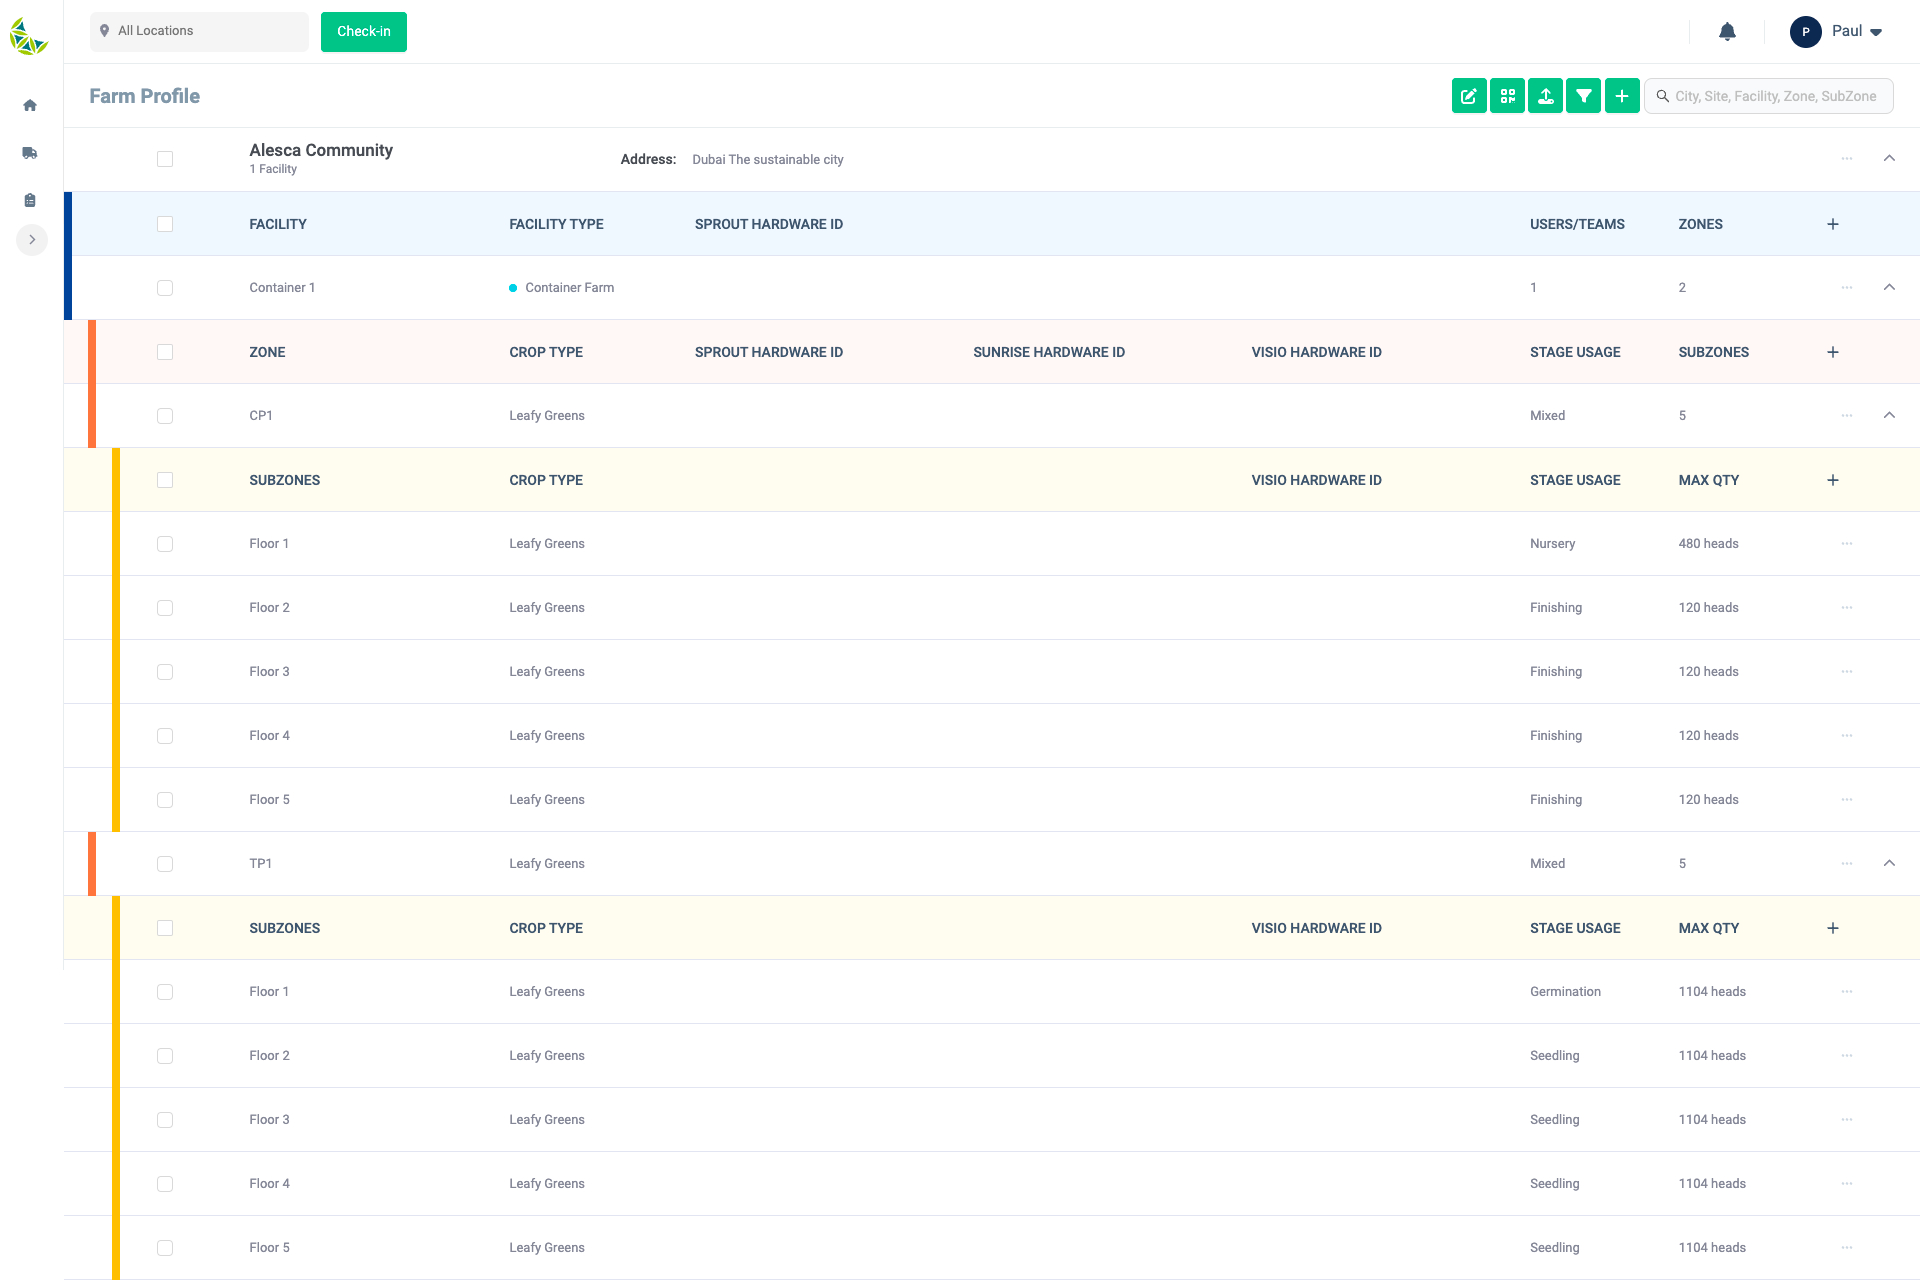
Make sure that the subzone registration details are correct. The example on this page uses a farm profile configured as follows.
The settings for “CROP TYPE”, “STAGE USAGE”, and “MAX QTY” are important.
Now, let's actually allocate areas!
Area allocation is done from the task details input screen on the right side of the screen. First, let's check the display contents of each task. There are three types of display as follows. Please note that the operations differ depending on the displayed content.
- "+ Assign Location": Assign a subzone as an area to the task with this display
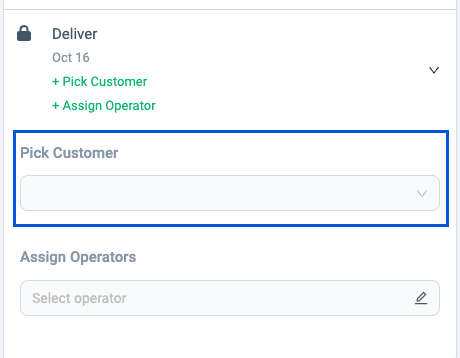
- "+Pick Customer": If the task is Deliver, assign the delivery destination customer as the area
- "Package", "Storage", "Processing": Tasks with this display do not require area selection
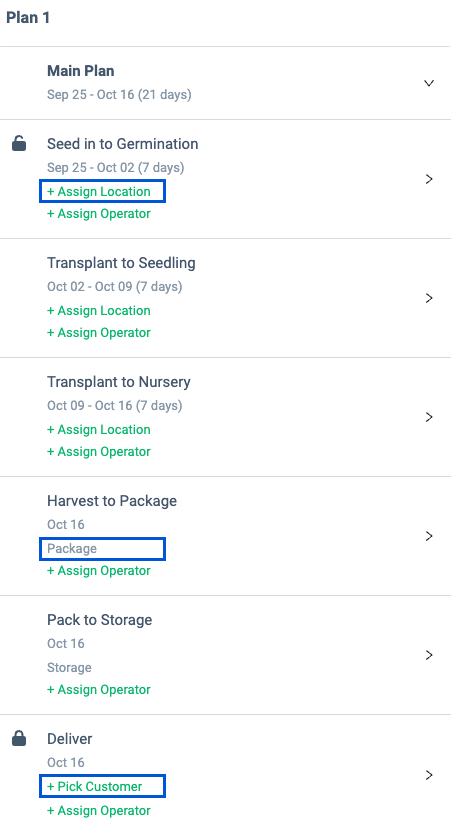
Let's check how to operate "+ Assign Location" and "+ Pick Customer" in order.
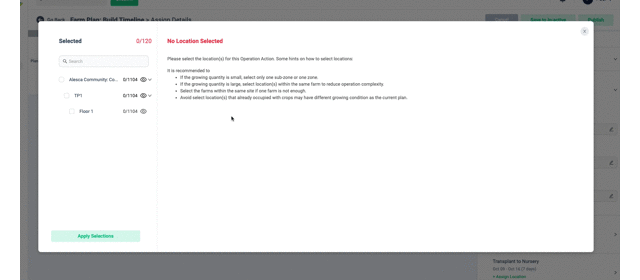
+ Assign Location
Click "Assign Location" on the task details input screen. A list of farms related to the area you selected on the top left of the screen will then be displayed.
Areas can be assigned using the checkbox located to the left of the area name. Click the checkbox for the area you want to allocate. Once all quantities have been allocated, the "Apply Selections" button at the bottom of the list becomes clickable. Click to reflect the assignment.
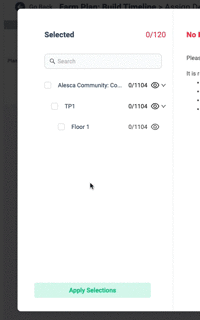
If you would like to see details of the grow plans that are currently assigned to each area, you can do so by clicking the eye icon to the right of the area name. The usage status is displayed in graph format in the space to the right of the list.
+ Pick Customer
For Deliver tasks, you select the customer to whom you want to deliver. Click "Pick Customer" to display a list of customers registered in Orion, so select the customer you want to deliver to.
Similarly, allocate areas for other tasks as well. This completes the area assignment step.
Assign operators
Once you have assigned the area, let's assign the person in charge of the task! Please note that the person in charge cannot be selected if the area assignment is not completed. The list of assignees displays users who match the following conditions:
- Users granted access to areas assigned to tasks
- Users whose task execution date is a working day
Click on the name of the person you want to assign to the task. The task of assigning the person in charge is now complete. Set assignees for other tasks as well.
Once the areas and assignees have been assigned to all tasks, the "Next" button located at the bottom of the right side of the screen will be clickable. Double check the assignment details and click!
Publish timeline
If there are no problems with the contents registered up to this step, you will be able to click the "Publish" and "Save to in-active" buttons at the top right of the screen.
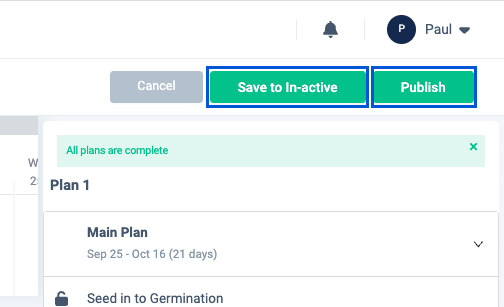
Now let's publish the timeline. Click "Publish". A screen will then appear asking if you want to save the timeline you just created as a template. If you want to use the same timeline configuration from next time onwards, enter a name and click the "Save" button. If you do not need to save it as a template, click Continue without Saving.
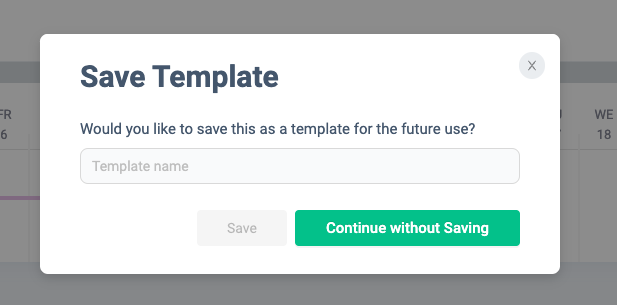
If you save it as a template in this step, it will be displayed as a template option in the next step of Select grow plan template.
Clicking either button will complete publishing the timeline. The creation of the grow plan is now complete! Tasks are assigned to each person based on the grow plan created.
Grow plan based on customer order
The following explanation assumes that customer information has been registered. Please refer to this page to complete the registration of customer information.
As explained at the beginning of this page, grow plans are divided into those that are based on customer orders and those that are not. The examples so far have dealt with creating a grow plan that is not tied to customer orders. In the case of a grow plan based on a customer order, the customer order has been created in advance, and you can start creating the grow plan from that order information. This point is a specific point of difference. Let's check with an example.
Create customer order information
First, let's create order information from customers. Click "Farm Management" on the left menu, then click "Sales". You can check customer information from the "Customer Information" tab.

Select the record of the customer who placed the order from the list, and click the "Order" tab on the right screen. This tab displays a list of orders placed by your customers. Customer orders can also be created from this tab. Click the "Create a New Order" button.

The customer order information creation screen will be displayed. From here, you can create a customer order by entering order information such as first delivery date, recurring delivery, crop type, size, total quantity, and selling price. Basically, all input items are required.
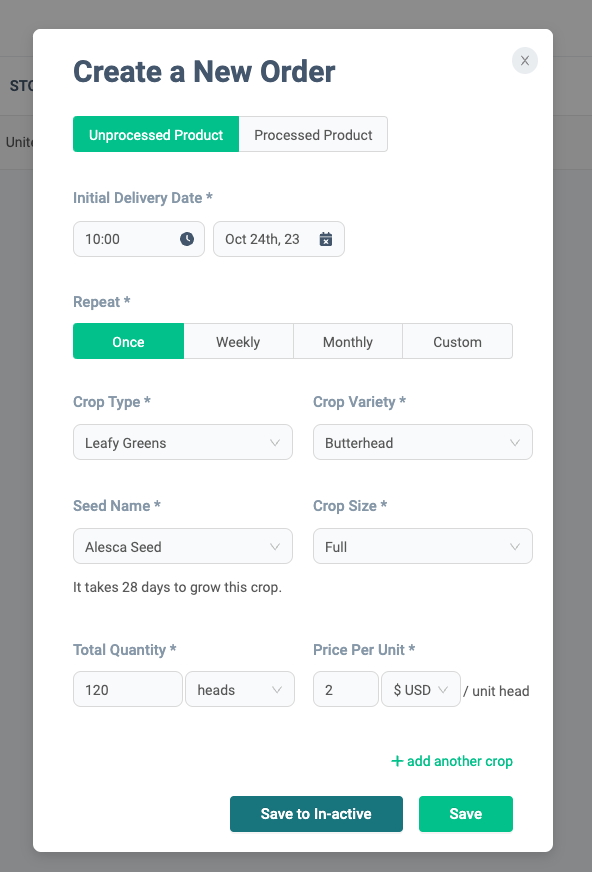
You can select the type of vegetable and delivery size, but this information refers to the "Usage Recommendation" of the seeds registered in "Register seeds". For more information, please check here.
If you set up regular delivery, you can enter the final delivery date. This is an optional item, but if it is not filled in, a one-year period will be created. If it will be a regular delivery for one year or more, please enter the value according to the contract period.
Once you have completed entering your order information, click the "Save" button. Registration of order information is now complete.
Create grow plan from customer order information
Customer order information created in this way can be checked in a list from the "New Customer Orders" screen. Once you have completed creating customer order information, move to the "New Customer Orders" screen. Click "Farm Management" on the left menu, then click "Farm Schedule." The tab we will use this time is the "New Customer Orders" tab.
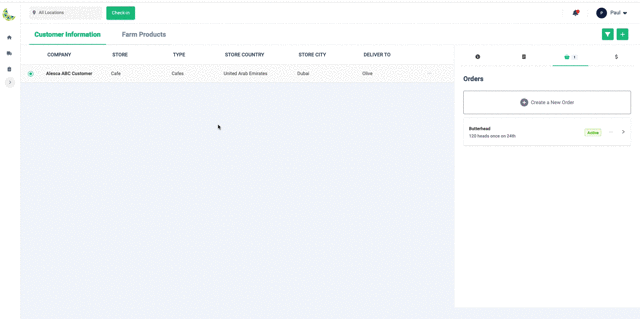
This screen displays all customer orders created within your account. Now, let's create a grow plan from the customer order we created. Select "Build a Grow Plan" from the menu of the order record for which you want to create a grow plan.

From here on, you will create a grow plan using the same steps as Creating a grow plan, but when creating customer order information, you will need to set regular delivery and set the delivery destination. Because you have selected a customer, these information-related fields behave a little differently.
Seed selection
When creating a customer order, you have already set the recurring delivery and selected the customer for delivery, so these input items are omitted.
Task details input screen
When you create a customer order, you set the quantity so it defaults to the quantity for each task.
The remaining steps are the same as creating a grow plan that is not based on a customer order.