Task List
Displaying tasks (daily)
When to use:
Use this to check the tasks scheduled for the selected day.
Users:
Operator/Manager
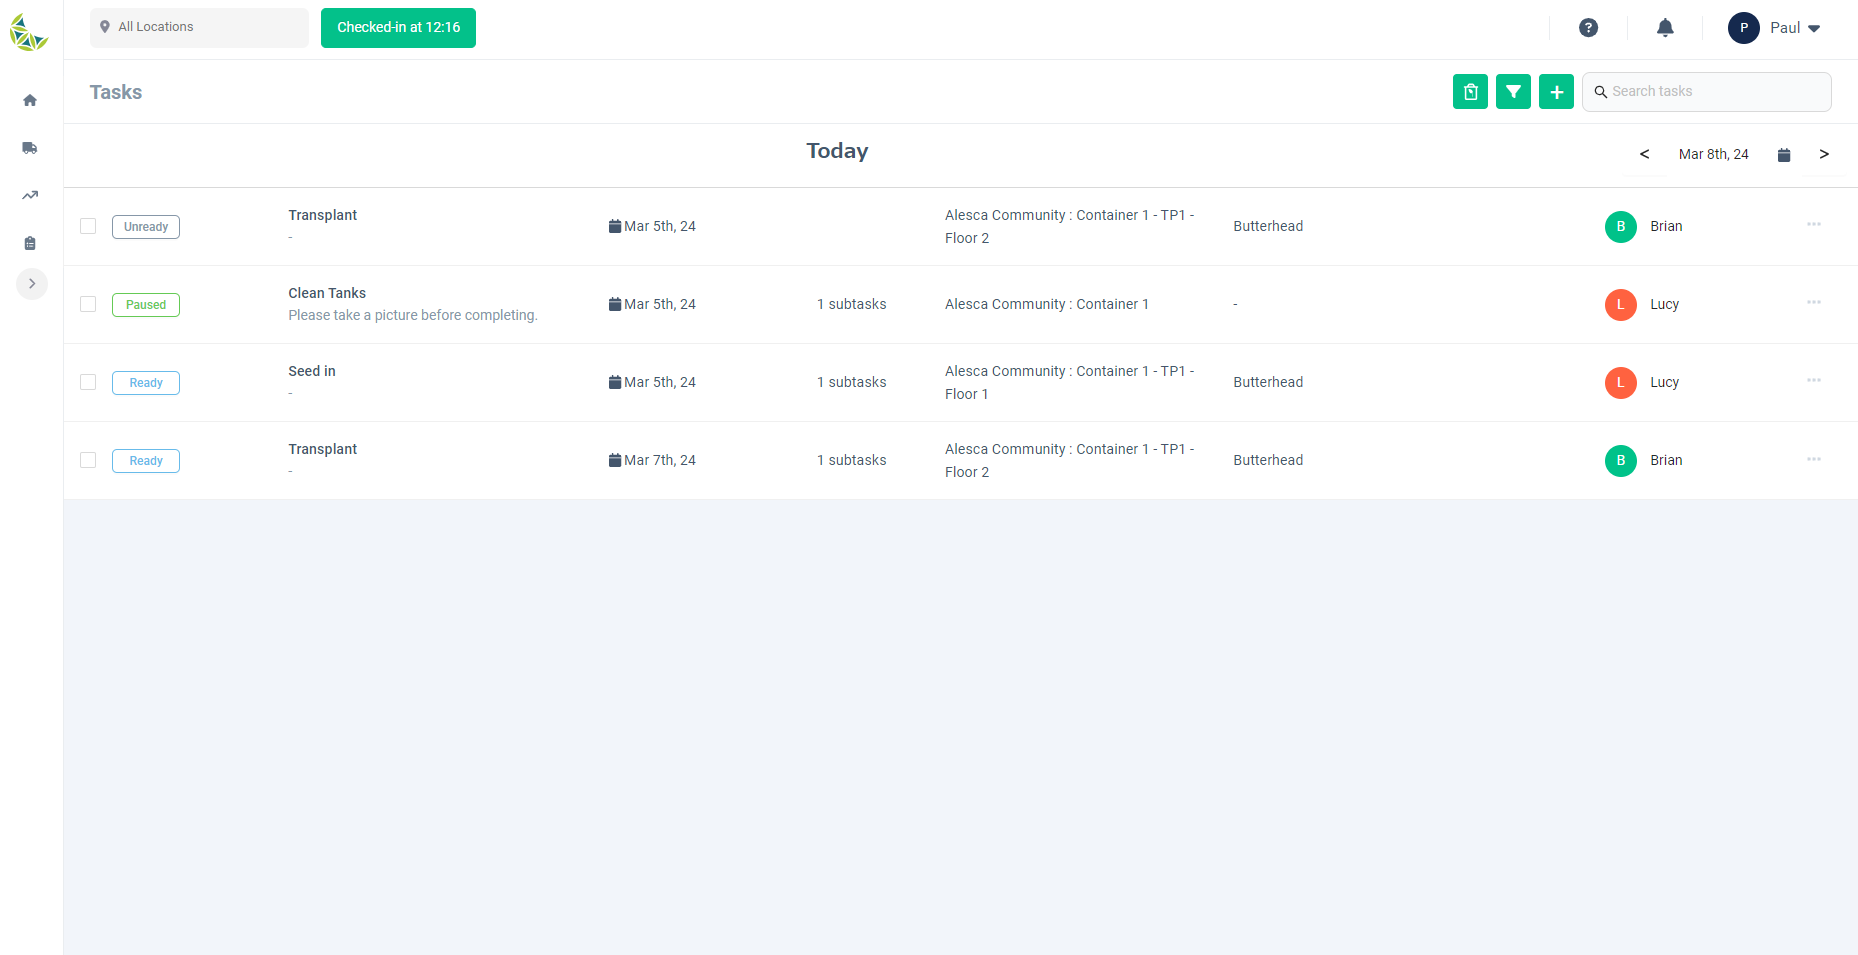
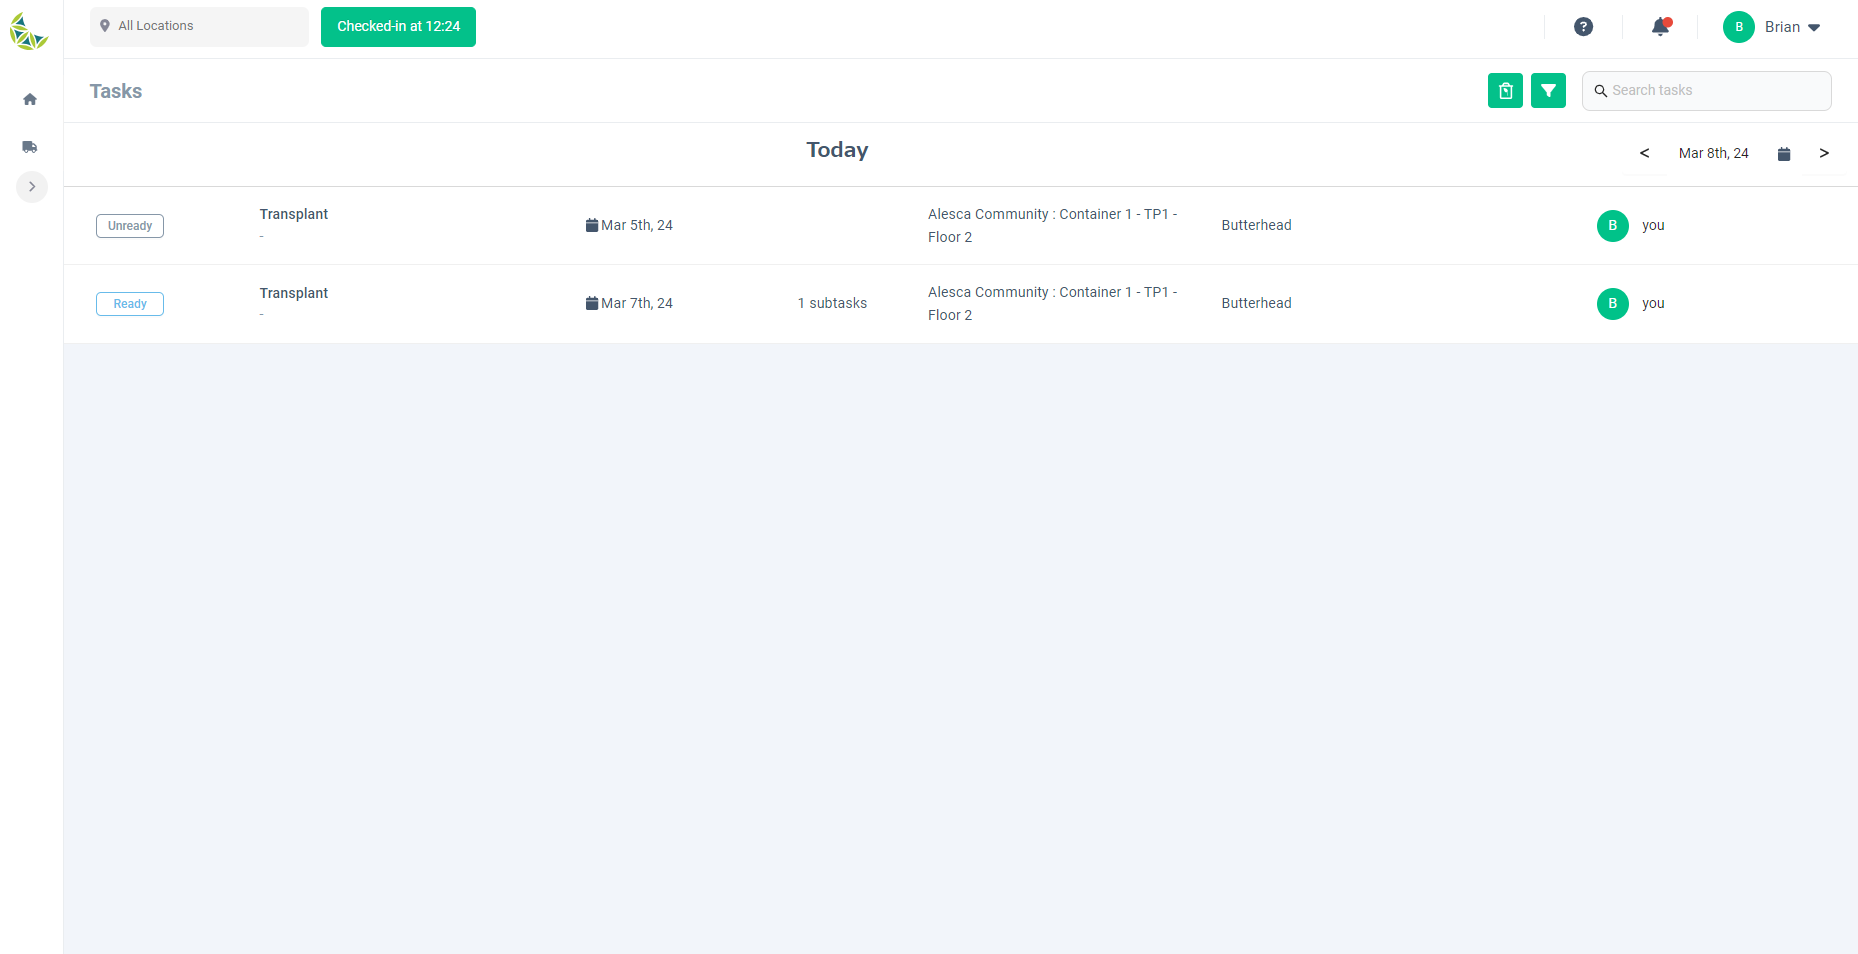
Screen Images:
- For Manager permissions
- For operator permissions
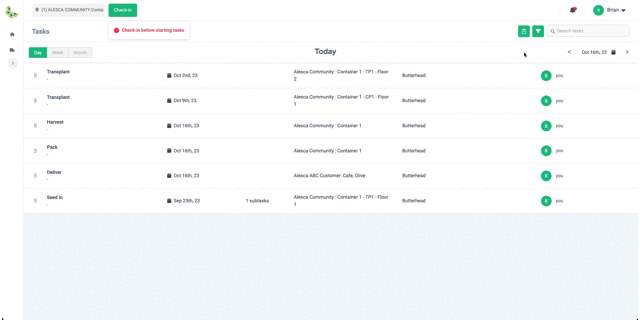
- How to operate the date and calendar
Detail Specifications:
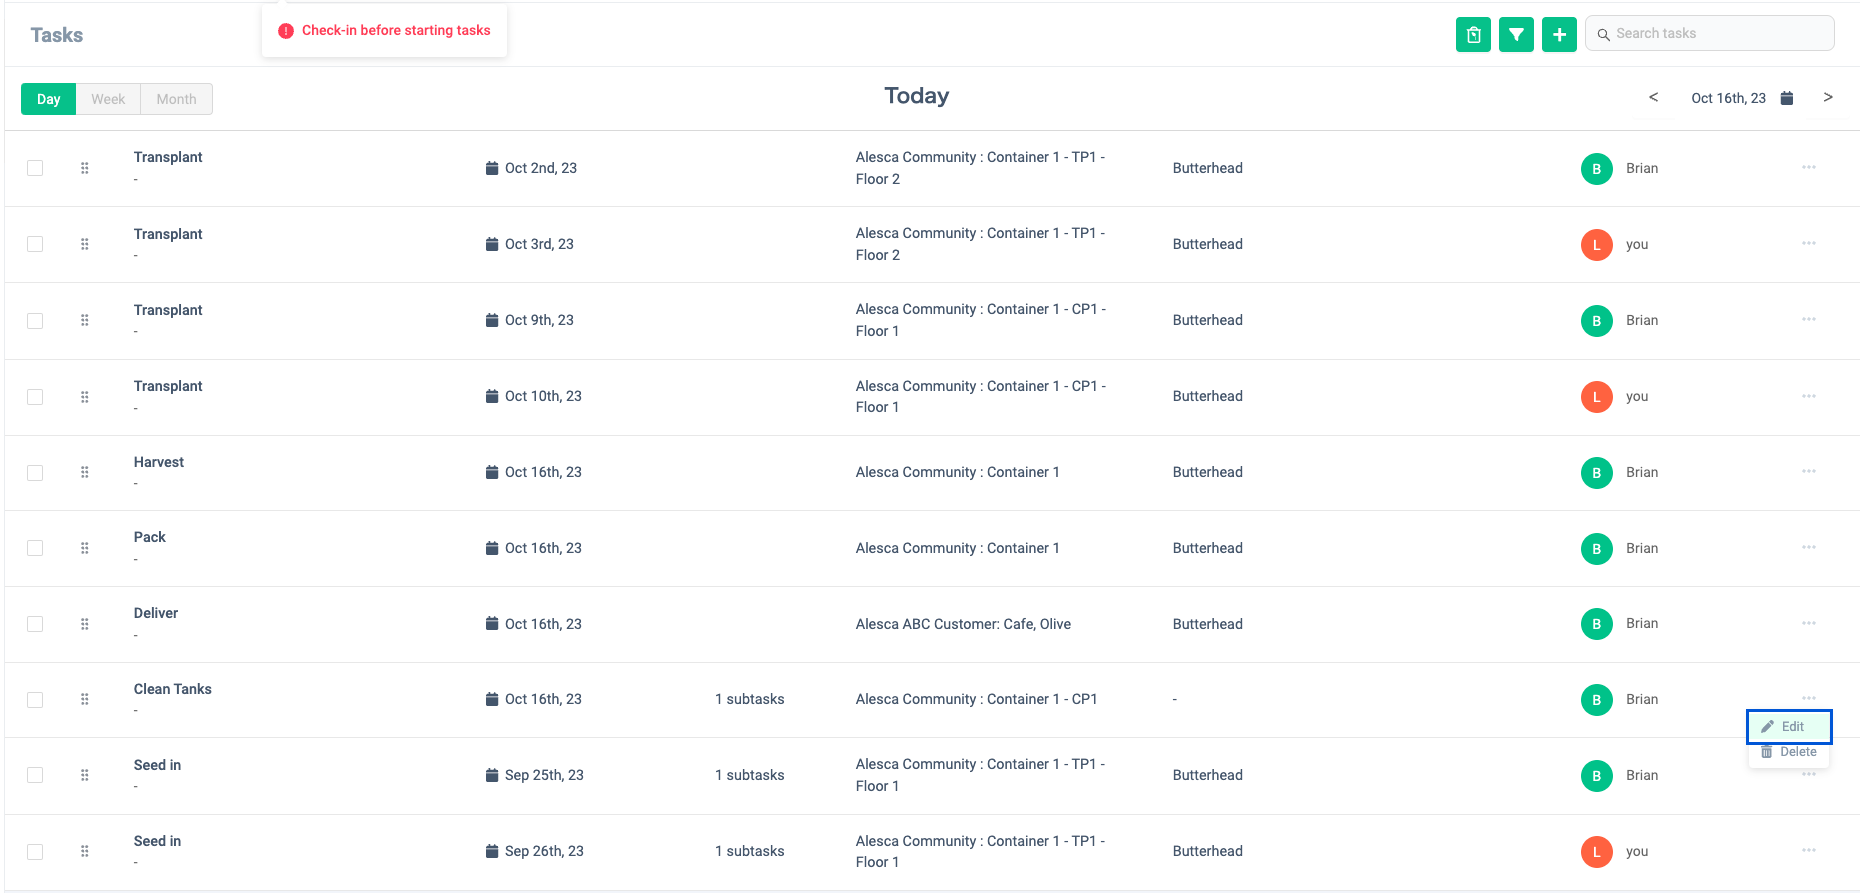
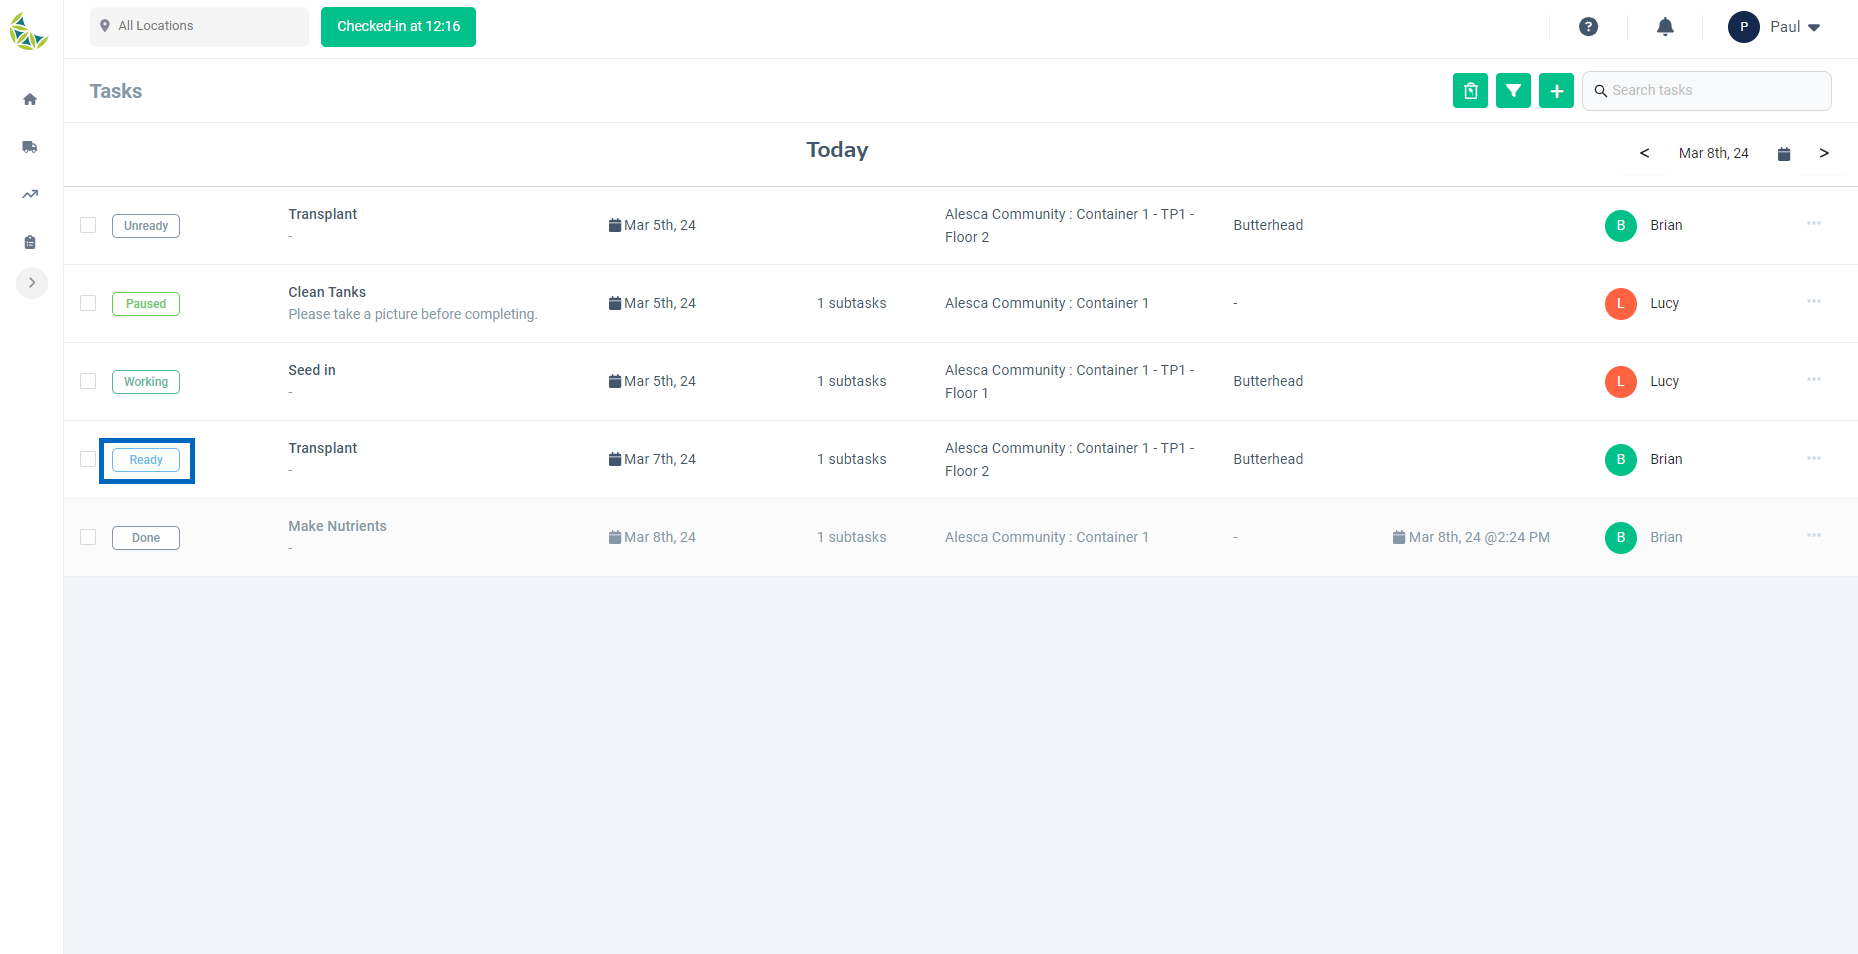
- Users can see a list of tasks scheduled for the selected day.
- Click the calendar icon on the top right to open the calendar screen. You can select the date on the calendar.
- You can move the date back or forward by one day by clicking " < " or " > ".
- Tasks are displayed by farm, so select the farm for which you want to display the task list.
- We have the following statuses for tasks.
- Unready: The task cannot be started. In the case of a task based on a cultivation plan, the previous task has not been completed.
- Ready: The task can be started. In the case of a task based on a cultivation plan, the previous task has already been completed.
- Working: The task has already been started.
- Paused: The task has been started once and is paused.
- Done: The task has been completed.
- There are two modes for displaying the task list. Operation view and Manager view. Roles that are granted the operation view permission (Operator by default) can only view the list of tasks assigned to them. On the other hand, roles that are granted the Manager view (manager or higher roles by default) can display a list of all tasks in the farm selected by the user.
- Please refer to #User Management for details on how to set up roles for each user.
- Please note that as mentioned above, the contents displayed in the list will differ depending on whether you have Manager or Operator permission.
Add maintenance task
When to use:
Used when adding a new maintenance task.
Users:
Manager
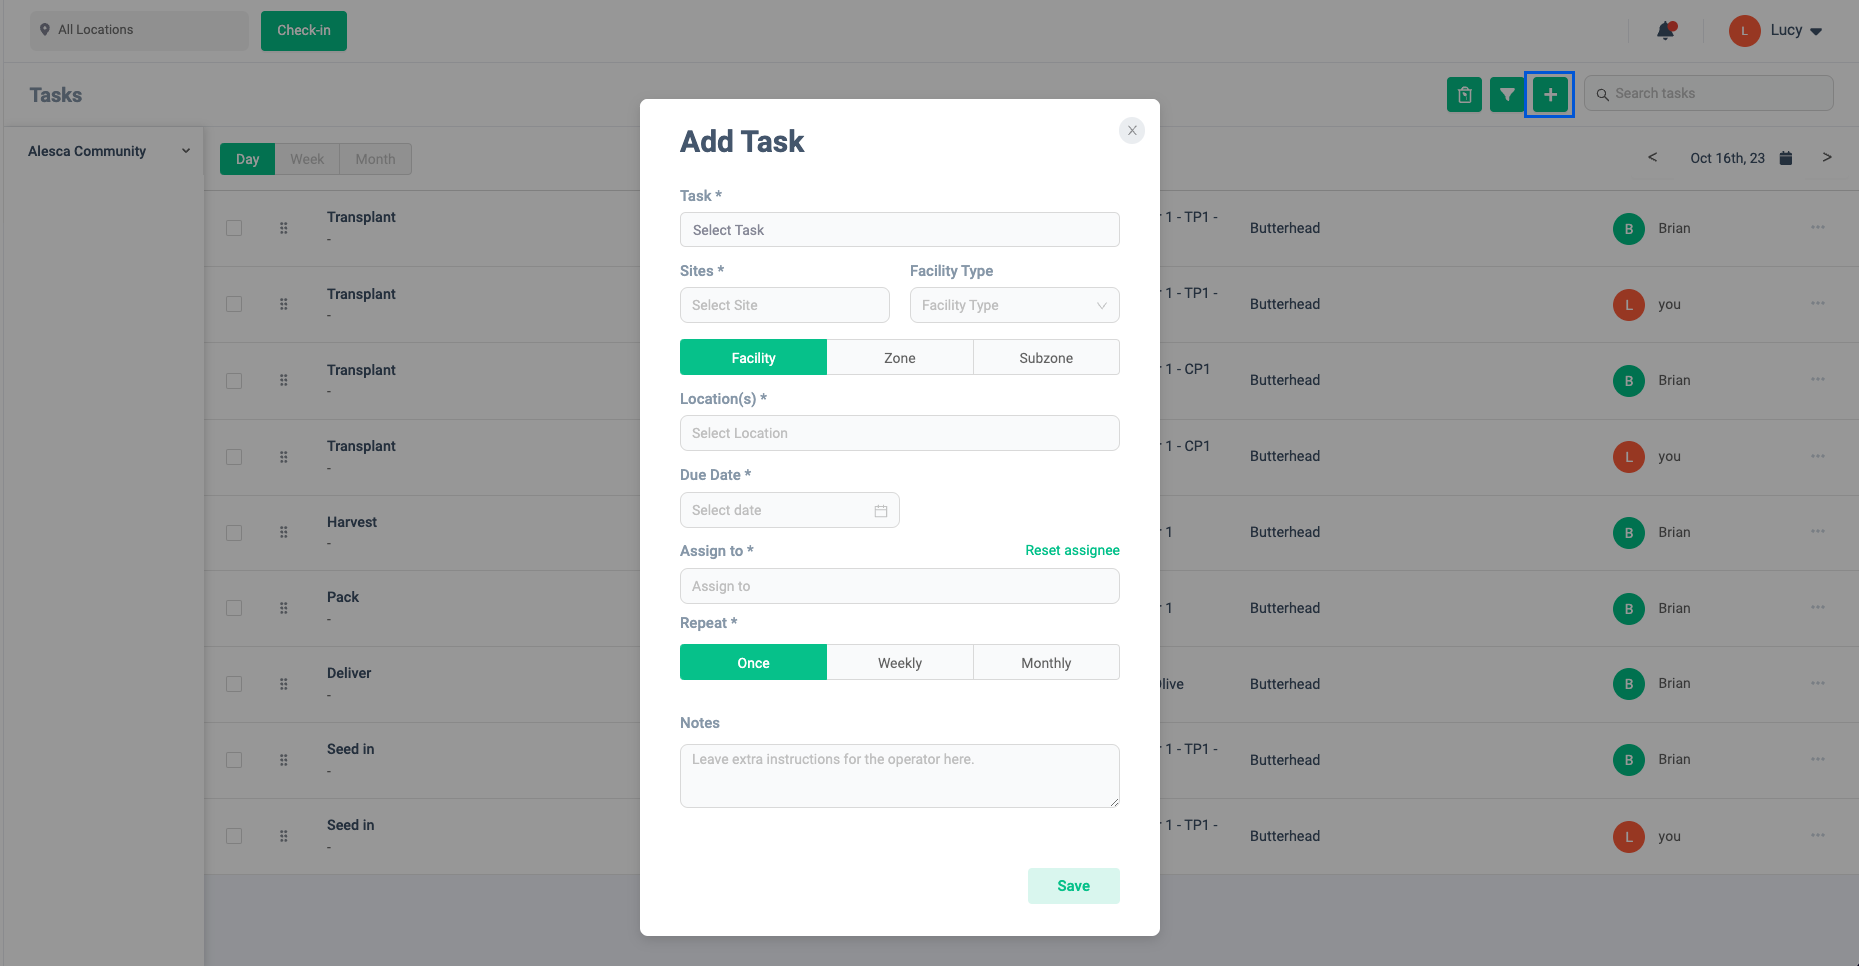
Screen Images:

Detail Specifications:
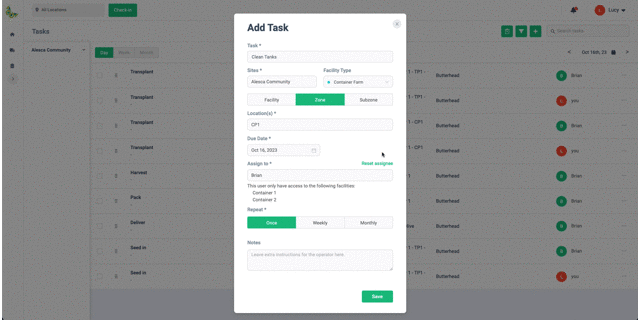
- You can create a new maintenance task by clicking the "+" button at the top right of the screen.
- To create a task, please enter all the necessary information in the input fields, such as the user to whom the task will be assigned and the area to which it will be assigned.
- Required fields are marked with an asterisk (*).
- Once you have filled in all the required fields, you will be able to click the "Save" button.
- If the task is successfully saved, it will be added to the task list screen and displayed.
- This feature is available only to users with Manager view permissions.
- For addition methods other than maintenance tasks, please refer to #Add grow plan.
Edit task
When to use:
Use when editing tasks.
Users:
Manager
Screen Images:
- edit button
Detail Specifications:
- Users can edit tasks by clicking "Edit" from the menu on the right side of the task being edited.
- The task content will be displayed as entered, so change it to the content you want to edit.
- This feature is available only to users with Manager view permissions.
Batch Edit tasks
When to use:
Used when editing tasks in bulk.
Users:
Manager
Screen Images:
- “Batch Edit” button

- If the selected task is only a maintenance task
- Cases other than the above
Detail Specifications:
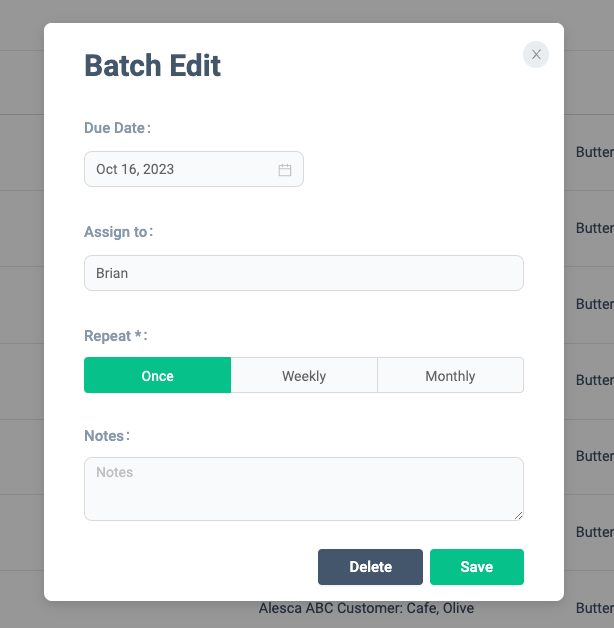
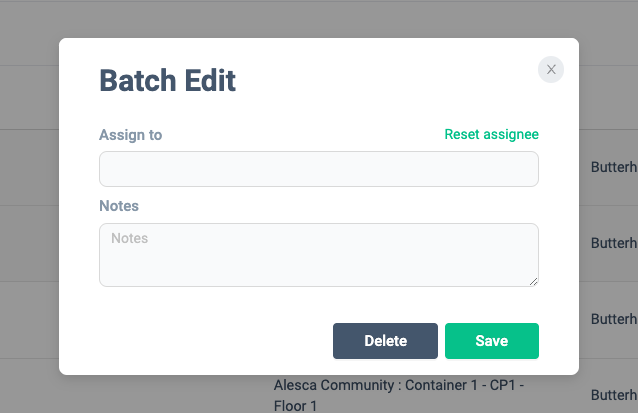
- Users can edit tasks in the task list in bulk.
- To edit in batches, check the checkbox to the left of the tasks you want to edit and click the "Batch Edit" icon. The "Batch Edit" icon is displayed only when multiple tasks are selected.
- Editable items vary depending on the type of task to be edited in bulk.
- For all maintenance tasks, you can edit the date, assignee, repetition, and memo all at once.
- In cases other than the above, you can edit the person in charge and notes all at once.
- This feature is available only to users with Manager view permissions.
Delete maintenance task
When to use:
Used to delete unnecessary maintenance tasks.
Users:
Manager
Screen Images:
-
"Delete" button

-
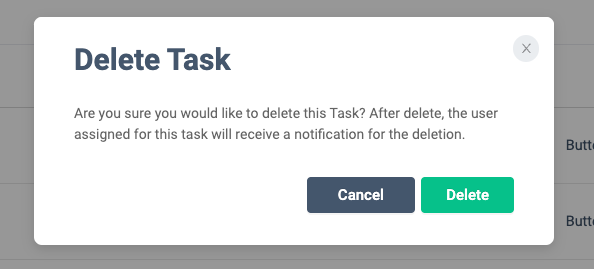
Confirmation screen
Detail Specifications:
- Users can delete maintenance tasks that are no longer needed.
- Click on the menu of the maintenance task you want to delete and click "Delete".
- When deleting, a final confirmation screen will be displayed. If you want to cancel the deletion, press "Cancel", or if you want to delete it as is, press "Delete".
- This feature is available only to users with Manager view privileges.
- Tasks associated with a cultivation plan cannot be directly deleted using the task list deletion function. Please edit from the details page of the cultivation plan. For details on the cultivation plan function, please refer to #Grow Plan.
Filtering tasks
When to use:
Use this to narrow down the tasks to be displayed.
Users:
Manager/Operator
Screen Images:
Detail Specifications:
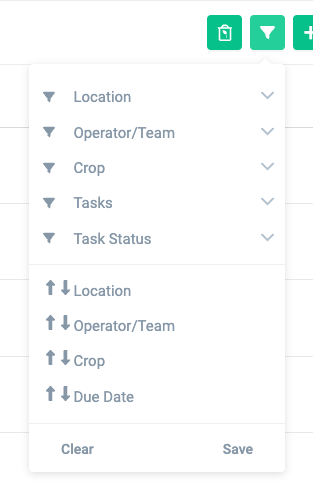
- Users can narrow down the tasks displayed by clicking the green "Filter" button near the top right of the screen.
- The filtering conditions are as follows. Check the checkbox of the content you want to narrow down and click the "Save" button.
- Location
- Assignee
- Crops
- Task
- Task status
- It is also possible to narrow down your search by combining multiple conditions.
Change task assignee
When to use:
Used when changing the person in charge of executing a task.
Users:
Manager
Screen Images:

Detail Specifications:
- Hover over the assignee's icon or name to see a list of users who can change the assignment. In this state, you can change the assignment by clicking on the user you want to reassign.
- Newly assigned users will receive emails and notifications.
- If the person is not assigned, the icon will say "unassigned". You can assign a person in charge using the same procedure.
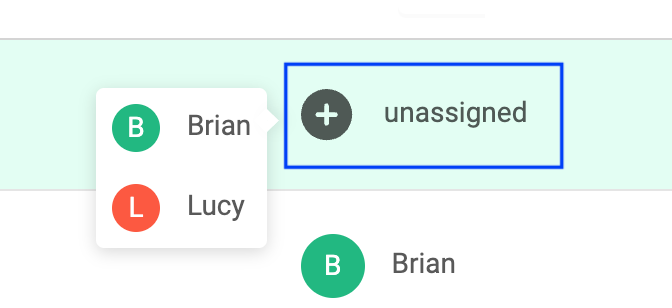
- The person in charge can be changed to another user only in the Manager view.
Destroy Crop
When to use:
It is used when crops need to be discarded for some reason during cultivation.
Users:
Operator/Manager
Screen Images:
Detail Specifications:
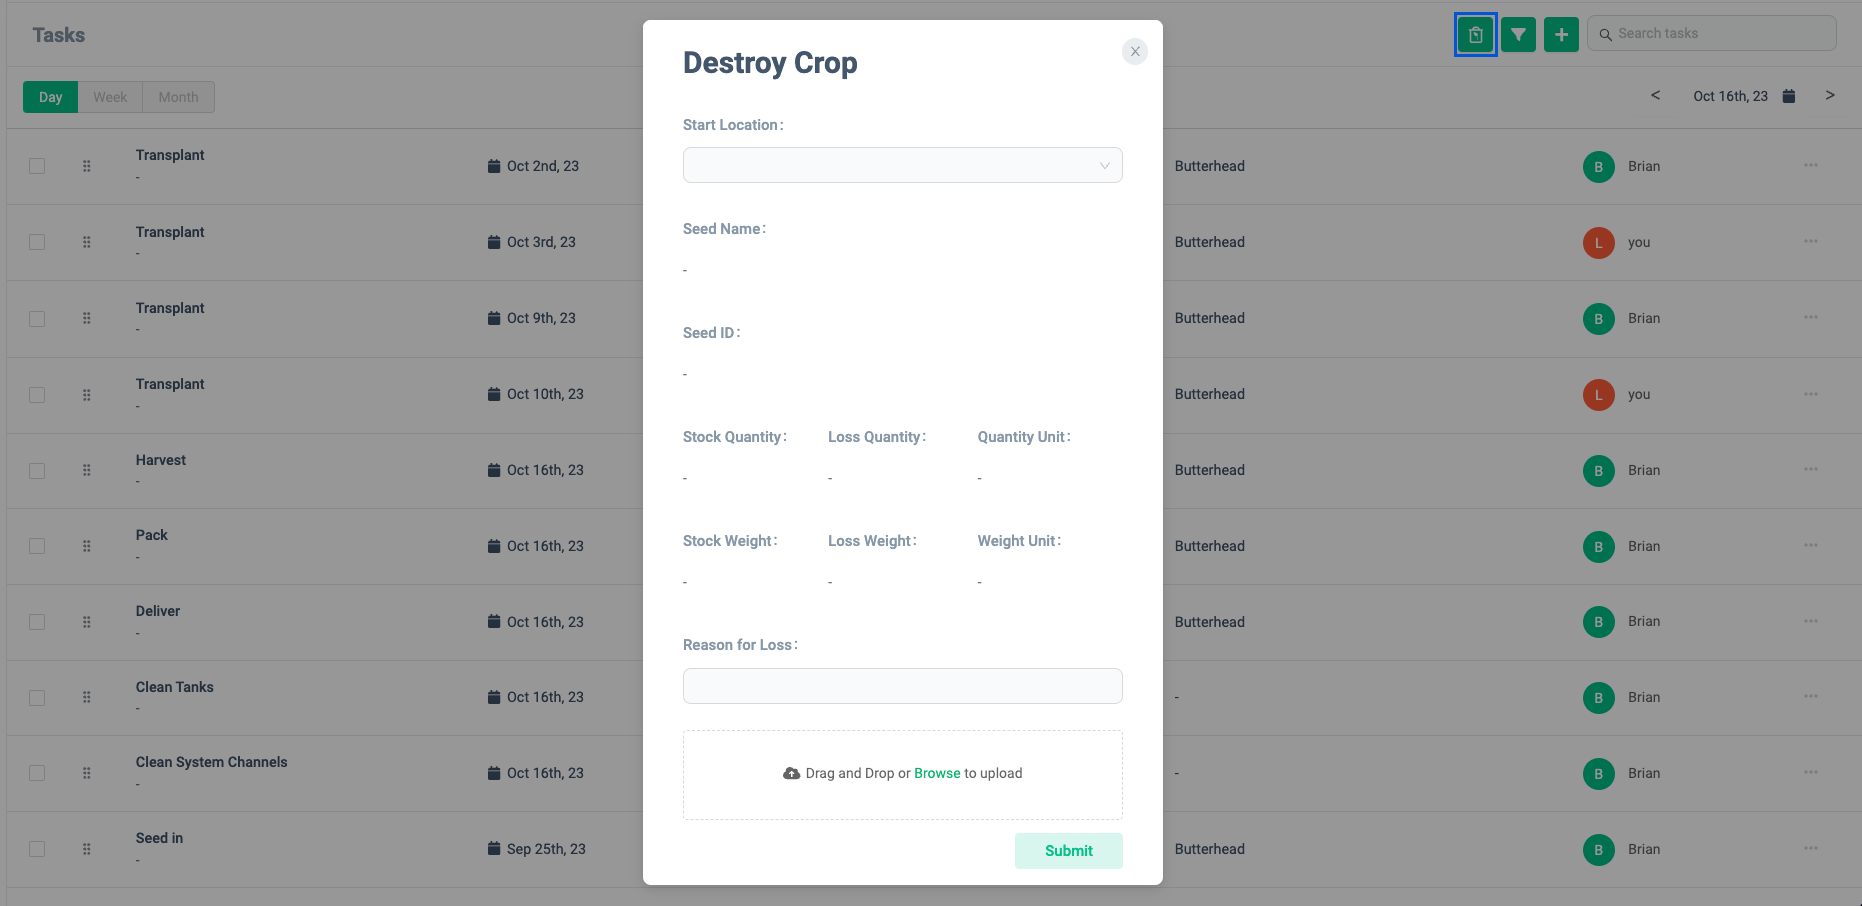
- If you wish to discard crops for any reason, please click the "Destroy Crop" button at the top right of the screen and enter and register the required information.
- To use this feature, you must be checked in to the location where the crop you want to discard is growing.
- When you select a starting location, information on crops grown in that location will be automatically displayed.
- If there are multiple crops being grown in the selected locations, crop options will be displayed, so click on the crop in question.
- Take a photo of the crop you want to discard and upload the image.
- You can upload images by dragging and dropping them into the dotted line area, or by clicking and selecting the image file.
- Start location and reason for abandonment are required fields.
- If you discard crops, your cultivation plan will be canceled midway through, so be careful.
- If the start location is not selected or an area where no crops are being cultivated, the reason for discarding cannot be selected.
Start tasks
When to use:
It is used to start a task based on a cultivation plan or a maintenance task.
Users:
Operator/Manager
Screen Images:
Tasks that can be started
Timer
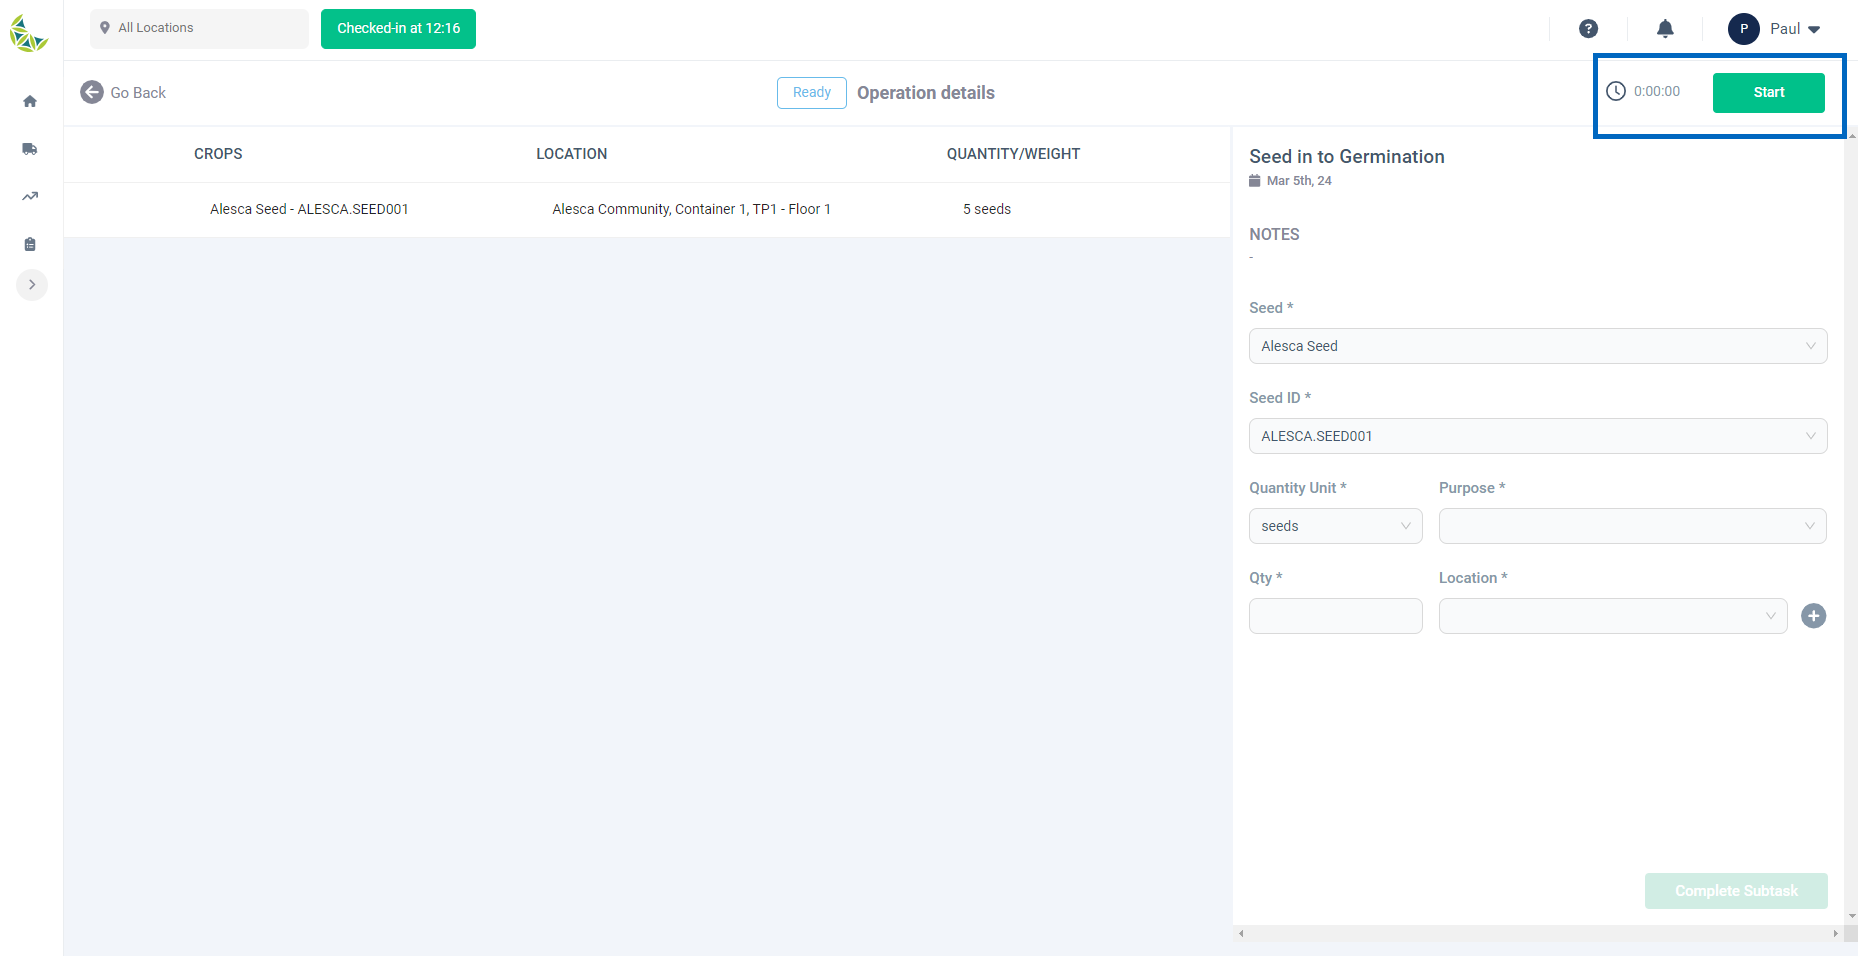
Detail Specifications:
- If the status of a task is Ready, the task can be started.
- The operation task associated with the cultivation plan is like a workflow, and a subtask for the next task is created when the previous task is completed.
- Maintenance tasks are treated as single tasks, so there is no workflow, and subtasks are created at the same time as they are created.
- When starting a task, a timer is started by pressing the "Start" button. This timer is used to accurately time your work.
- This action changes the status of the task from Ready to Working.
- If you want to stop working, press the "Pause" button to stop the timer.
- This action will change the status of the task from Working to Paused.
- If you want to resume the suspended work, press the "Restart" button to start the timer again.
- This action changes the status of the task from Paused to Working.
- The timer cannot be started if the task status is Unready.
- Be sure to check that the timer is running when registering task results.
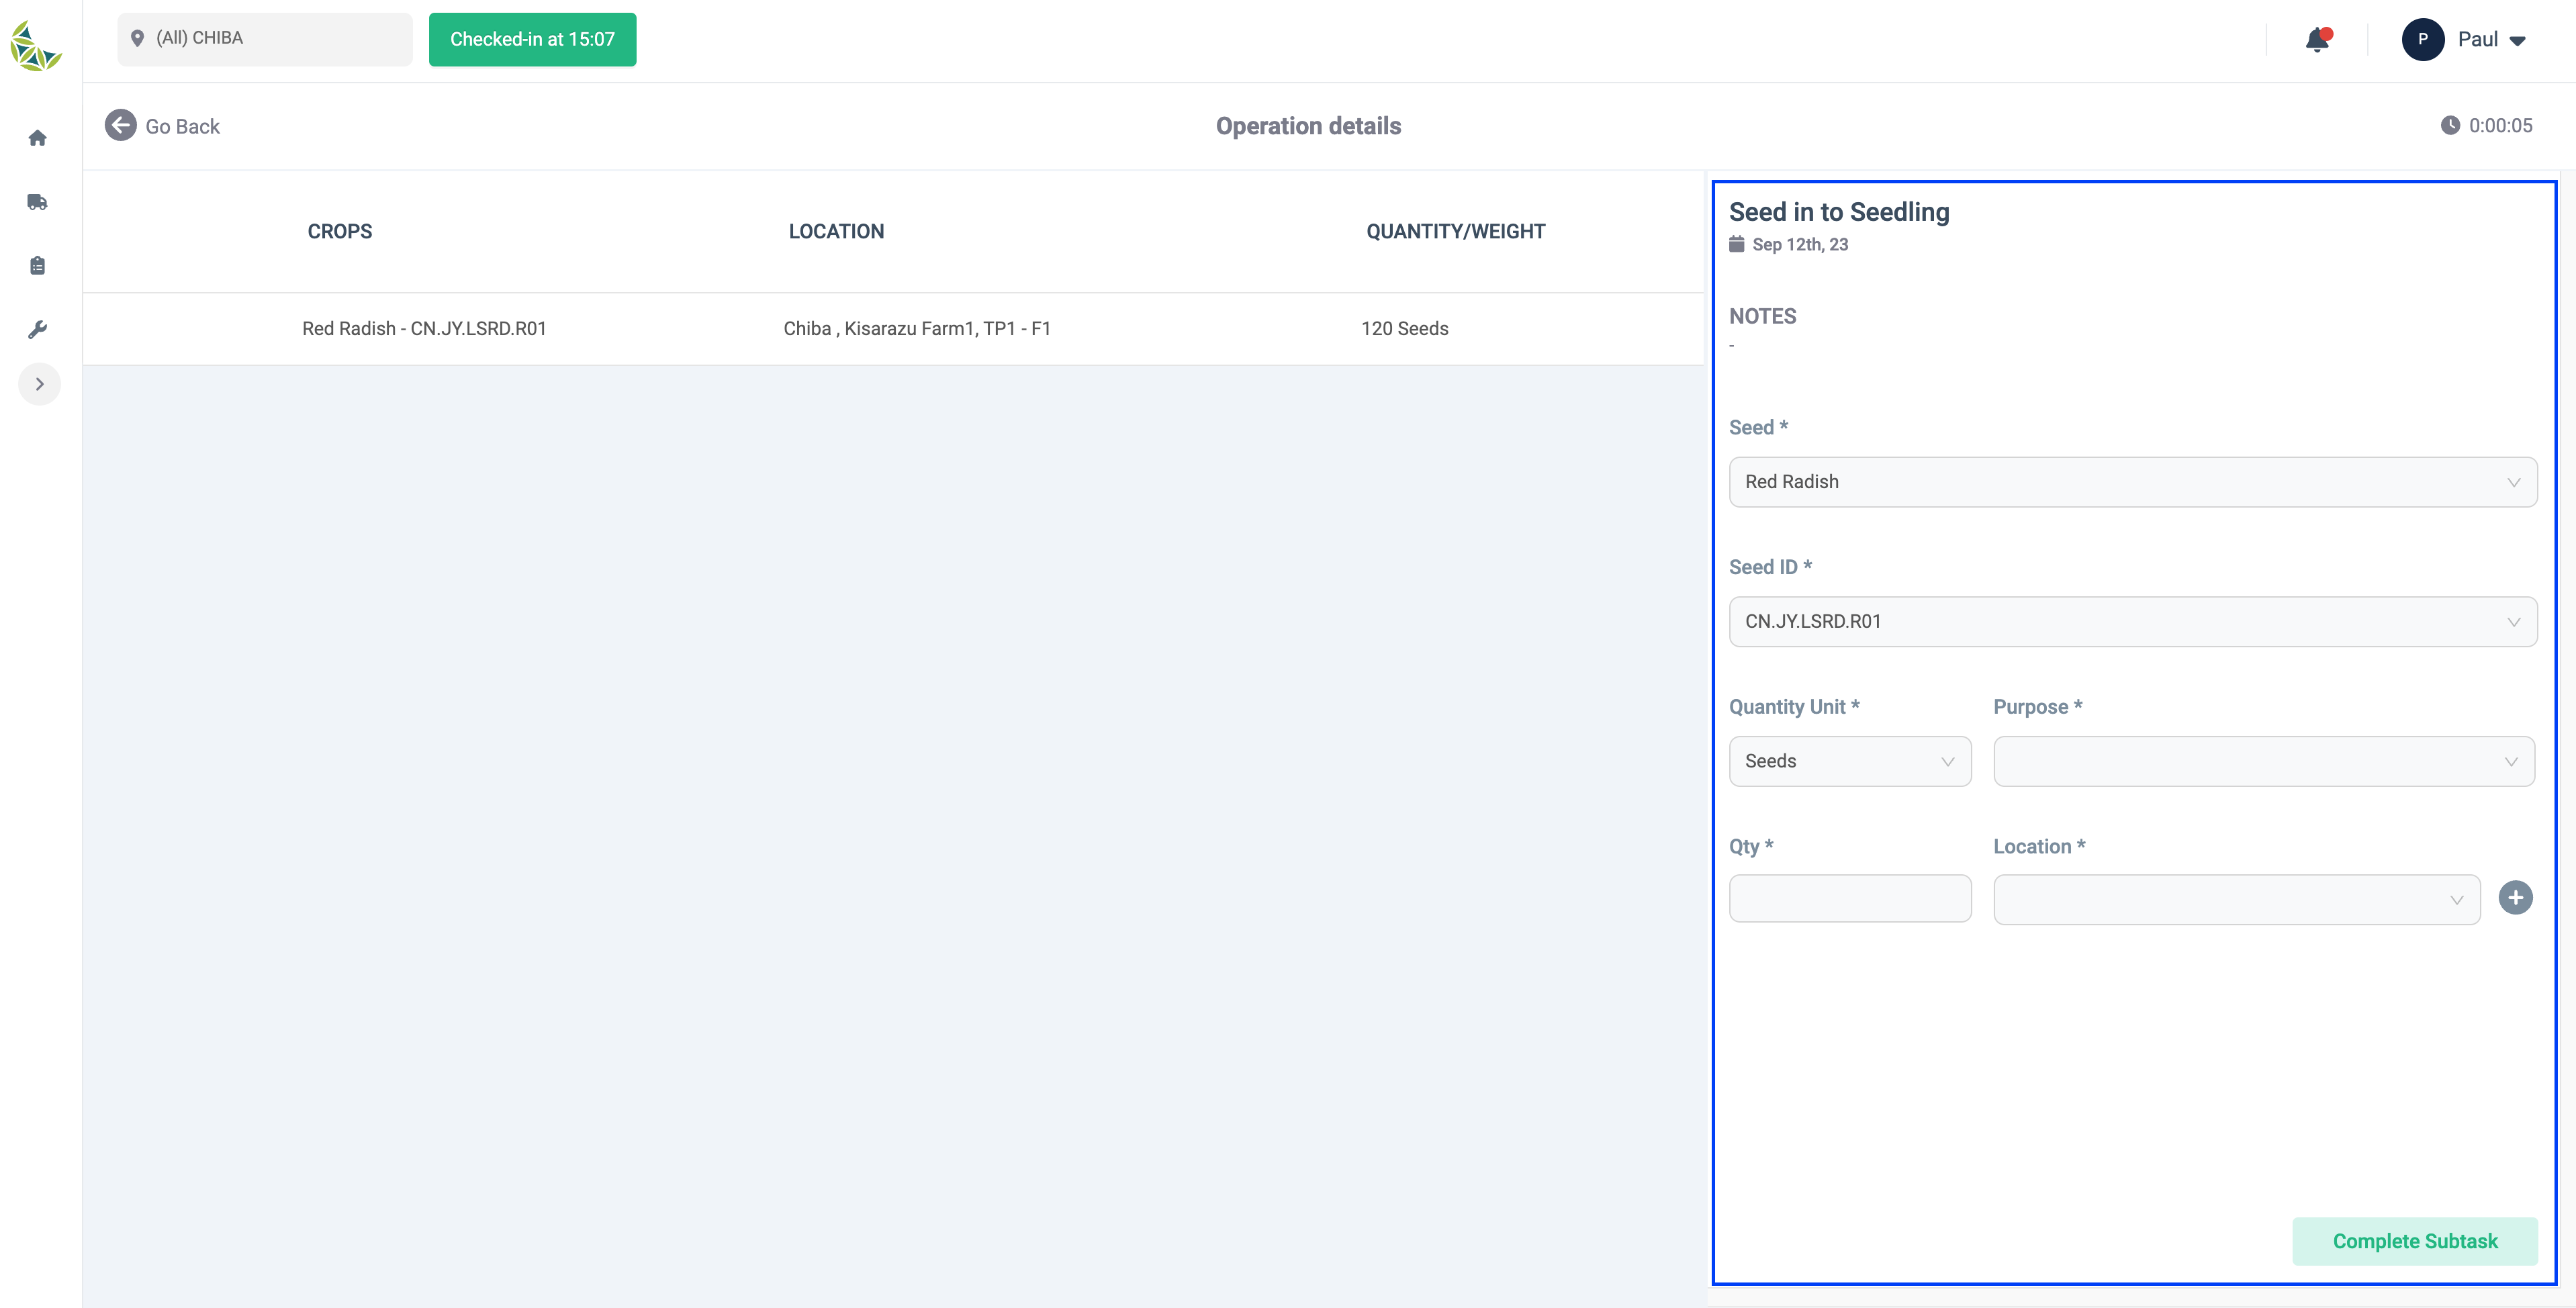
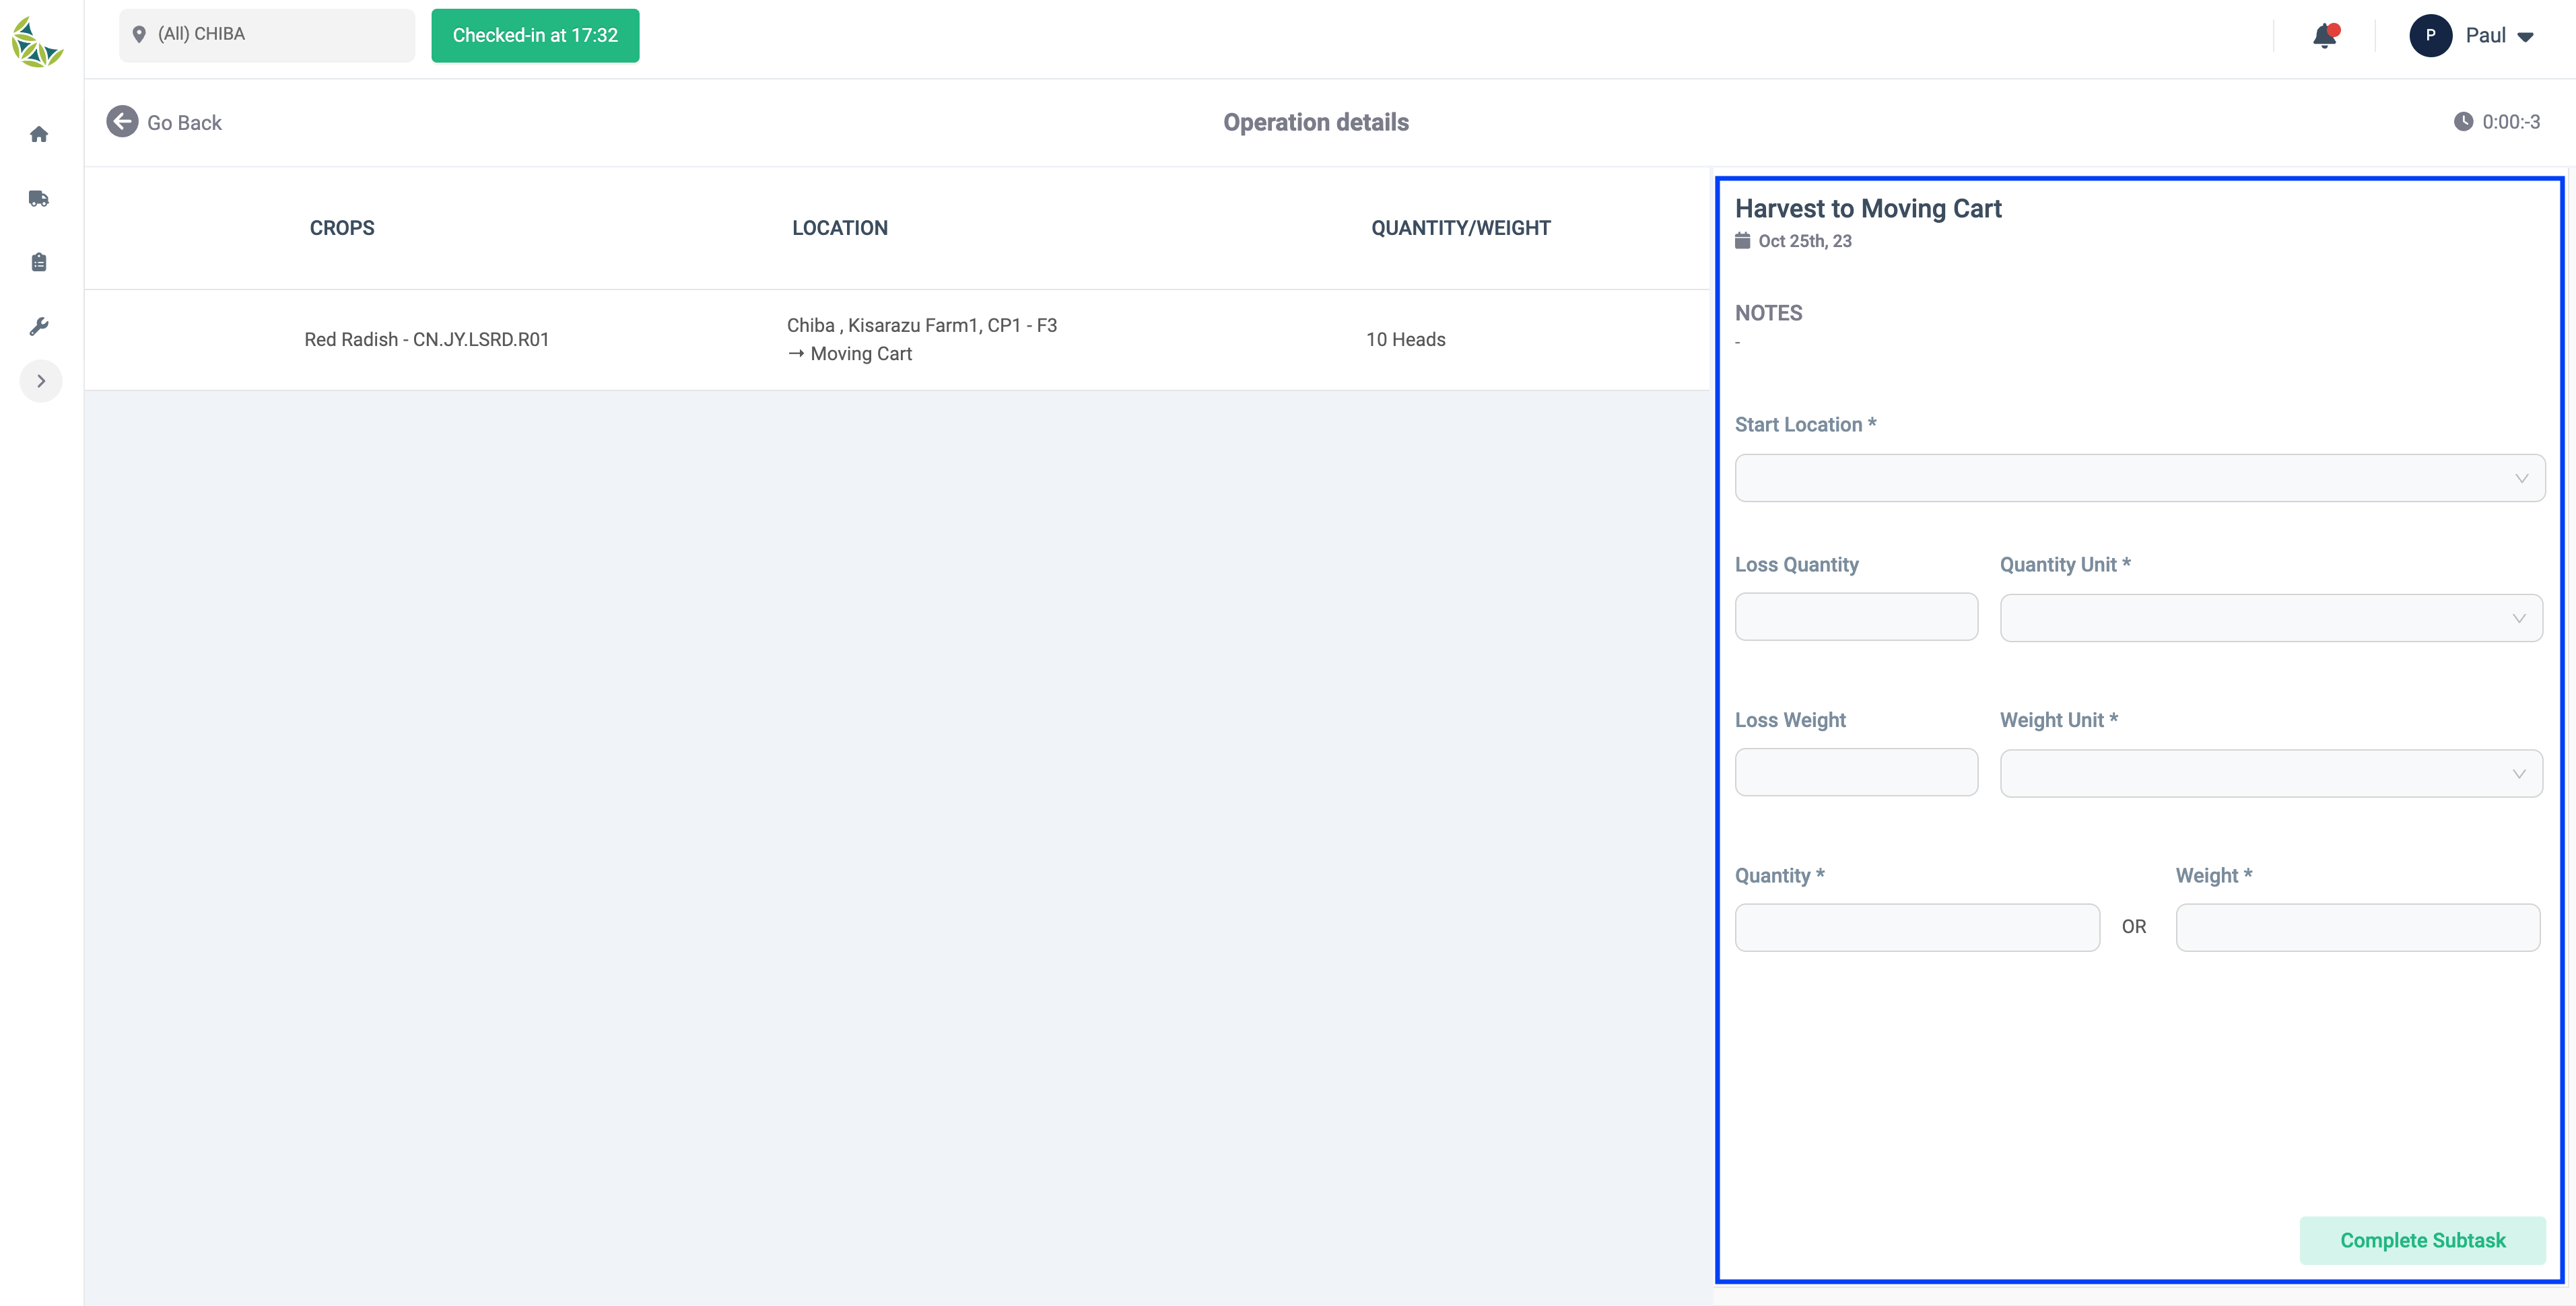
Registration of task results
When to use:
Used when recording task results based on the cultivation plan.
Users:
Operator/Manager
Screen Images:
If the input item is type A
If the input item is type B
If the input item is type C
If the input item is type D
If the input item is type E
Add finish location
Task registered correctly
Detail Specifications:
*For "Registering task results," which will be explained below, you must have checked in to the area where you want to execute the task.
-
Users can record task achievements and complete tasks.
-
However, the timer can only record achievements and complete tasks when the timer has started and the status of the task is Working.
-
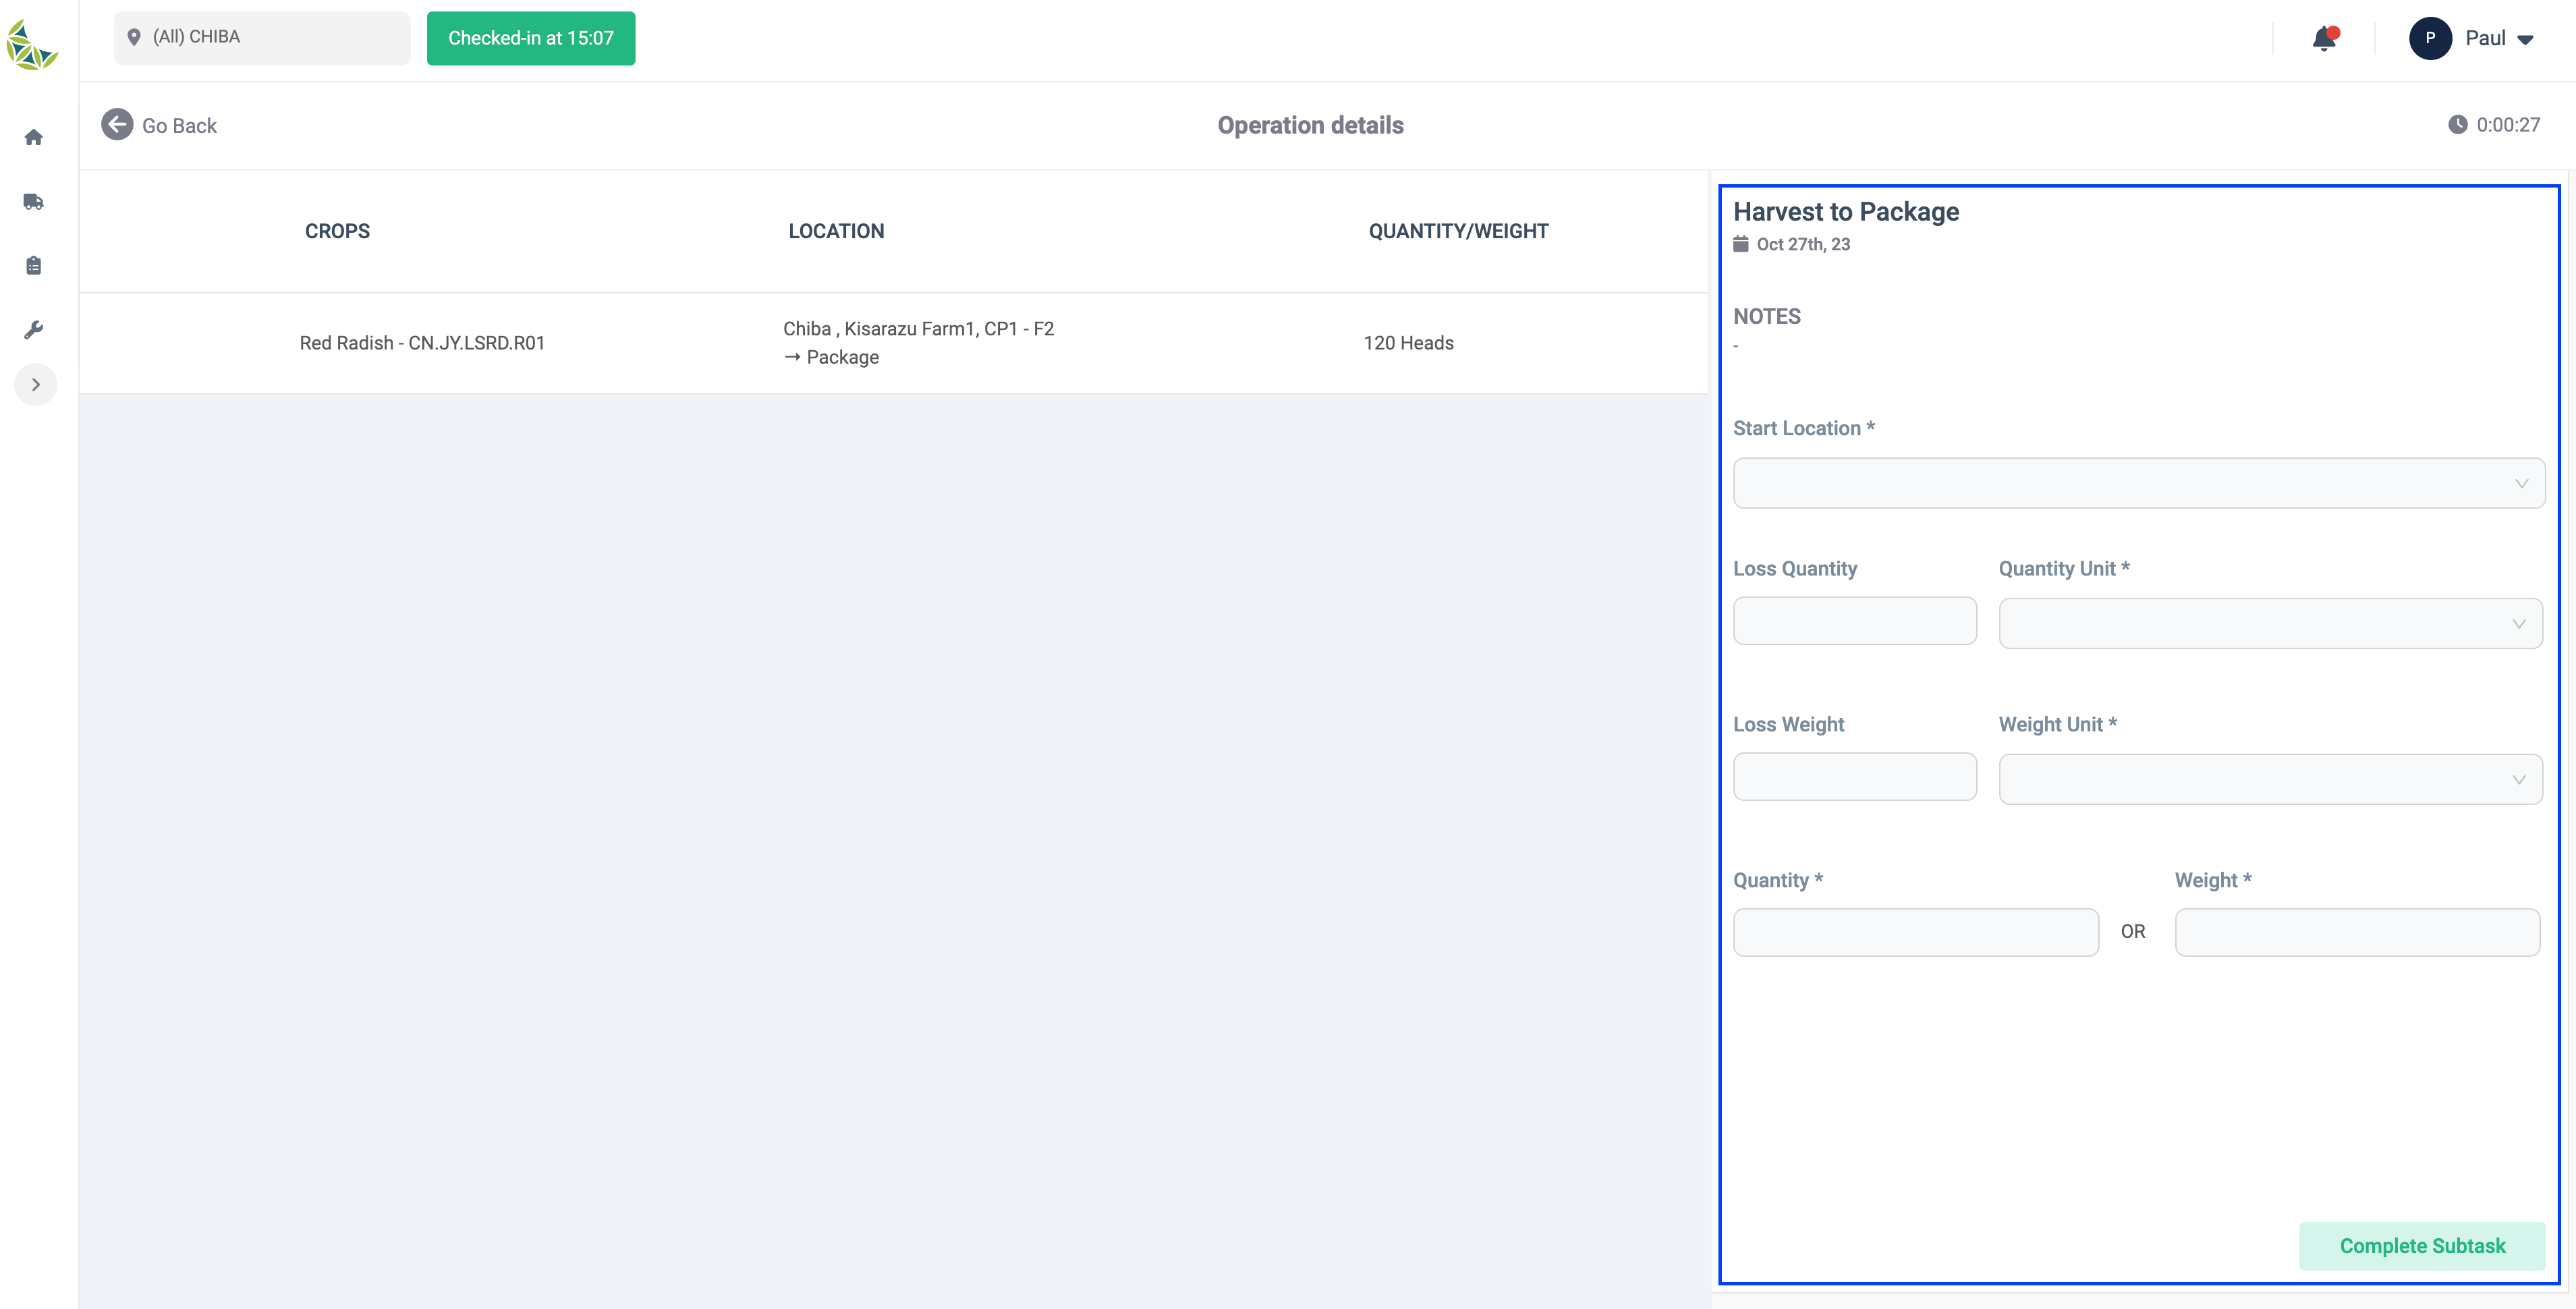
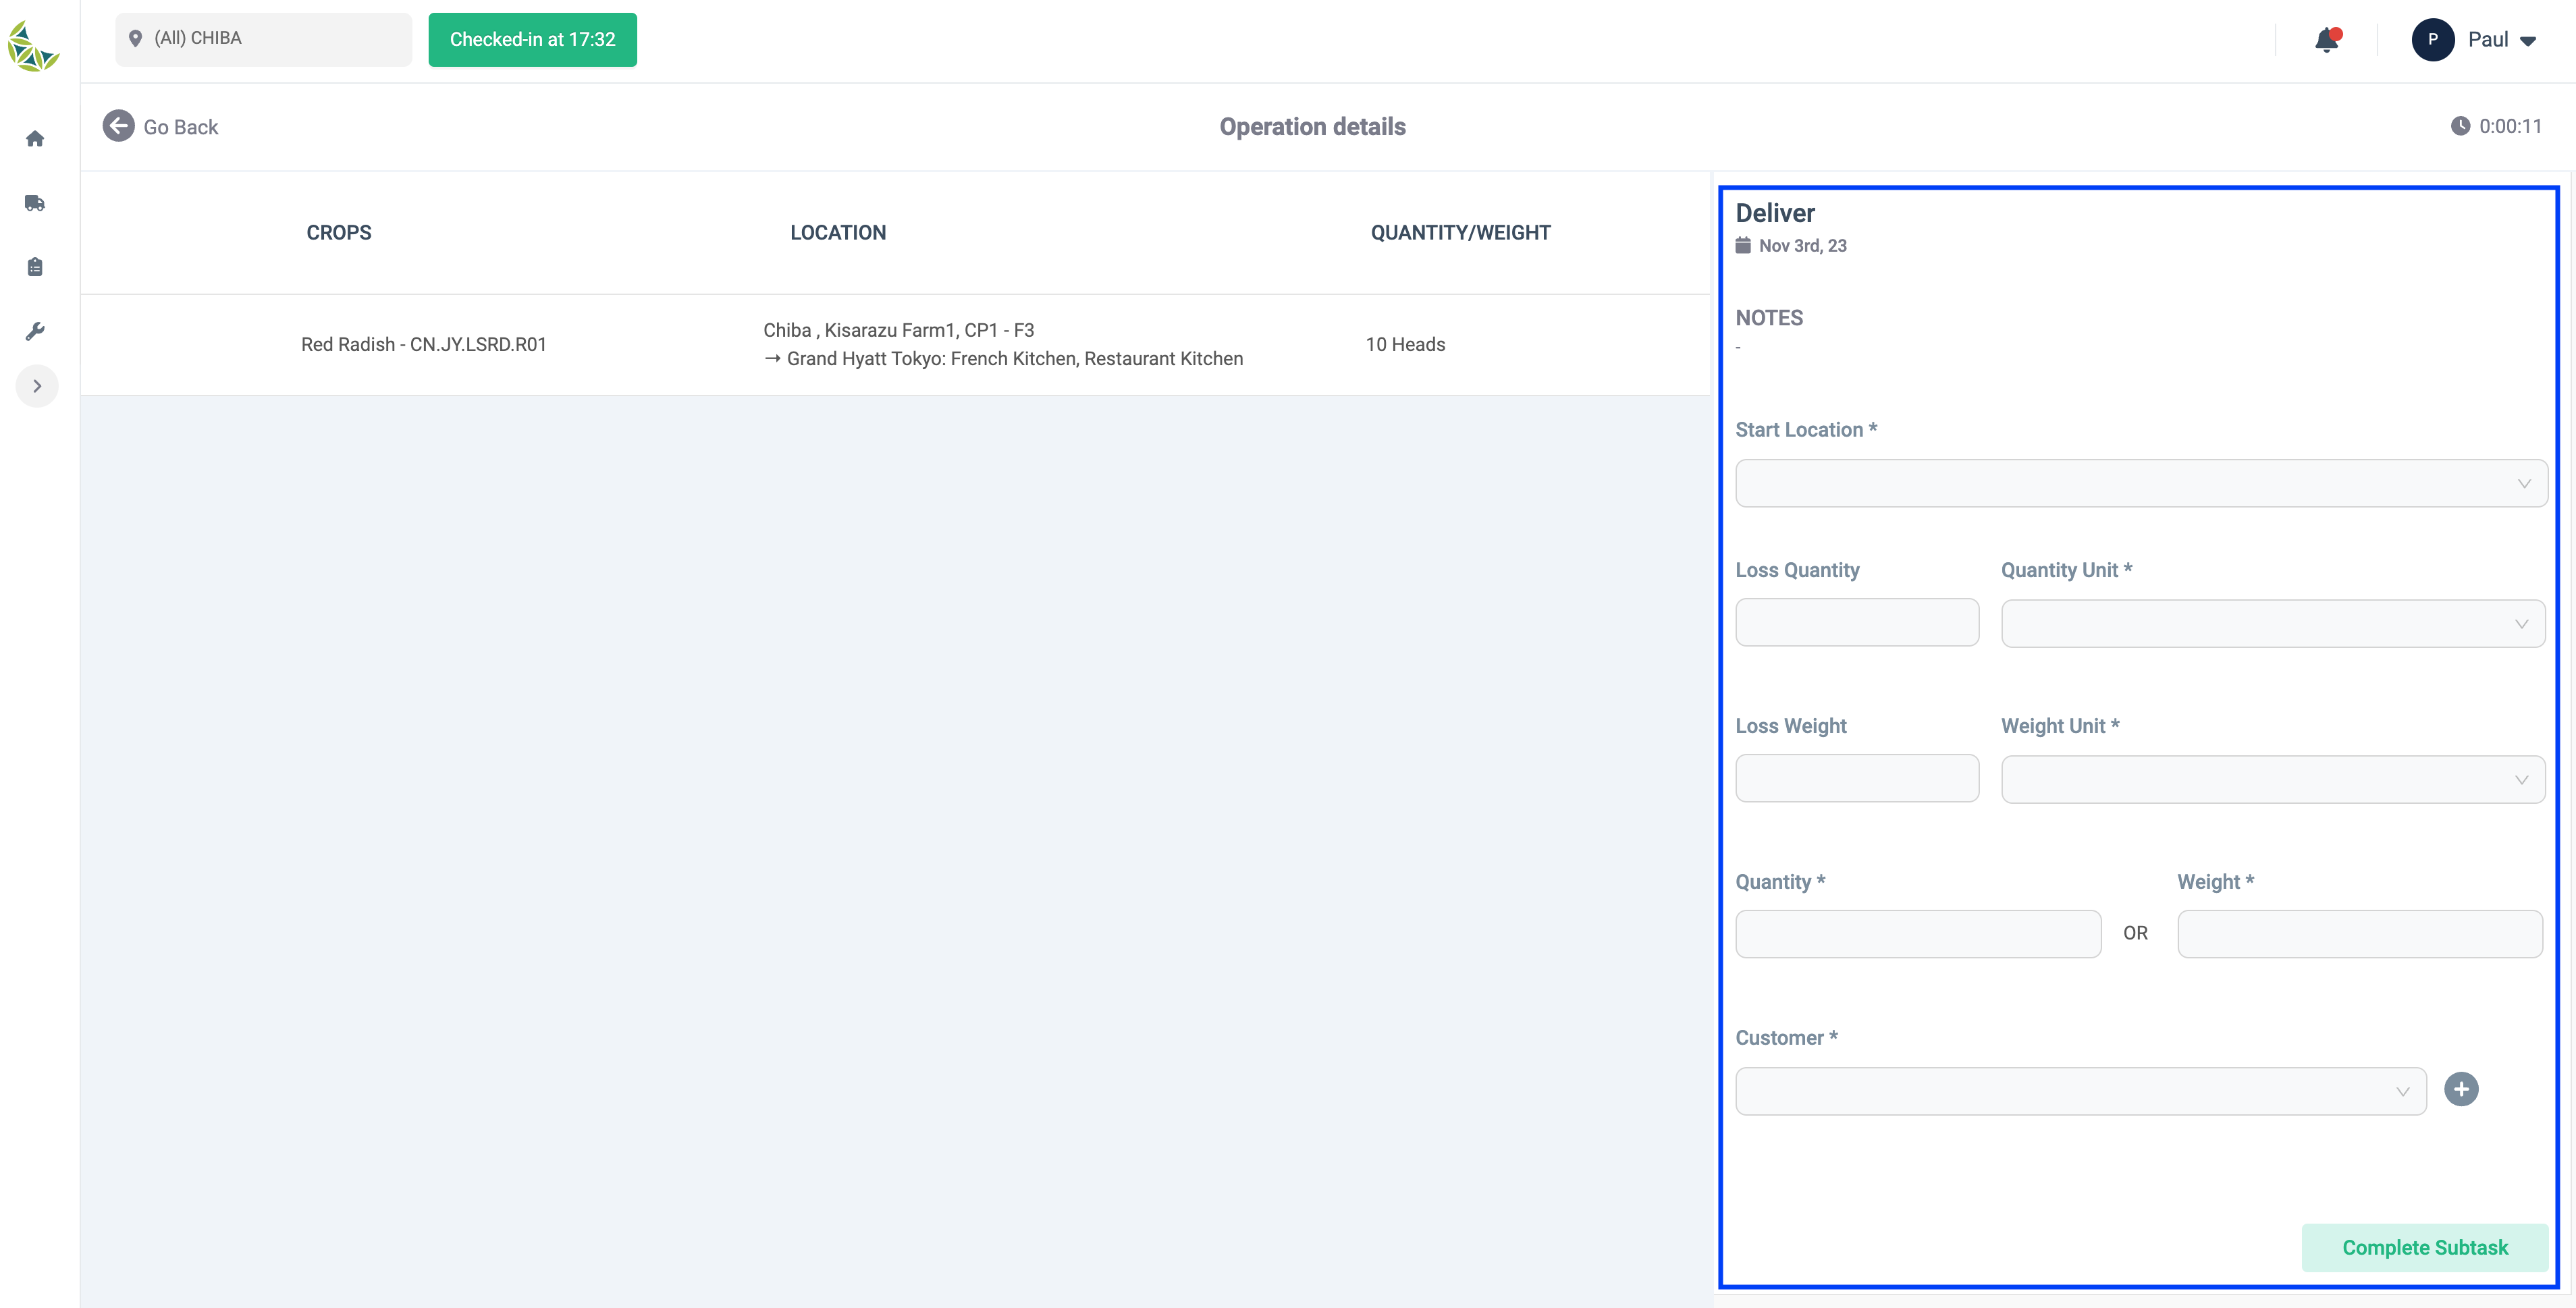
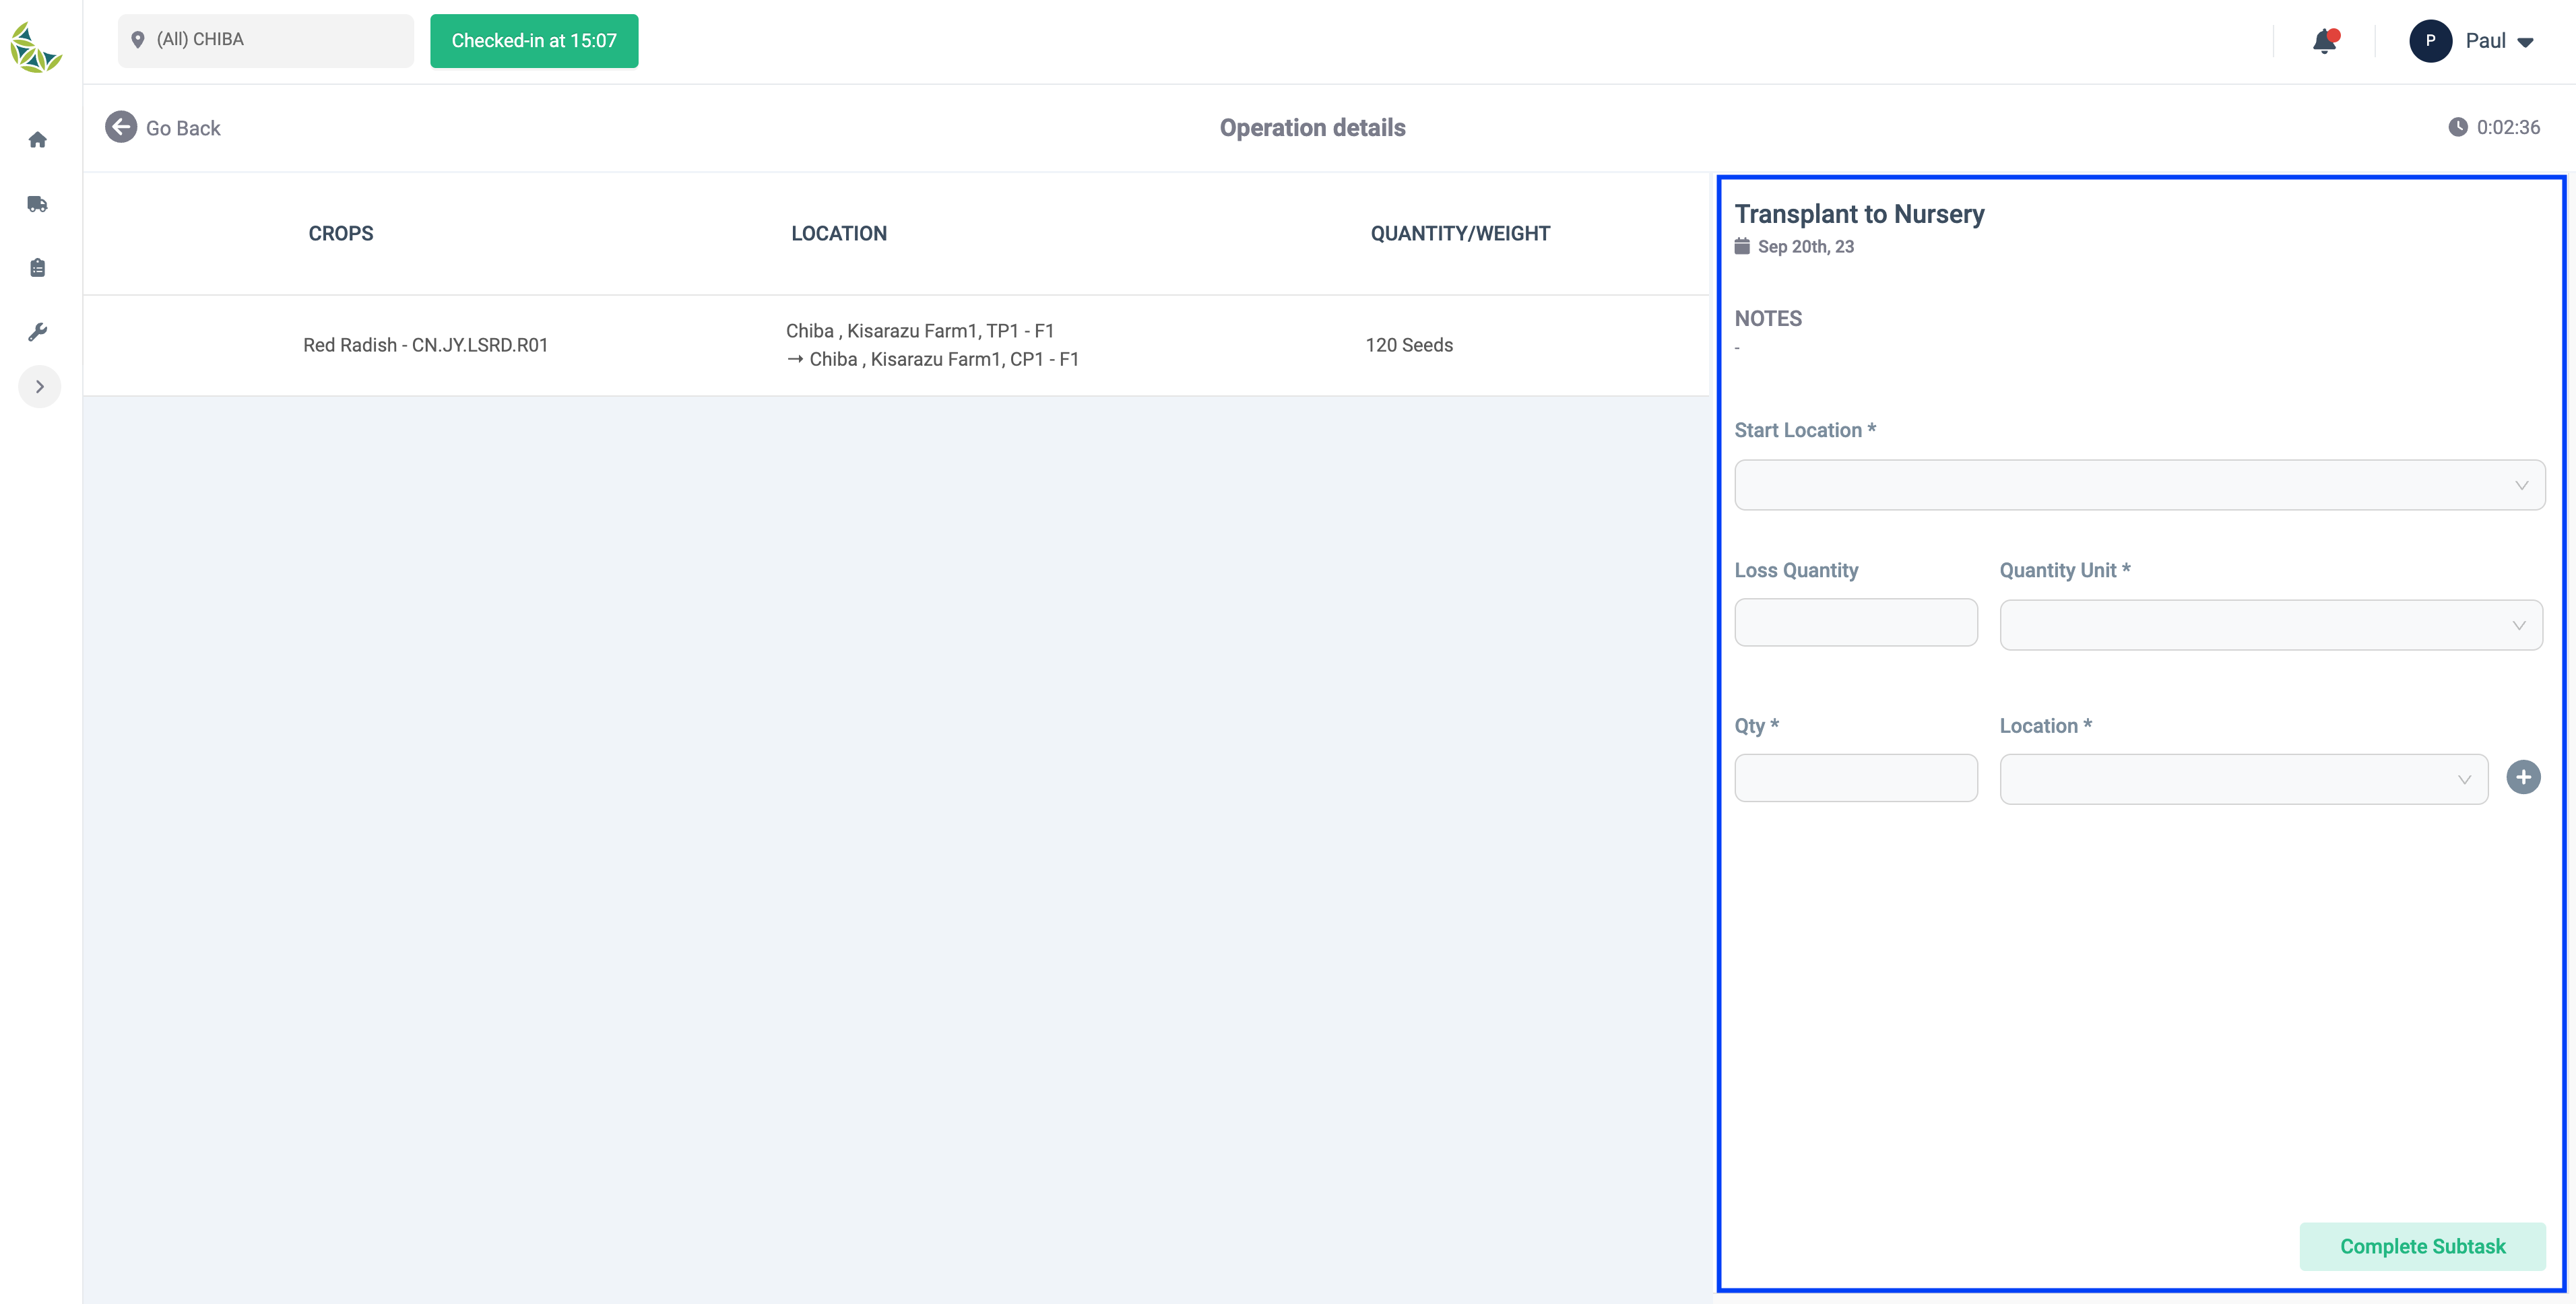
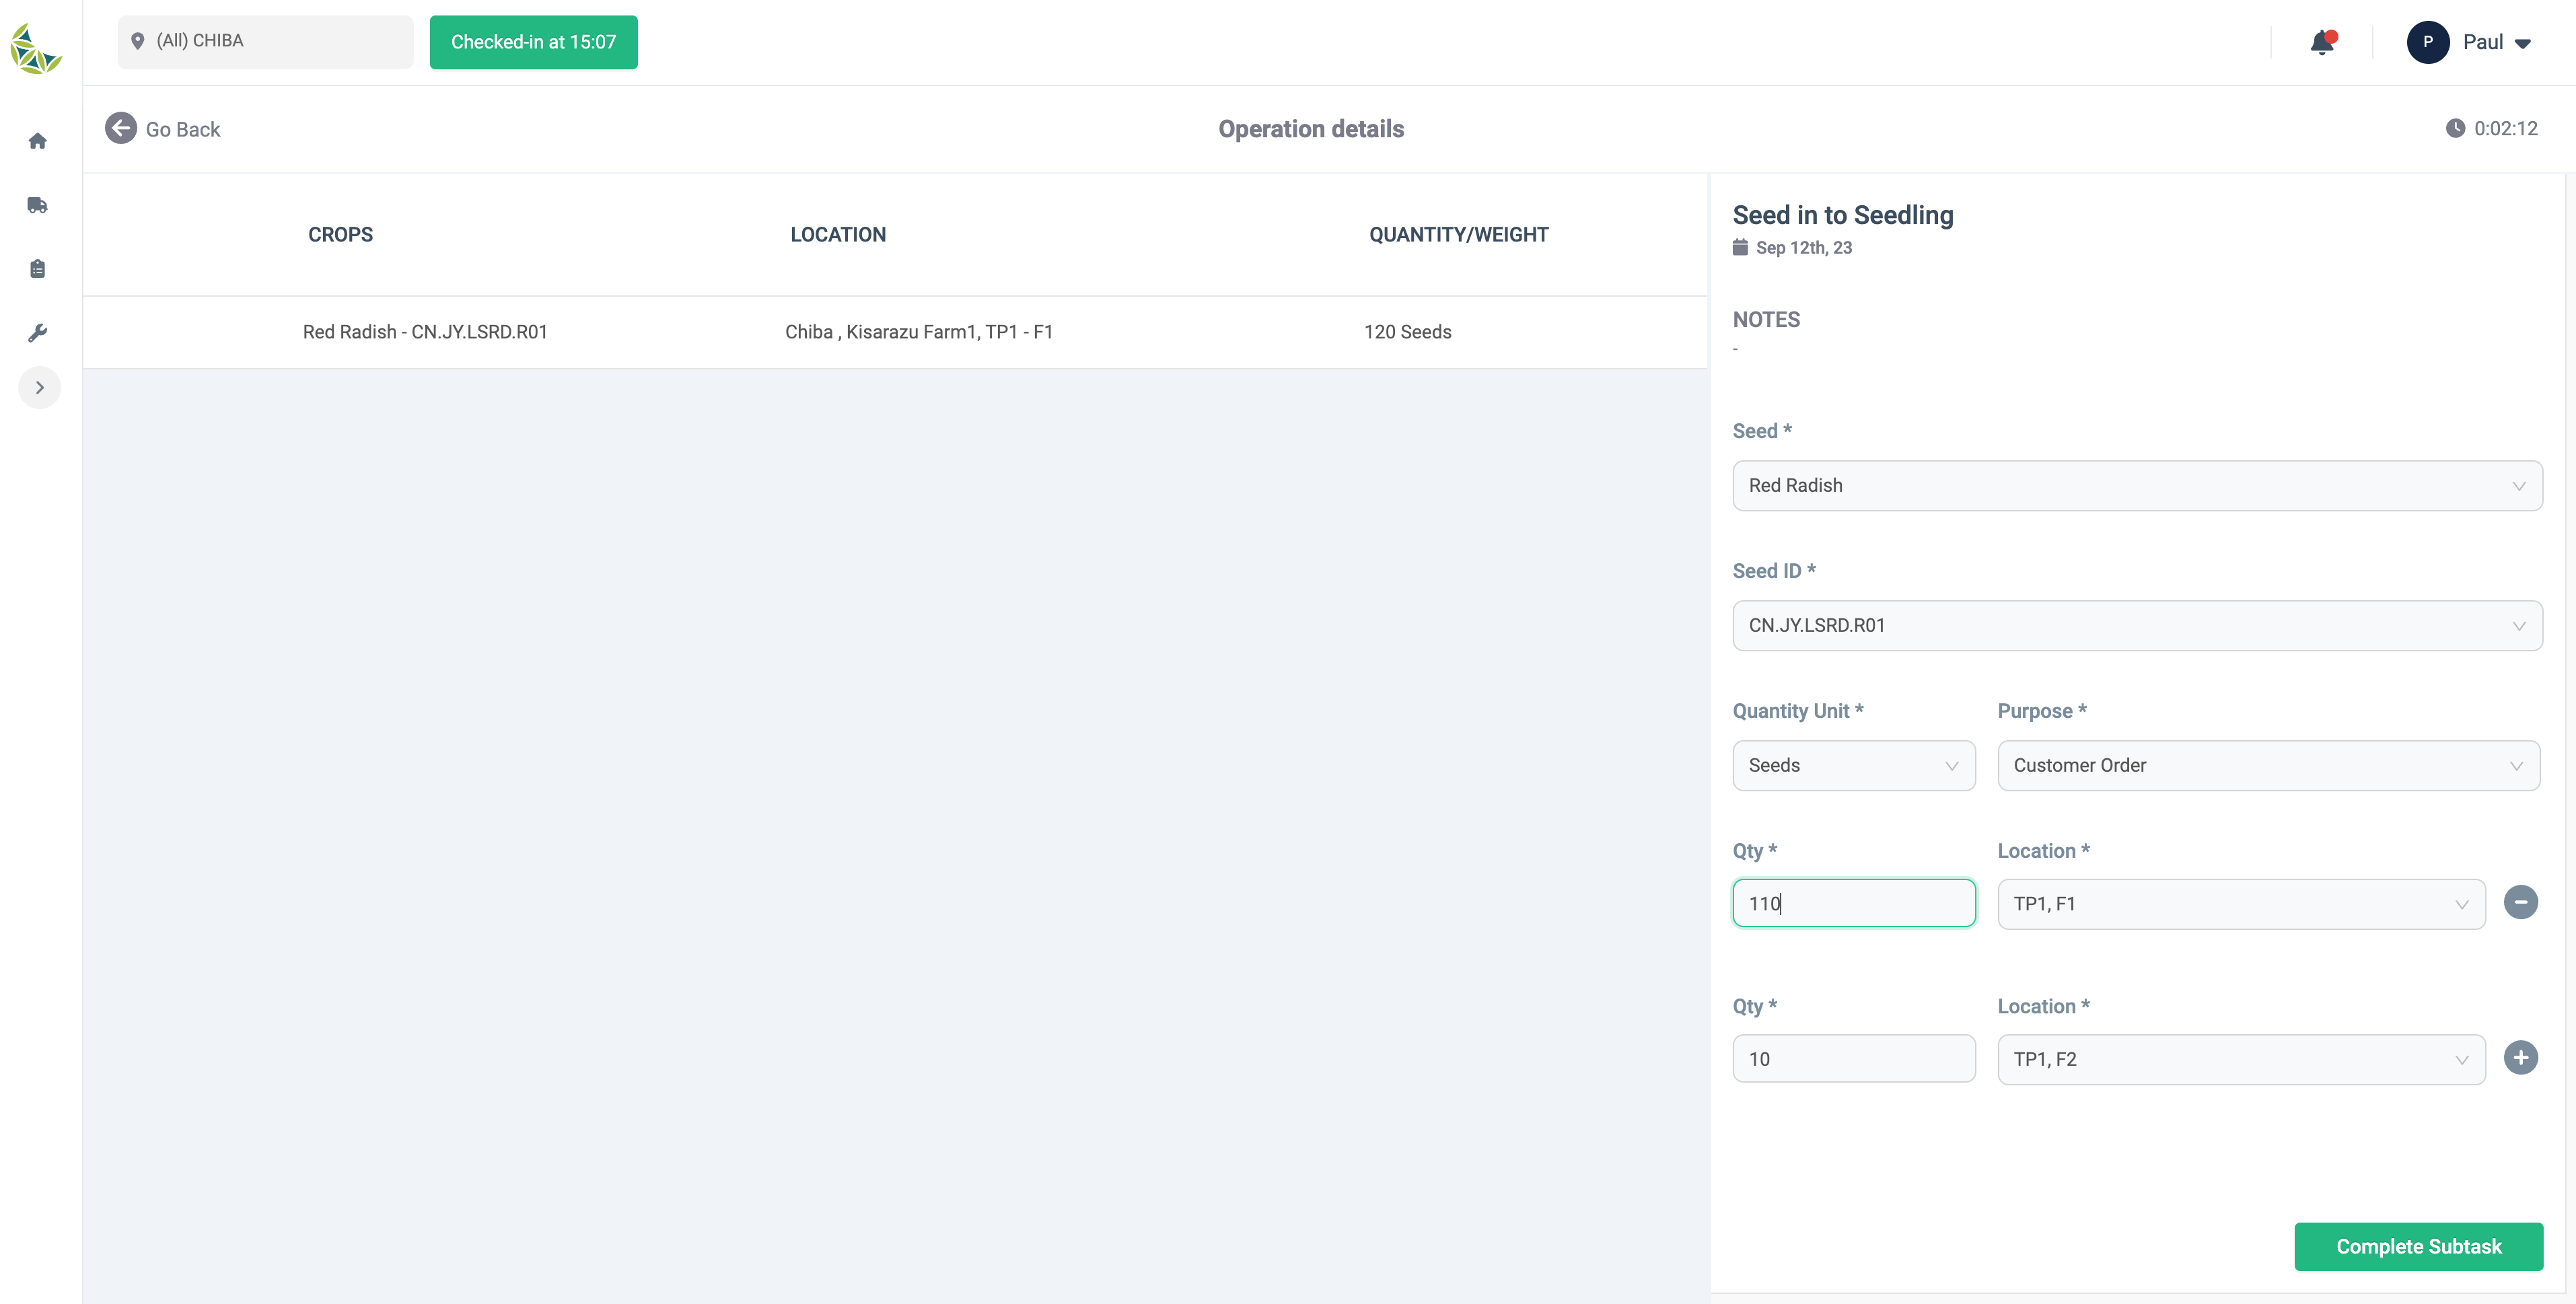
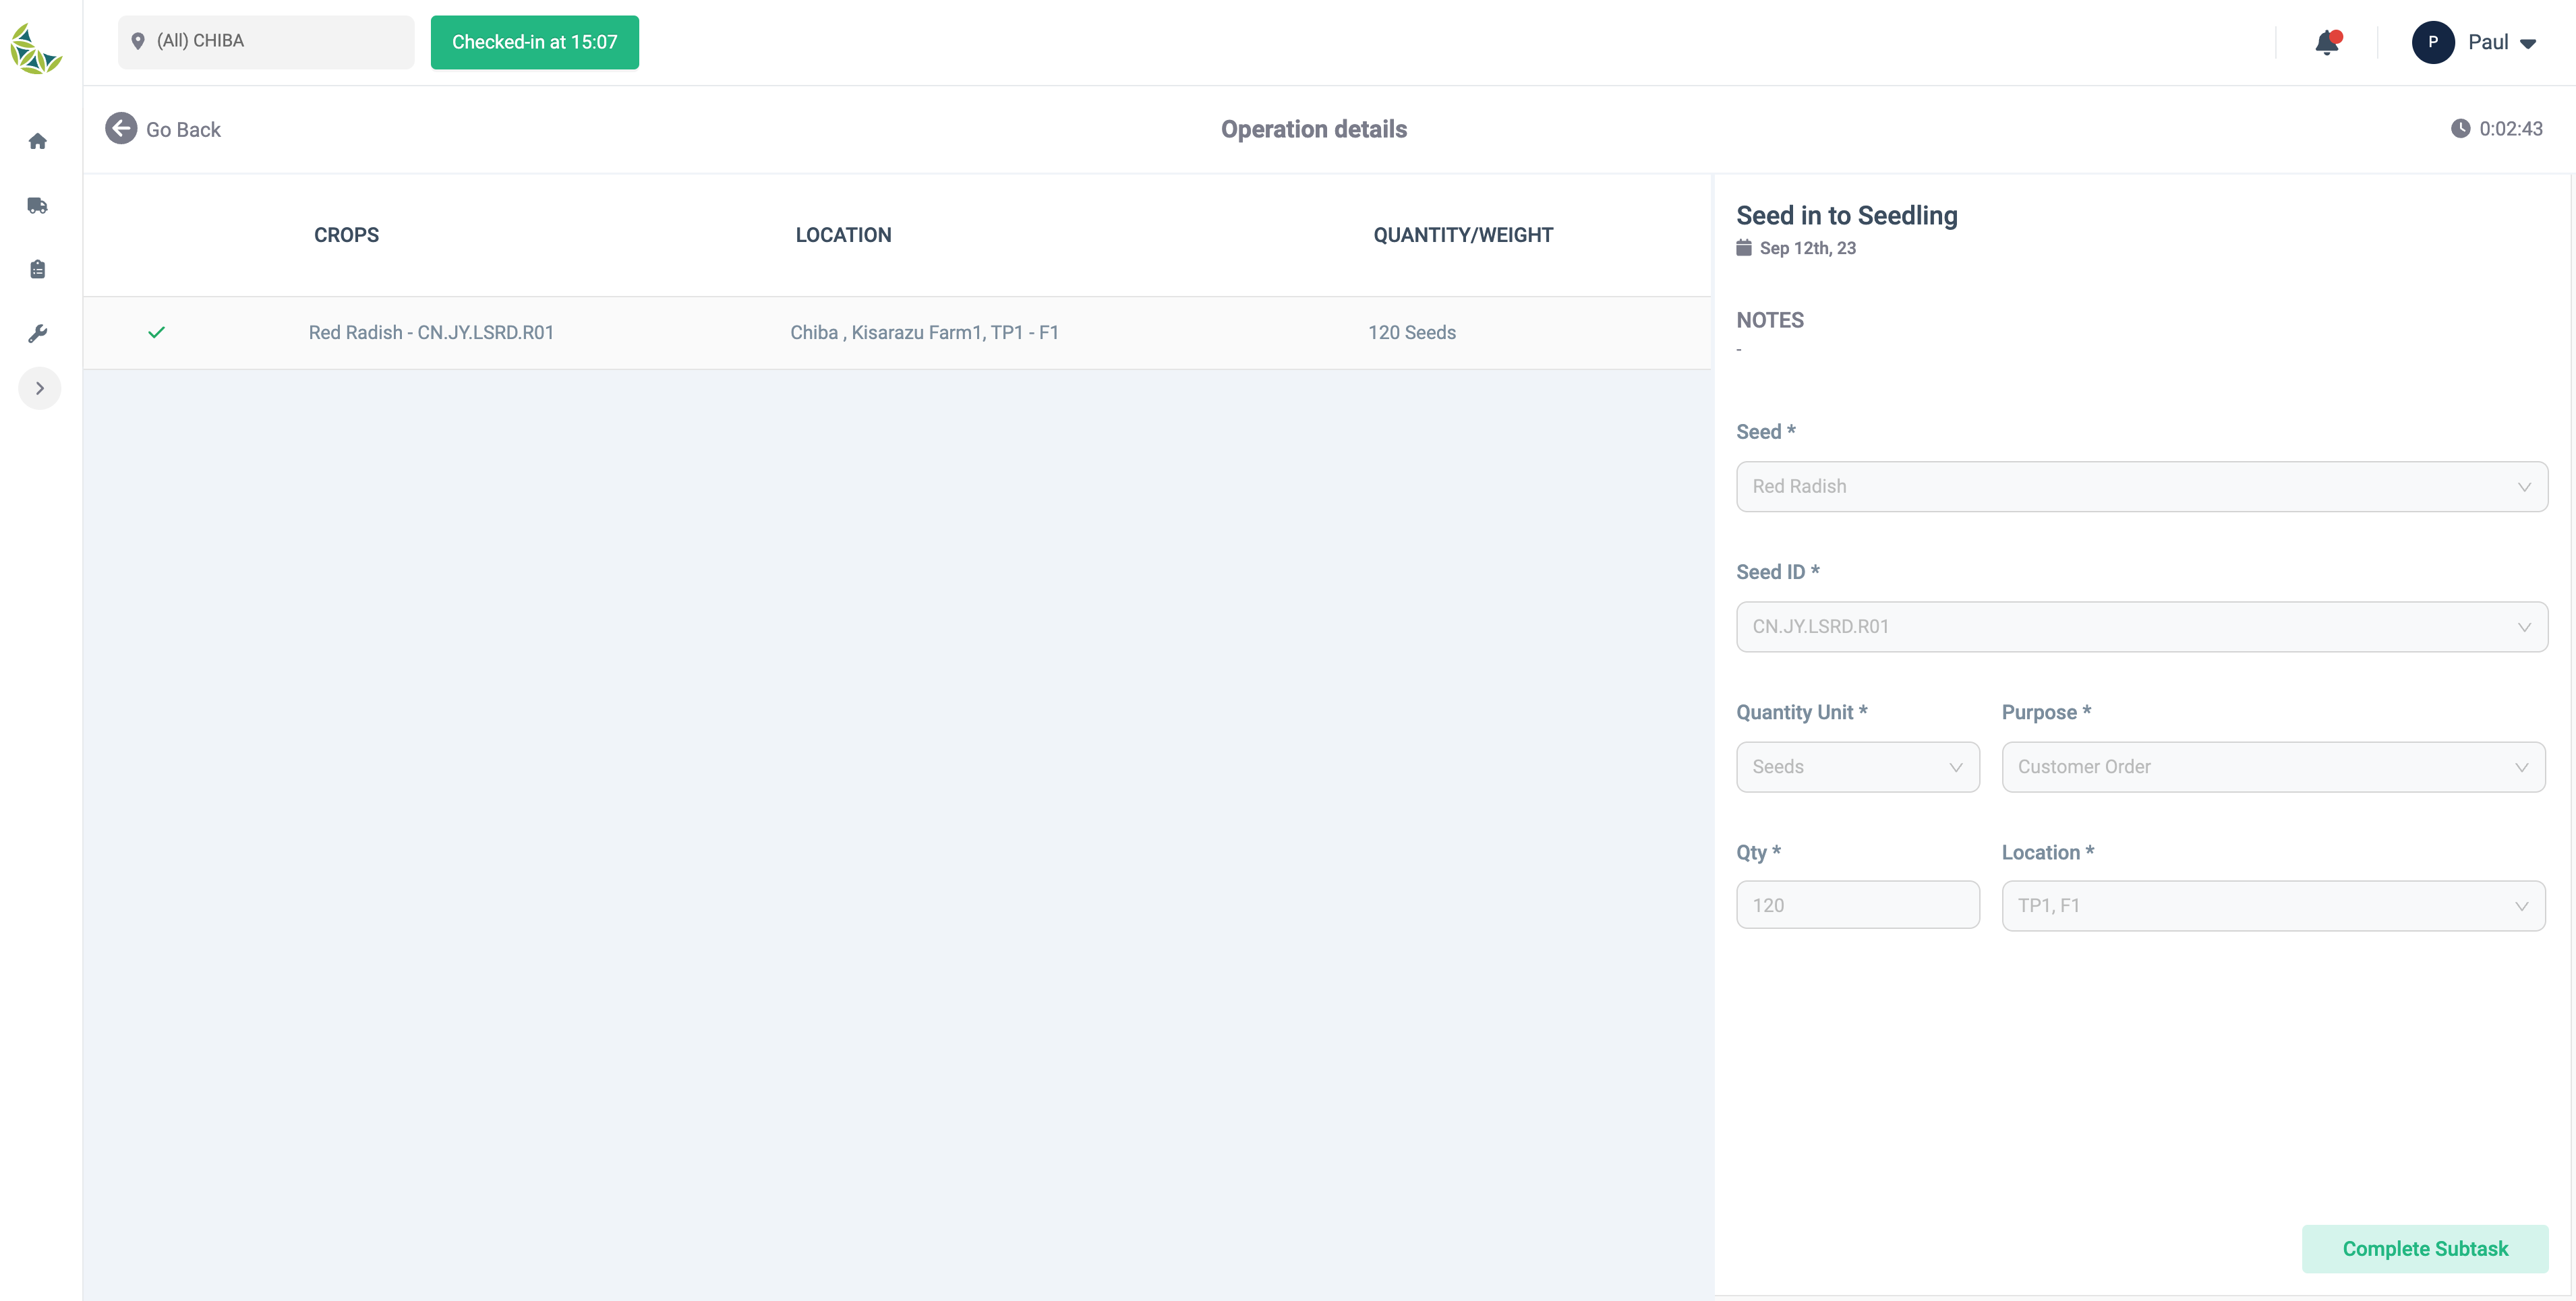
On the screen for recording cultivation work, by entering the required fields, you will be able to press the task completion button. There are five types of input items, A to E, as shown in the table below.
- A: Seed planting
- Seeds and seed IDs are automatically set according to the planned cultivation plan. It can also be changed by the Operator on input.
- B: Tasks that are associated with harvesting (repetition) and processing plant, storage, or movement stages.
- One of the combinations (unit of measure + quantity) or (unit of weight + weight) is a required input field.
- C: Task with associated package stage
- A: Seed planting
-
D: Delivery, harvesting with no stage attached
- E: Other tasks
- Population: If the entered (sum of quantities + sum of scrapped quantities) < quantity at the time of subtask creation, the differential quantity shall be left in the start area.
- E: Other tasks
※ *: Required
※ (*1), (*2): Either one is required
| A | B | C | D | E | |
|---|---|---|---|---|---|
| Seed | x* | ||||
| Seed ID | x* | ||||
| Quantity Unit | x* | x(*1) | x(*1) | x(*1) | x* |
| Quantity | x* | x(*1) | x(*1) | x(*1) | x* |
| Weight Unit | x(*2) | x(*2) | x(*2) | ||
| Weight | x(*2) | x(*2) | x(*2) | ||
| Purpose | x* | ||||
| Start Location | x* | x* | x* | x* | |
| Loss Quantity | x | x | x | x | |
| Loss Weight | x | x | x | ||
| Reason for Loss | x | x | x | x | |
| Finish Location | x* | x | x* | ||
| Customer | x* |
- Multiple finish locations can be registered as needed.
- If you want to add a finish location, press the + button on the right end.
- Delete unnecessary locations with the - button.
- If the task is registered correctly, a green check mark (✔) will be displayed and it will not be editable.
Registration of maintenance task results
When to use:
Used when recording maintenance work.
Users:
Operator
Screen Images:
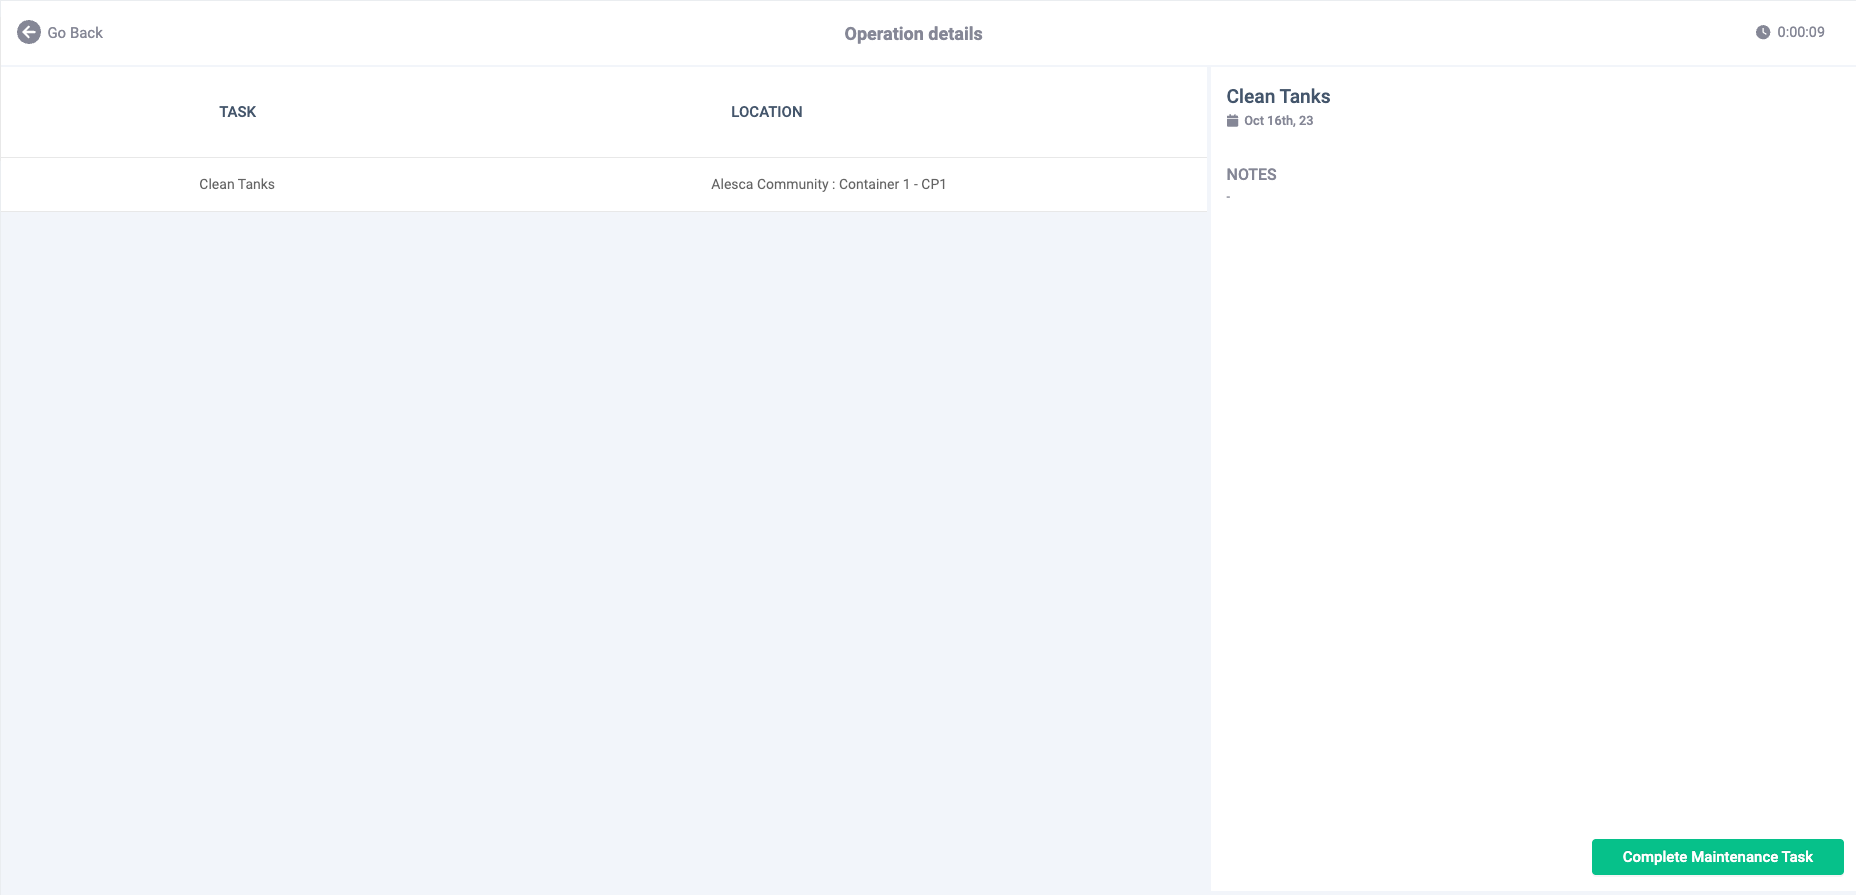
Detail Specifications:
- You can record achievements and complete a task only when the status of the task is Working.
- The status can be set to Working by starting the timer on the task's results registration screen.
- There are no particular items that require input. Once the task is complete, press the "Complete Maintenance Task" button.
Registering simple task results
When to use:
Used when recording simple actions.
Users:
Operator
Screen Images:
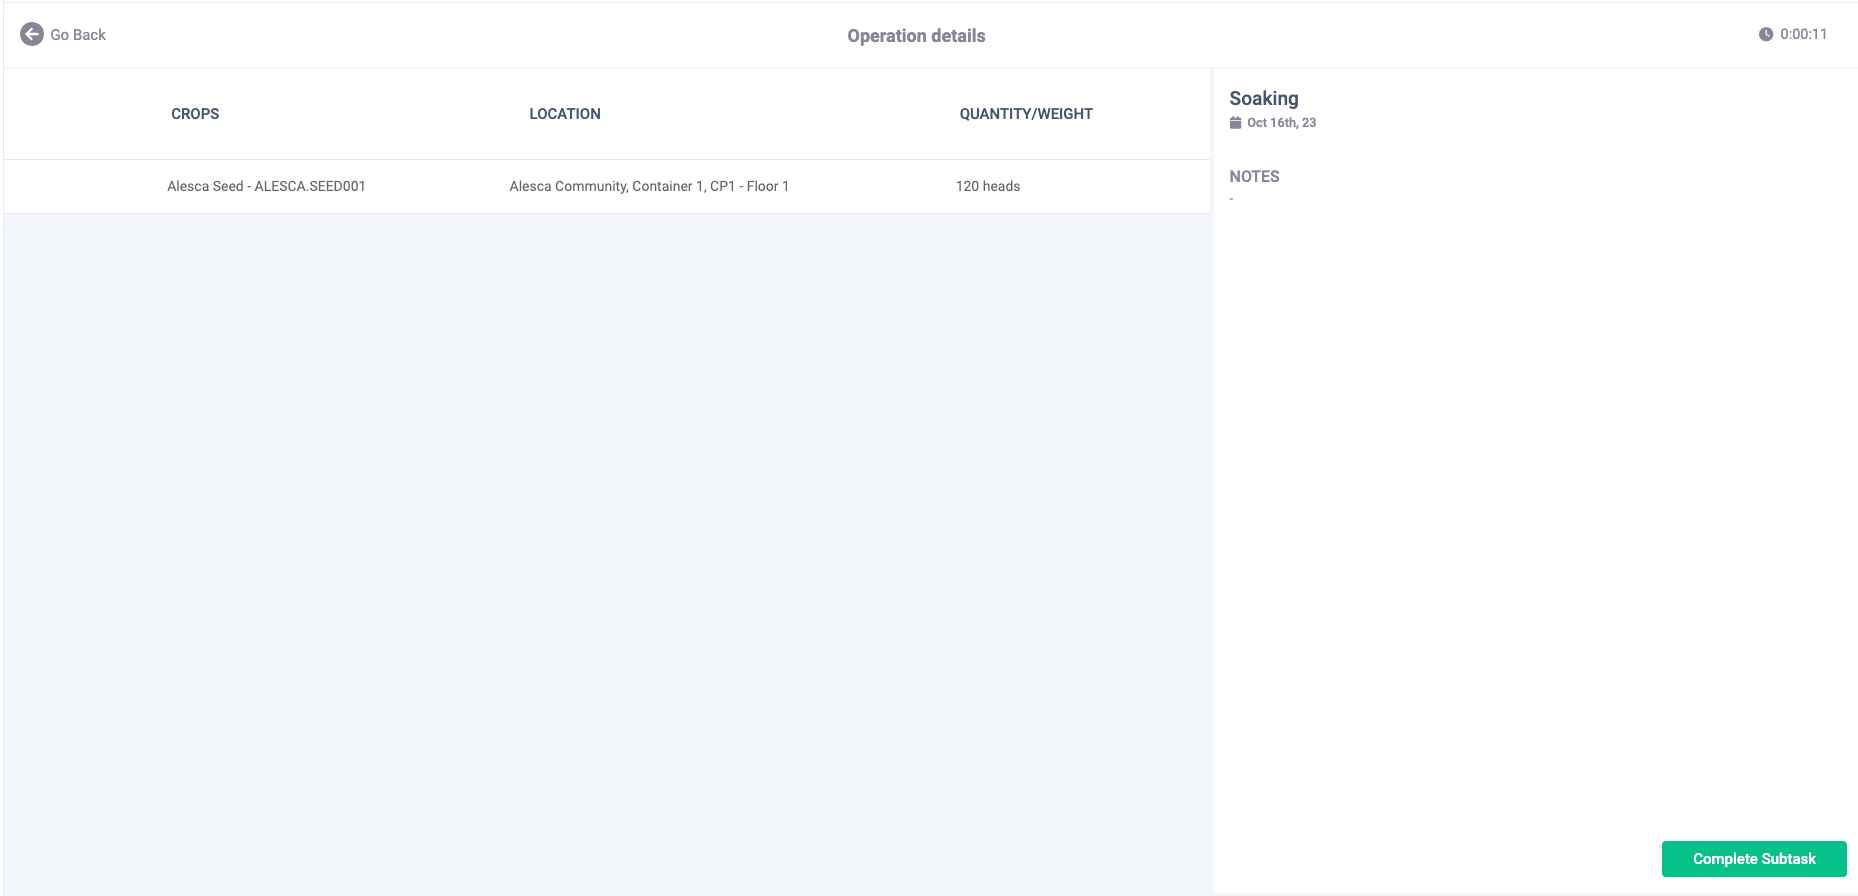
Detail Specifications:
- You can record achievements and complete a task only when the status of the task is Working.
- The status can be set to Working by starting the timer on the task's results registration screen.
- There are no particular items that require input. When the task is complete, press the "Complete Subtask" button.