Automation
Sprout
Display sprout list
When to use:
Use this when you want to check the list of Sprouts installed on the farm.
Users:
Manager
Screen Images:

Detail Specifications:
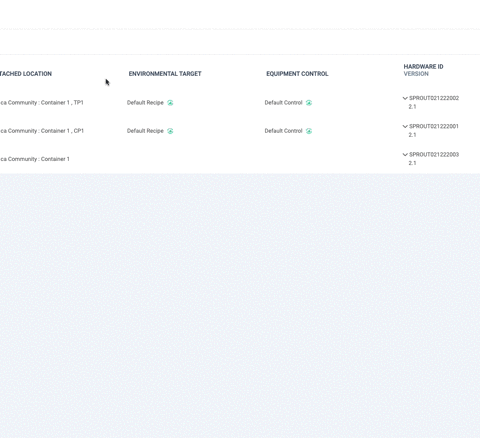
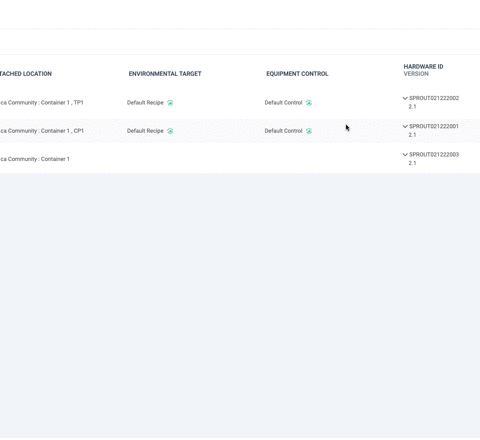
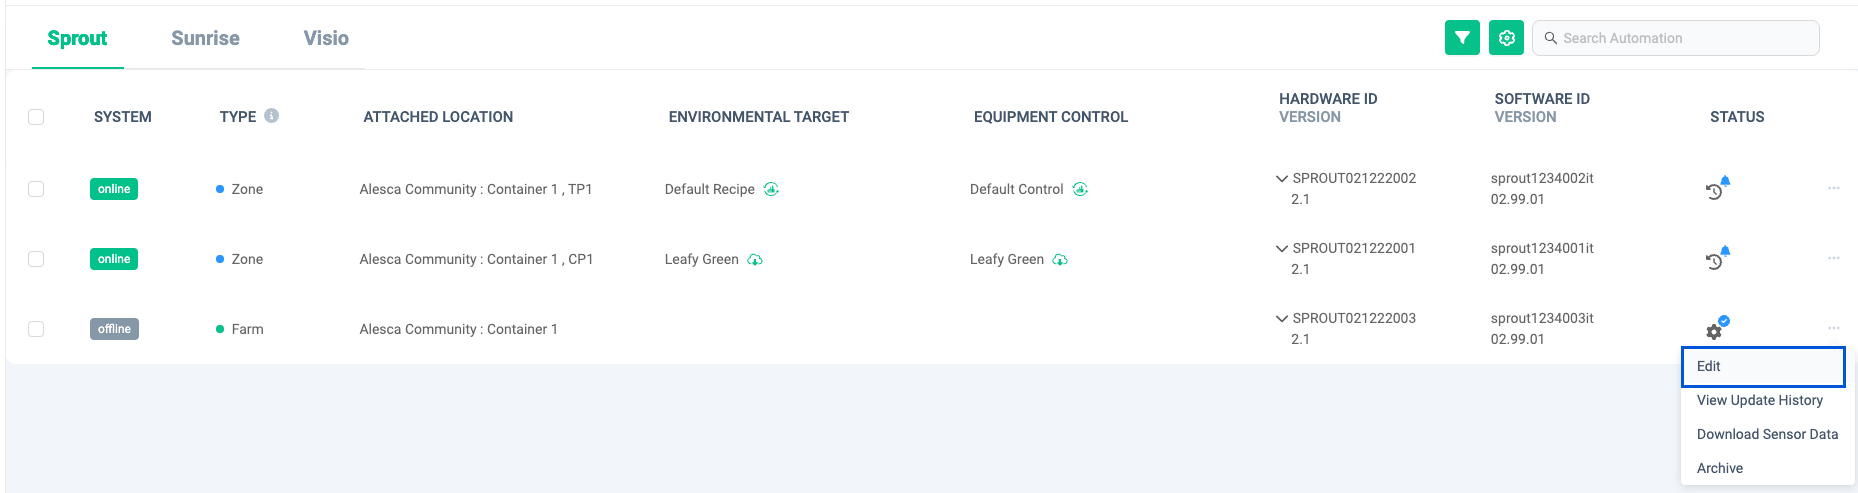
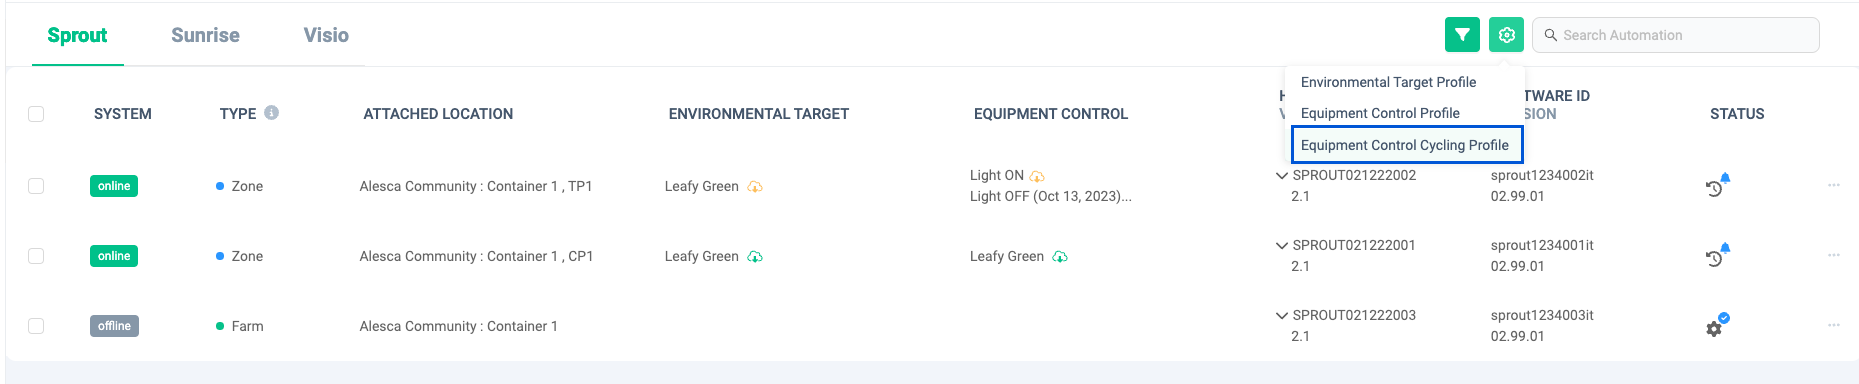
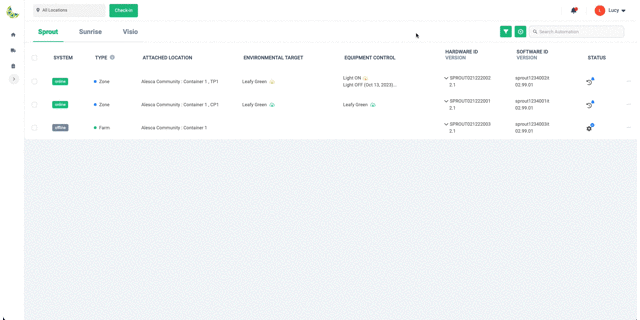
- A list of Sprouts installed on your farm will be displayed.
- From the list, you can check Sprout's network connection status, installation location, environmental target settings, Sprout management settings, hardware ID/Orion ID, and firmware update progress.
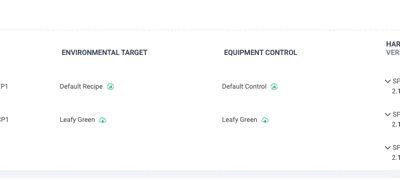
SYSTEM: Display connection status online/offline.TYPE/ATTACHED LOCATION: Displays the name of the area as the Sprout installation location.ENVIRONMENTAL TARGET: Displays the profile name of the currently set environmental goal.EQUIPMENT CONTROL: Displays the currently set Sprout management profile name.HARDWARE ID/SOFTWARE ID/VERSION: Display each ID and current version.STATUS: Displays the progress of firmware update.
- You can search based on the
HARDWARE IDandSOFTWARE IDvalues from the search box at the top right of the screen. - You can check the
SUB CONTROL UNITby clicking the arrow placed to the left ofHARDWARE ID.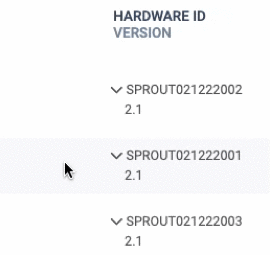
The ENVIRONMENTAL TARGET and EQUIPMENT CONTROL items have various other functions, so let's check them individually.
ENVIRONMENTAL TARGET / EQUIPMENT CONTROL
*The profile name currently set for each Sprout is displayed.

- Click on the profile name to check or edit the current settings.
- You can set up a profile on Sprout using Orion. You can check whether the settings are reflected in Sprout by checking the icon displayed next to the profile name.

| Icon | Status |
|---|---|
| Executed Factory Reset on Sprout and initialized the profile | |
| Changing the profile from the Bluetooth App or Sprout | |
| Changed the profile from Orion and the changes were applied to Sprout | |
| Changed profile from Orion and waiting for changes to be applied to Sprout | |
| While waiting for changes to Sprout, the profile was changed again, so it was overwritten. |
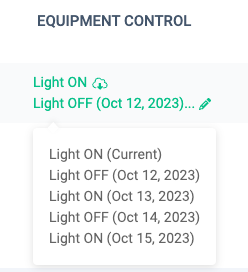
-
You can check the history of profile settings changes. Click the icon displayed to the right of each profile name. You will then see a history of profile changes. Icons indicating the status are also displayed on this history screen.
- History also shows the date you updated your profile and username.
- History also shows the date you updated your profile and username.
-
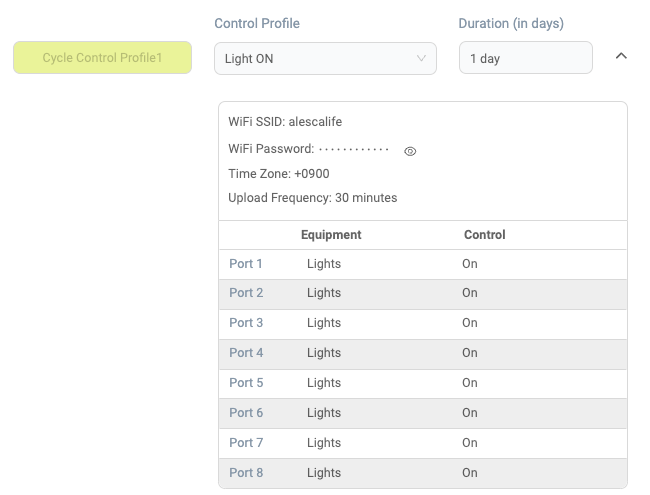
If you set Equipment Control Cycle in the profile, you can check the schedule for the last 5 cycles by hovering over it.
For information on how to edit Environmental Target and Equipment Control profiles, please refer to the description of each function.
Edit Sprout
When to use:
Use this when you want to edit the Sprout installation location, SUB CONTROL UNIT, profile to be set, etc.
Users:
Manager
Screen Images:
Detail Specifications:
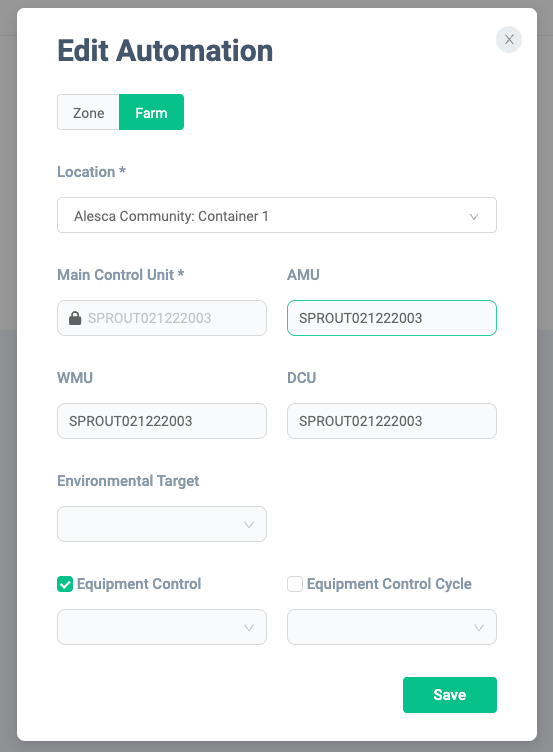
- Click "Edit" from the menu of the Sprout record you want to edit.
- The Sprout edit screen will be displayed. You can edit the location, SUB CONTROL UNIT, and profile (Environmental Target/Equipment Control).
- The profile set for Sprout can only be changed from this screen.
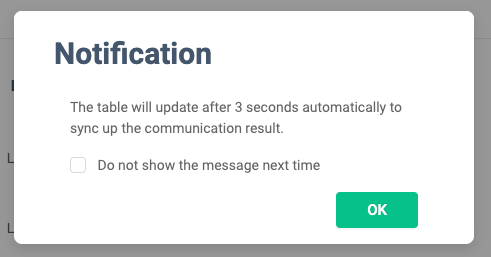
If you set a new profile or change the profile you are setting, send the settings changes to Sprout after saving the changes. In order to reflect the communication results to Sprout, the Sprout list will be automatically reloaded 3 seconds after saving is completed.
The first time you change your profile settings, a notification screen similar to the following will appear. If you do not need to display it next time, check the checkbox and click "OK".
If you want to set up an Equipment Control Cycle profile, see How to set up Equipment Control Cycle.
Add Environmental Target
When to use:
When growing new vegetables on the farm, use this when adding a new Environmental Target suitable for that vegetable.
Users:
Manager
Screen Images:
-
menu

-
Environmental Target list screen
-
Environmental Target setting screen
Detail Specifications:
-
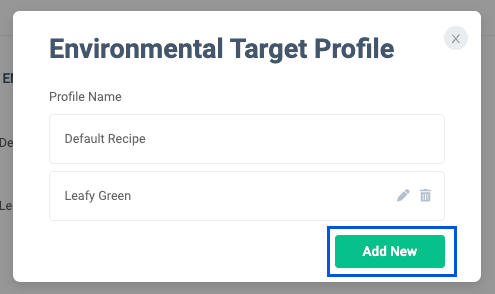
Click the "Sprout Control Profile" button at the top right of the screen, then click "Environmental Target Profile." The Environmental Target list screen will be displayed.
-
The Environmental Target list screen displays Environmental Targets registered in Orion.
-
Click the "Add New" button located at the bottom of the Environmental Target list screen. The Environmental Target setting screen will be displayed.
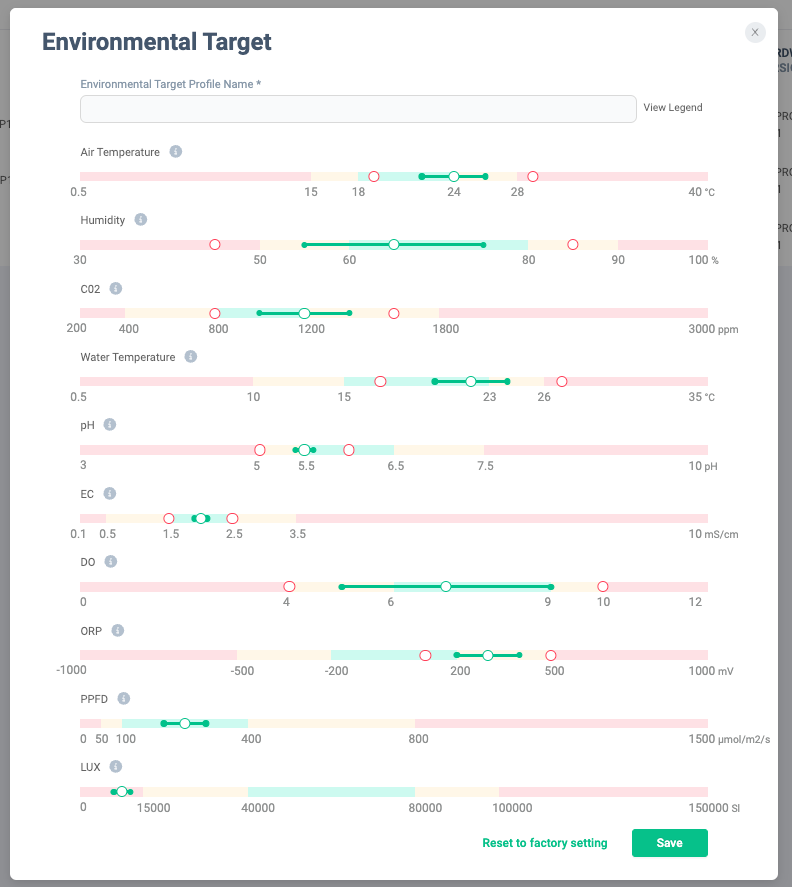
- When creating a new Environmental Target, default setting values will be entered. Feel free to change it.
-
Enter the name you want to set for the Environmental Target.
-
Click "View Legend" to see tips for setting the Environmental Target.
- "Danger Zone", "Warning Zone", and "Optimal Zone" are defaulted to Environmental Target for each sensor key. This default value is displayed based on the case of growing general vegetables.
- By setting "Alert Variation", you can receive notifications when the value exceeds or falls below the set value.
- The system controls the farm environment based on the "Target & Target Variation" settings.

-
Setting values for "Target & Target Variation" can be changed by dragging and dropping.

- If you want to return to the settings before the change, click the "reset" button.
-
The setting value of "Alert Variation" can also be changed by drag and drop.

-
"Alert Variation" settings can be deleted. When you hover over the point, "Delete Alert Variation" will be displayed, so click it. Once deleted, notifications will no longer be sent. After deletion, you can set it again by clicking "Add Alert Variation".

-
If you want to return to the default settings, click "Reset to factory setting" located at the bottom of the screen.
-
Once the Environmental Target settings are complete, enter a name for the profile and click the "Save" button. Saving of the Environmental Target is completed.
Edit Environmental Target
When to use:
Used when changing the Environmental Target settings.
Users:
Manager
Screen Images:
-
menu

-
Environmental Target list screen

Detail Specifications:
- Click the "Sprout Control Profile" button at the top right of the screen, then click "Environmental Target Profile." The Environmental Target list screen will be displayed.
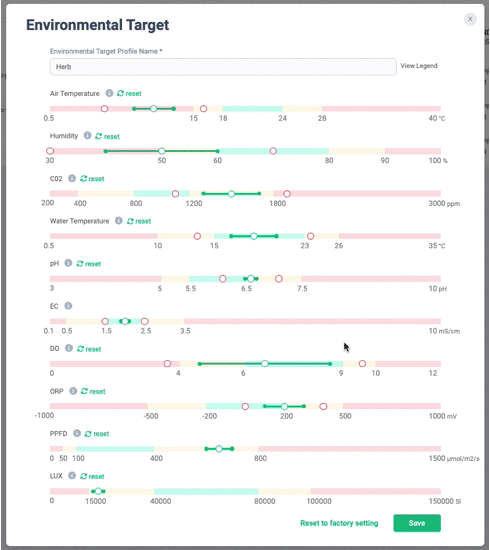
- From the list, click the "Edit" button displayed to the right of the name of the profile you want to edit.
- The Environmental Target editing screen will be displayed with the preset values, so edit the settings as you wish.
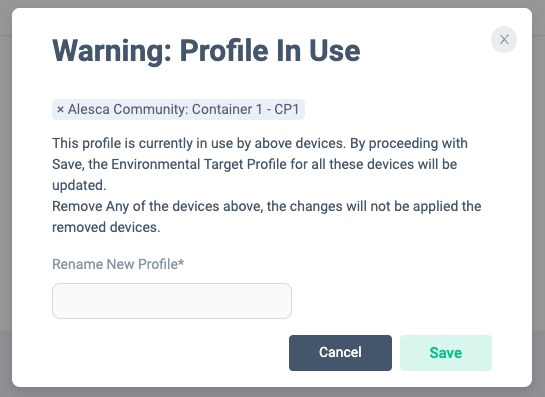
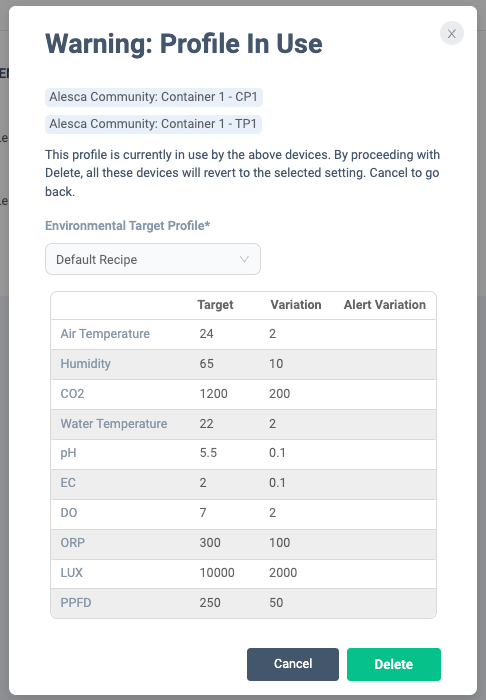
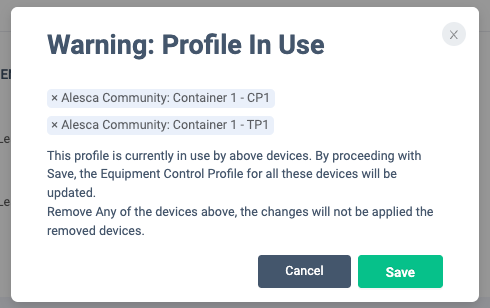
- If the profile to be edited is used by multiple Sprouts, the following warning screen will be displayed.

- If you want to apply the changes to all Sprouts, click "Save".
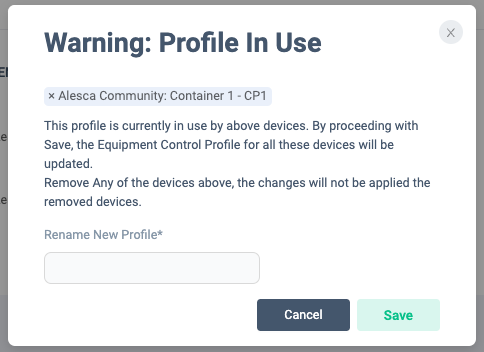
- If there are Sprouts that you do not want to apply changes to, click the "x" to the left of the area name. You can remove it from changes.
- If you remove even one Sprout, you will need to set a new profile name. The profile with the name entered here will be applied to Sprout.
- If you remove even one Sprout, you will need to set a new profile name. The profile with the name entered here will be applied to Sprout.
- Once editing is complete, the edited profile settings will be sent to Sprout.
Environmental Targets can also be edited from the Sprout list screen. Clicking the name of the Environmental Target displayed in the list will take you to the Environmental Target editing screen. The editing procedure and specifications are the same as the previous explanation.
Delete Environmental Targets
When to use:
Used when deleting Environmental Targets.
Users:
Manager
Screen Images:
- menu

- Environmental Target list screen
![]()
Detail Specifications:
- Click the "Sprout Control Profile" button at the top right of the screen, then click "Environmental Target Profile." The Environmental Target list screen will be displayed.
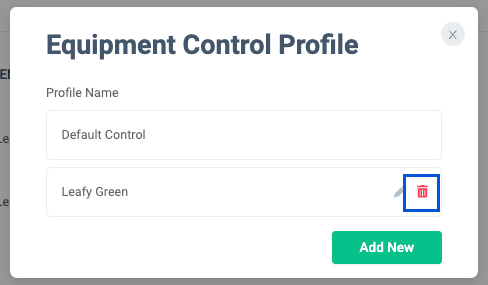
- From the list, click the "Delete" button displayed to the right of the name of the profile you want to delete.
- If the profile to be deleted is being used by Sprout, the following warning screen will be displayed.
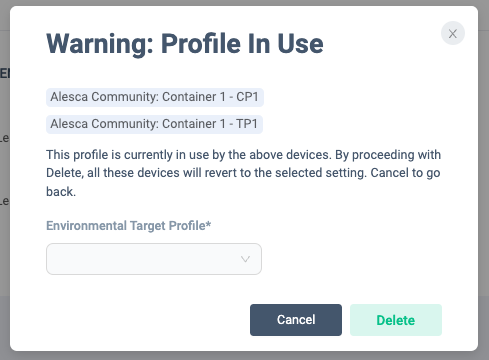
- Select the profile you want to set instead of the profile you want to delete and click "Delete".
- Select the profile you want to set instead of the profile you want to delete and click "Delete".
Add Equipment Control
When to use:
Use this when you want to register new Equipment Control settings.
Users:
Manager
Screen Images:
- menu

- Equipment control list
- Equipment Control setting screen
Detail Specifications:
-
Click the "Sprout Control Profile" button at the top right of the screen, and then click "Equipment Control Profile." The Equipment Control list screen will be displayed.
-
The Equipment Control list screen displays Equipment Controls registered in Orion.
-
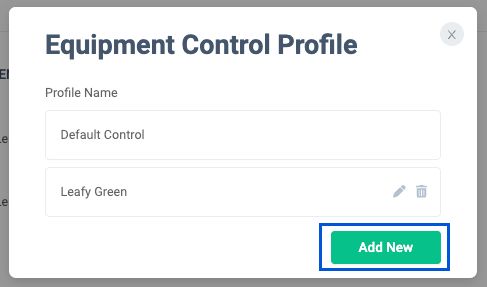
Click the "Add New" button located at the bottom of the Equipment Control list screen. The Equipment Control setting screen will be displayed.
-
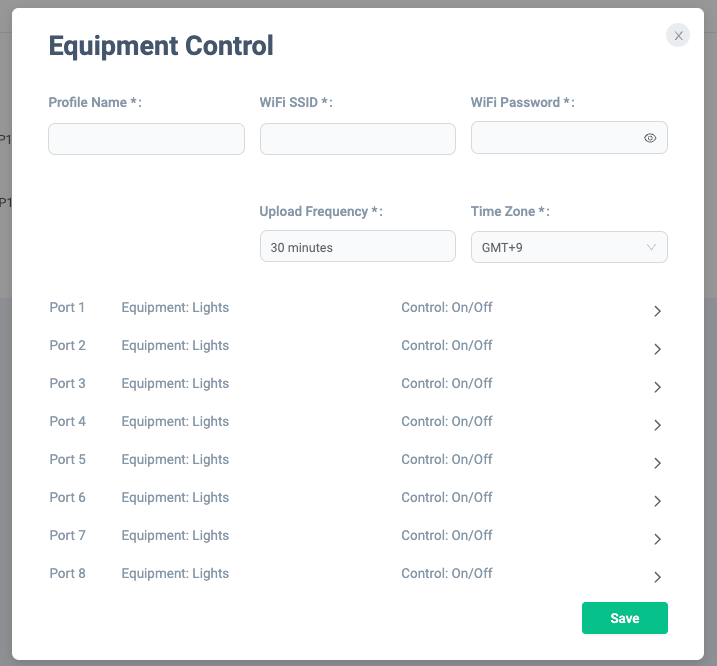
Name, WiFi SSID, WiFi Password, Upload Frequency, and Time Zone are required fields. Let's enter it.
-
You can set the device to be controlled for each Sprout port. For port settings,
EquipmentandControlcan be set respectively.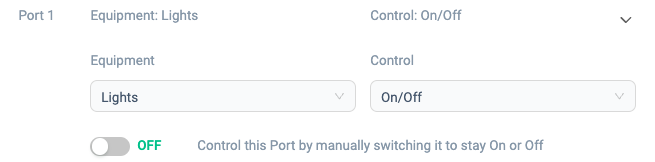
Equipment: Air Pump, Chiller, Fans, Lights, Sunrise, Water PumpControl: On/Off, Schedule, Cycle- On/Off: Port ON/OFF settings can be switched with a switch.
- Schedule: You can specify the time to turn on the port and the time to turn it off.
- Cycle: You can specify the ON period, OFF period, and time to start the cycle.
-
After completing the port settings, click the "Save" button. Equipment Control is now saved.
Items that are grayed out can only be set by Alesca members.
Edit Equipment Control
When to use:
Used when editing the contents of Equipment Control.
Users:
Manager
Screen Images:
- menu

- Equipment control list

Detail Specifications:
- Click the "Sprout Control Profile" button at the top right of the screen, and then click "Equipment Control Profile." The Equipment Control list screen will be displayed.
- From the list, click the "Edit" button displayed to the right of the name of the profile you want to edit.
- The Equipment Control editing screen will be displayed with the set values, so edit the settings as you wish.
- If the profile to be edited is used by multiple Sprouts, the following warning screen will be displayed.
- If you are happy to apply the changes to all Sprouts, click "Save".
- If there are Sprouts that you do not want to apply changes to, click the "x" to the left of the area name. You can remove it from changes.
-
If you remove even one Sprout, you will need to set a new profile name. The profile with the name entered here will be applied to Sprout.
-
- Once editing is complete, the edited profile settings will be sent to Sprout.
Equipment Control can also be edited from the Sprout list screen. Clicking the Equipment Control name displayed in the list will take you to the Equipment Control editing screen. The editing procedure and specifications are the same as the previous explanation.
Delete Equipment Control
When to use:
Used when deleting Equipment Control.
Users:
Manager
Screen Images:
- menu

- Equipment control list
Detail Specifications:
- Click the "Sprout Control Profile" button at the top right of the screen, and then click "Equipment Control Profile." The Equipment Control list screen will be displayed.
- From the list, click the "Delete" button displayed to the right of the name of the profile you want to delete.
- If the profile to be deleted is being used by Sprout, the following warning screen will be displayed.
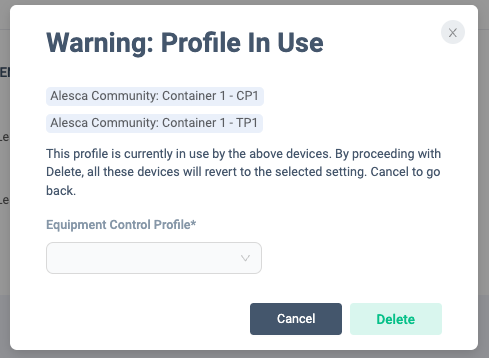
- Select the profile you want to set instead of the profile you want to delete and click "Delete".
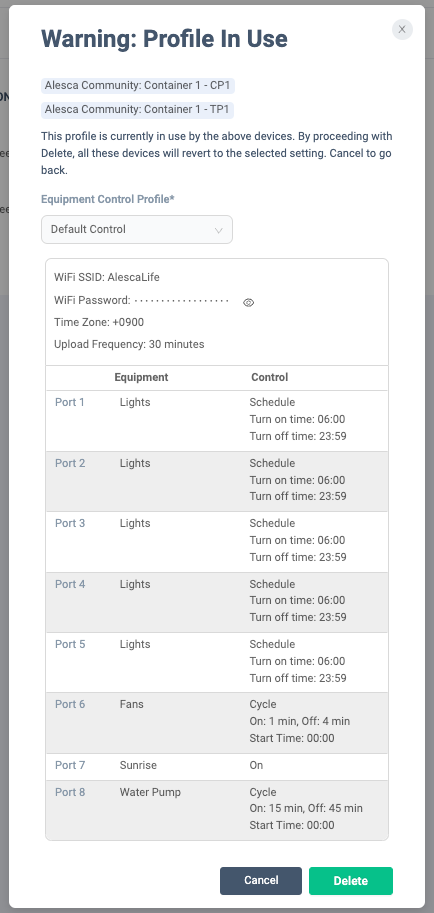
- Select the profile you want to set instead of the profile you want to delete and click "Delete".
Add Equipment Control Cycle
When to use:
If you want to switch the Equipment Control profile at a specified period (in days), you can set Equipment Control in cycles. Use this when adding this setting profile.
Users:
Manager
Screen Images:
- menu

- Equipment control cycle list
- Equipment Control Cycle setting screen
Detail Specifications:
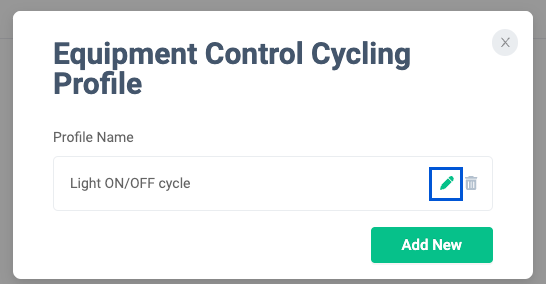
- Click the "Sprout Control Profile" button at the top right of the screen, and then click "Equipment Control Cycle Profile." The Equipment Control Cycle list screen will be displayed.
- The Equipment Control Cycle list screen displays Equipment Control cycles registered in Orion.
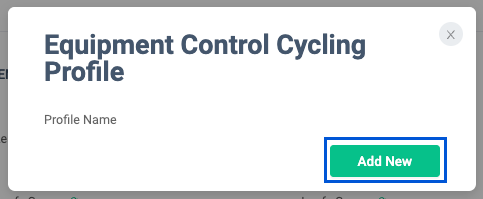
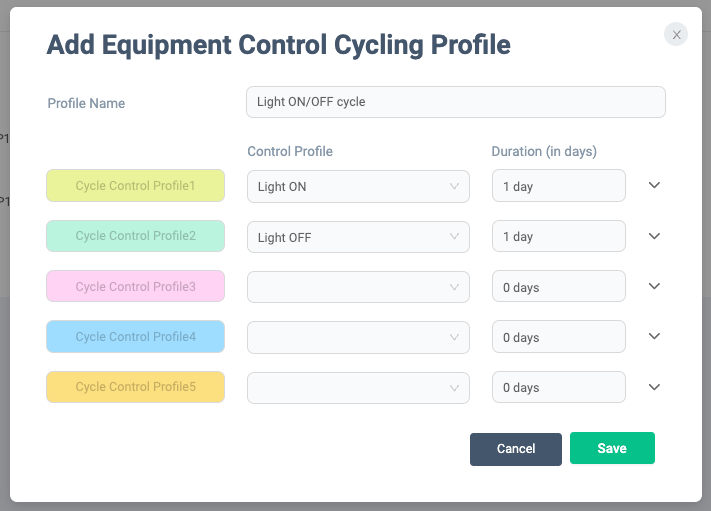
- Click the "Add New" button located at the bottom of the Equipment Control Cycle list screen. The Equipment Control Cycle setting screen will be displayed.
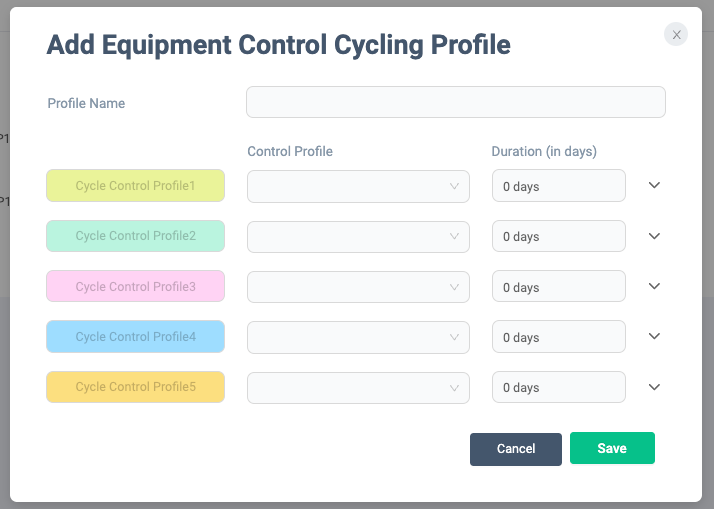
*Up to 5 Equipment Control profiles can be set as a cycle.

- Select the profile you want to set for the cycle from
Control Profile - Enter the number of days to continue the profile in
Duration - You can check the contents of the selected profile by clicking the arrow on the right end of each record.
- Select the profile you want to set for the cycle from
- The number of times the cycle itself is repeated is set at the same time when setting the profile in Sprout.
- Once you have completed entering the cycle, click the "Save" button.
How to set Equipment Control Cycle
- Open the Sprout edit screen. Check the
Equipment Control Cyclecheckbox and select a profile.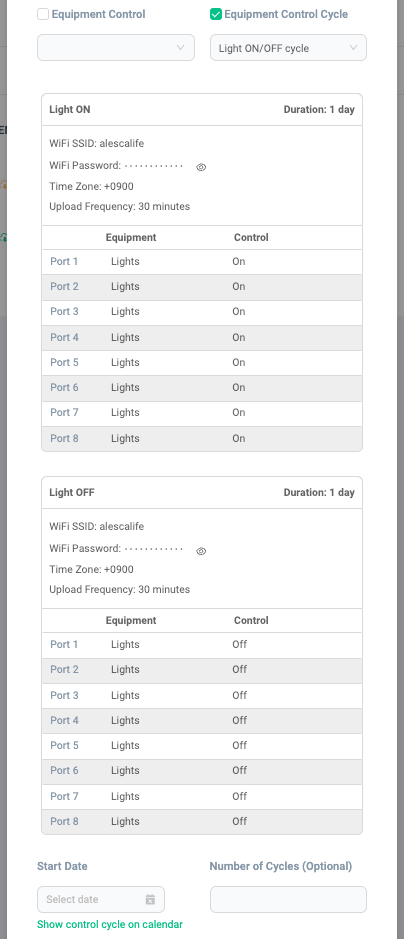
Start DateandNumber of Cyclesinput items will be displayed. Enter the date you want the cycle to start and how many times you want the cycle to repeat.- If you leave
Number of Cyclesblank, you can set the cycle to repeat indefinitely.
- If you leave
- You can check the cycle repeat contents in calendar format. After entering the
Start DateandNumber of Cycles, click "Show control cycle on calendar".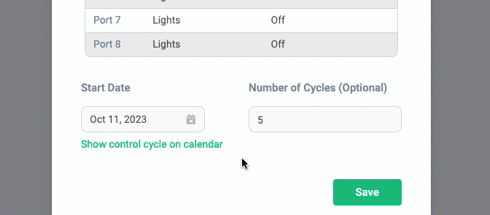
Edit Equipment Control Cycle
When to use:
Used when changing the settings of the Equipment Control cycle.
Users:
Manager
Screen Images:
- menu
- Equipment control cycle list
Detail Specifications:
- Click the "Sprout Control Profile" button at the top right of the screen, and then click "Equipment Control Cycle Profile." The Equipment Control Cycle list screen will be displayed.
- From the list, click the "Edit" button displayed to the right of the name of the profile you want to edit.
- The Equipment Control Cycle editing screen will be displayed with the set values, so edit the settings as you wish.
- When you're done editing, press "Save" to apply your edits.
Delete Equipment Control Cycle
When to use:
Used when deleting Equipment Control Cycle.
Users:
Manager
Screen Images:
- menu

- Equipment control cycle list
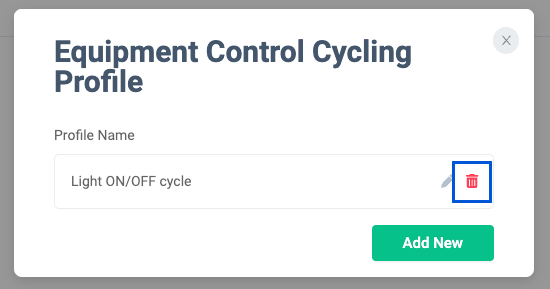
Detail Specifications:
- Click the "Sprout Control Profile" button at the top right of the screen, and then click "Equipment Control Cycle Profile." The Equipment Control Cycle list screen will be displayed.
- From the list, click the "Delete" button displayed to the right of the name of the profile you want to delete.
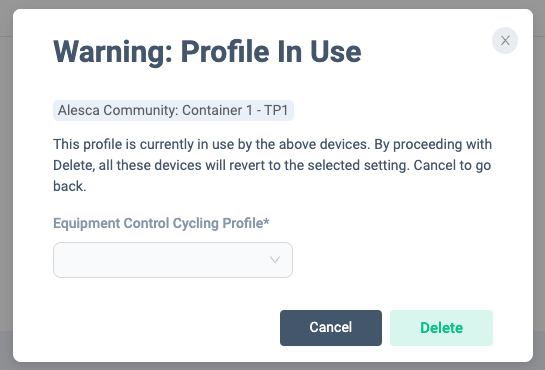
- If the profile to be deleted is being used by Sprout, the following warning screen will be displayed. Set up a replacement profile and click Delete.
Sprout filtering/sorting
When to use:
Use this when you want to filter or sort the Sprout list.
Users:
Manager
Screen Images:
Detail Specifications:
- Click the "Filter" button at the top right of the screen.
- Connection status, type, SW version, HW version, Environmental Target, Equipment Control, upgrade status, and area can be used simultaneously as filter conditions.
- Connection status, Orion ID, hardware ID, SW version, HW version, upgrade status, and area can be used simultaneously as sorting conditions.
- Check the conditions you want to display and click the "Save" button to apply them to the list.
- Click the "Clear" button to reset the conditions.
Check Sprout upgrade history
When to use:
Use this to check the upgrade history of Sprout's firmware version.
Users:
Manager
Screen Images:

Detail Specifications:
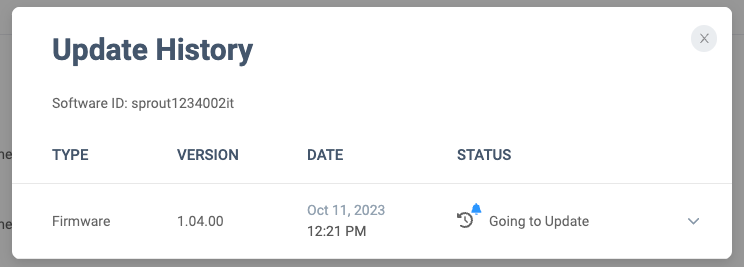
- Click "View Update History" from the Sprout menu to check the firmware upgrade history. Past upgrade history is displayed.
Download sensor data
When to use:
Used when downloading sensor data in CSV format.
Users:
Manager
Screen Images:

Detail Specifications:
- Click "Download Sensor Data" from the Sprout menu for which you want to download sensor data. You can download sensor data for the past 30 days in CSV format.
Sunrise
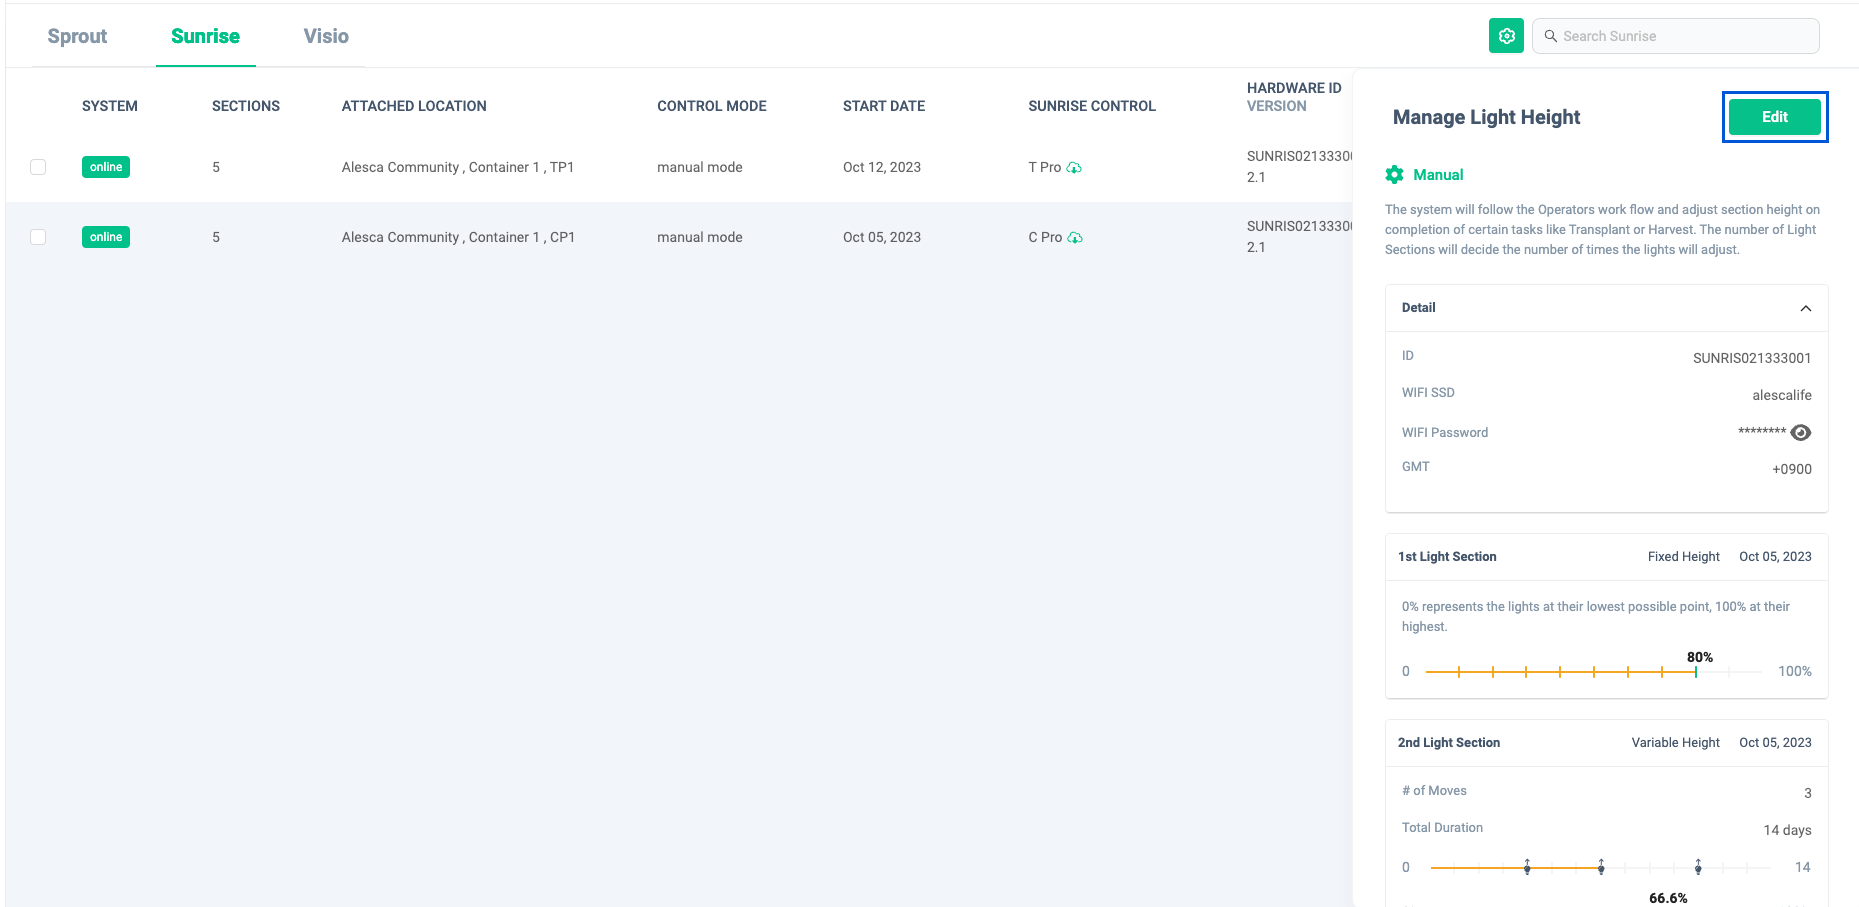
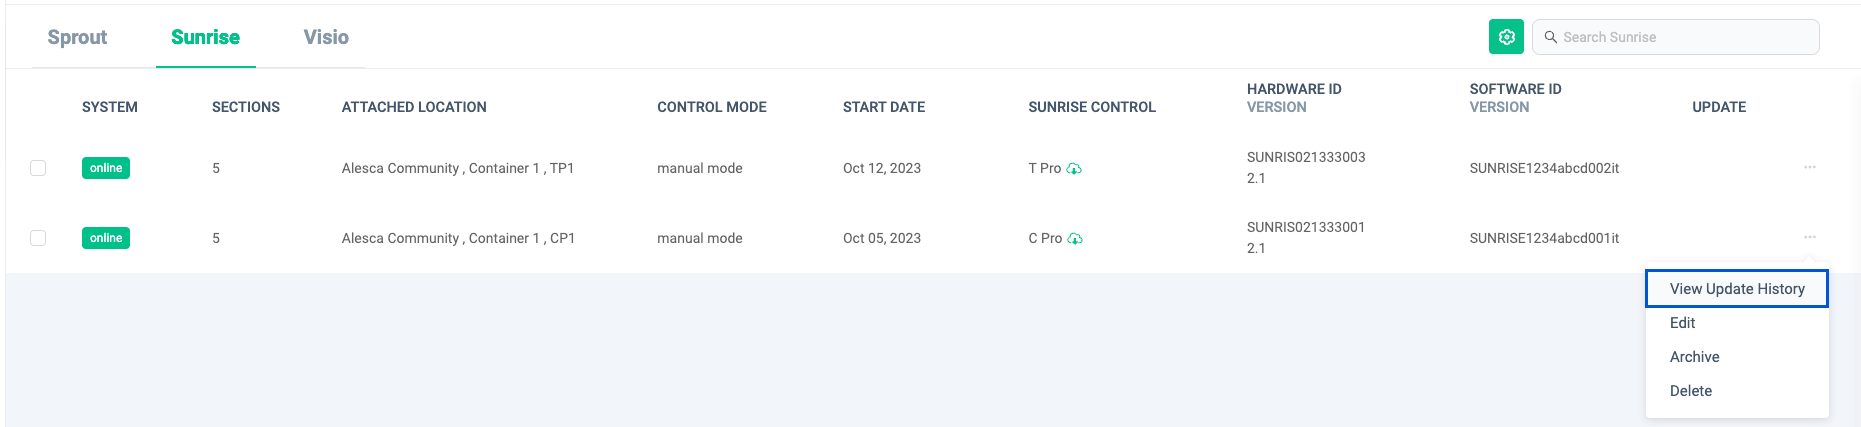
Display Sunrise list
When to use:
Use this when you want to check the list of Sunrise installed on the farm.
Users:
Manager
Screen Images:

Detail Specifications:
-
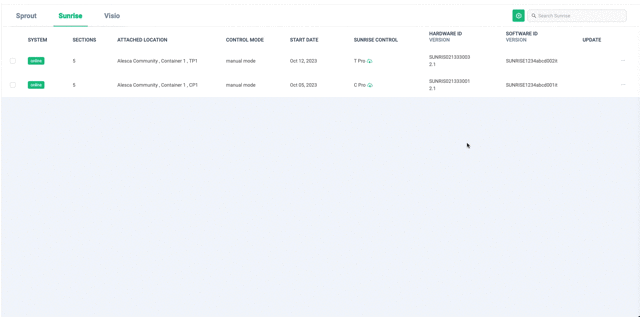
A list of Sunrise installed on your farm will be displayed.
-
From the list, you can check the Sunrise network connection status, number of sections, installation location, control mode, Sunrise management settings, hardware ID/Orion ID, and firmware update progress.
SYSTEM: Display connection status online/offline.SECTIONS: Displays the number of sections in Sunrise.ATTACHED LOCATION: Displays the name of the area where Sunrise is installed.CONTROL MODE: Displays the control mode set in the Sunrise management profile.SUNRISE CONTROL: Displays the currently configured Sunrise management profile name.HARDWARE ID``/SOFTWARE ID/VERSION: Display each ID and current version.UPDATE: Displays the progress of firmware update.
-
You can search based on the
HARDWARE IDandSOFTWARE IDvalues from the search box at the top right of the screen. -
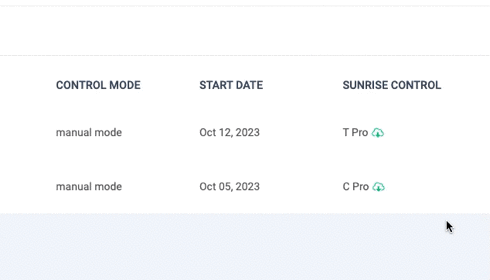
You can check the history of profile settings changes. Click the icon displayed to the right of each profile name. A history of profile changes is displayed.
-
You can check the current Sunrise height status by clicking on the Sunrise record.
Sunrise height status
- Clicking on a Sunrise record will display details about Sunrise's height status on the right side of the screen. The displayed contents differ depending on whether the control method is
Fixed HeightorVariable Height. Let's check them in order.
Fixed Height
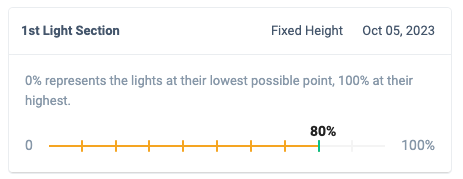
- The orange line is the predicted height calculated from the registered values. The green line is the actual height that reflects the communication results from Sunrise.
Variable Height
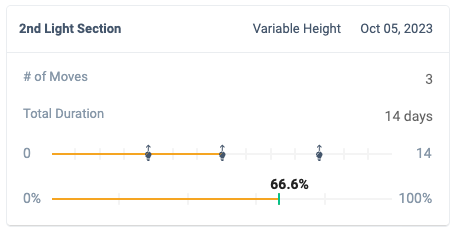
- The upper line shows the timing when the height will change, calculated based on
Total Durationand# of Moves. The height changes depending on the number of days the electricity icon is placed. - The bottom line shows the predicted and current height. The orange line is the predicted height, and the green line is the actual height that reflects the communication results from Sunrise.
Editing Sunrise
When to use:
Use this when you want to edit the installation location of Sunrise.
Users:
Manager
Screen Images:
Detail Specifications:
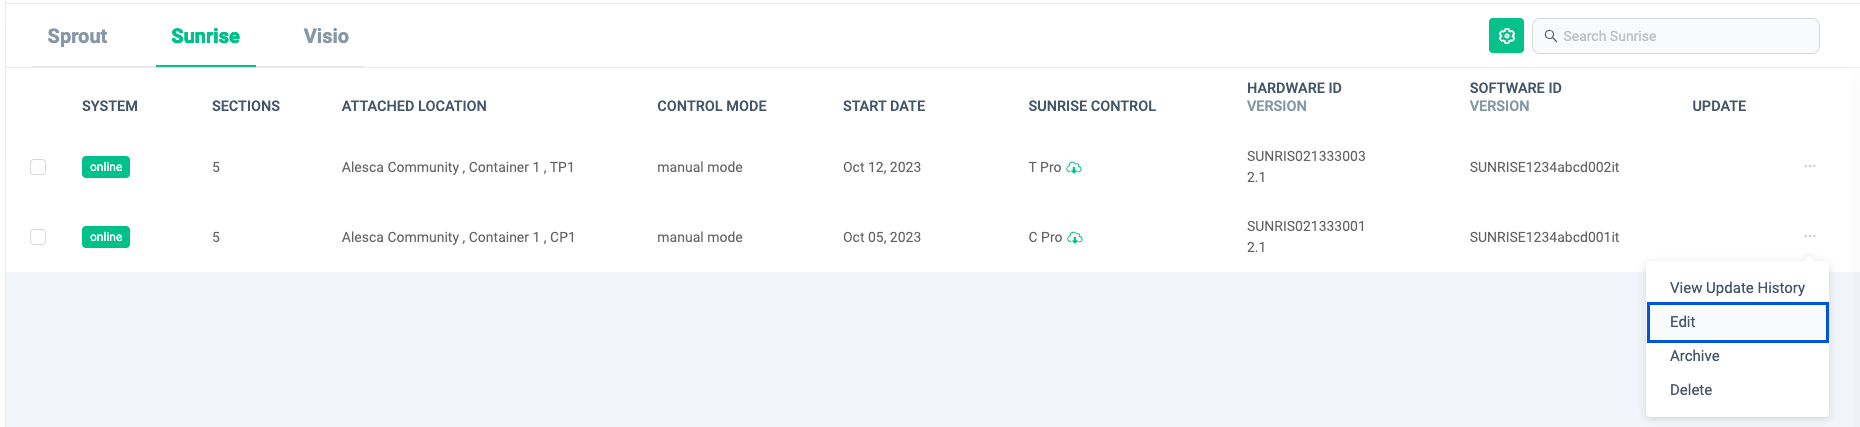
- Click "Edit" from the menu of the Sunrise record you want to edit.
- The Sunrise editing screen will be displayed. You can edit the location.
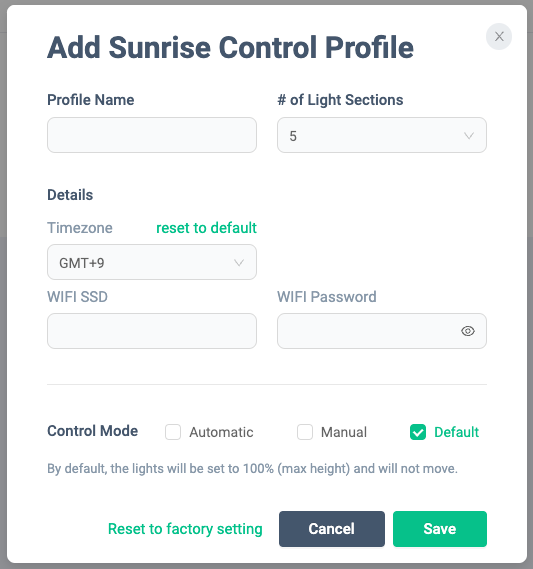
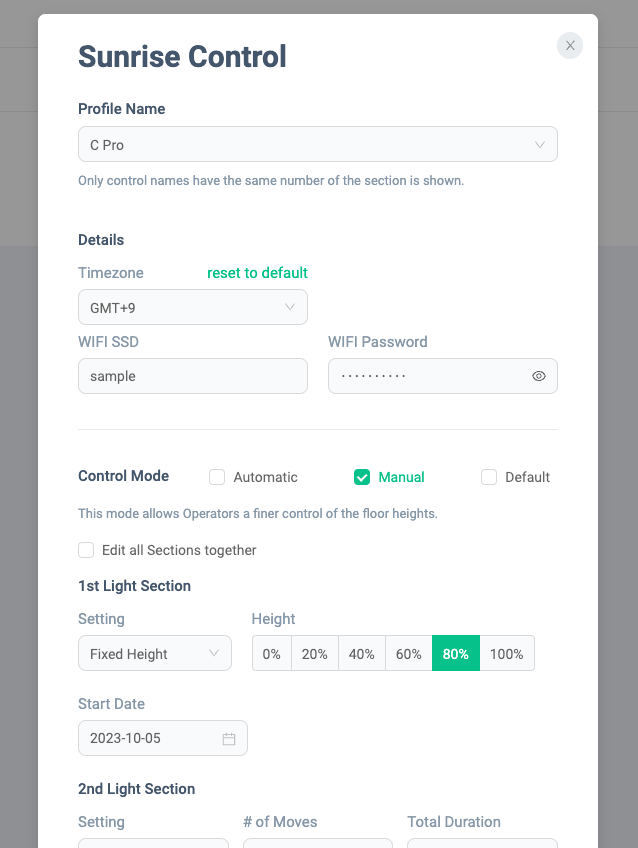
Add Sunrise Control
When to use:
Use this when you want to register new Sunrise Control settings.
Users:
Manager
Screen Images:
- menu

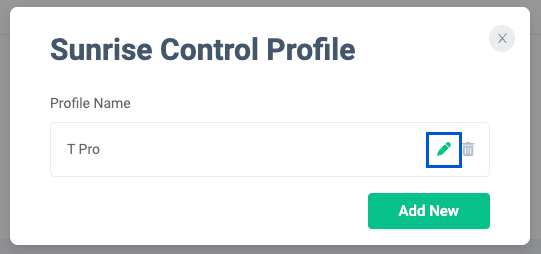
- Sunrise Control list
- Sunrise Control setting screen
Detail Specifications:
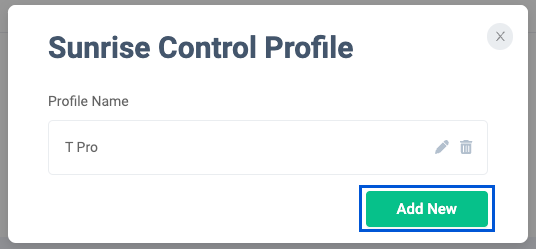
-
Click the "Sunrise Control Profile" button at the top right of the screen, and then click "Sunrise Control Profile." The Sunrise Control list screen will be displayed.
-
The Sunrise Control list screen displays Sunrise Controls registered in Orion.
-
Click the "Add New" button located at the bottom of the Sunrise Control list screen. The Sunrise Control settings screen will be displayed.
-
"# of Light Sections" represents the number of sections controlled by Sunrise. If there are 4 sections, select
4, and if there are 5, select5.
-
Control Mode can be selected from
Default,Manual, andAutomatic. Let's check them in order.
Default
-
If you select Default, the height of the shelf will be fixed at 100%. The default setting value is Default.

Manual
- If you select Manual, you can freely customize the height of the shelf.

- The height will be set for the number of values selected in "# of Light Sections".
- Height can be set from two types:
Fixed HeightandVariable Height.Fixed Height: You can set a fixed height in 20% increments from 0% to 100%.
Variable Height: You can set the number of# of Movesand height to change automatically during the number of days ofTotal Duration. The height is automatically calculated and adjusted by the system.
Automatic
- If you select Automatic and set
Total Durationand# of Move, the height will be automatically adjusted according to the progress of the tasks in the cultivation plan.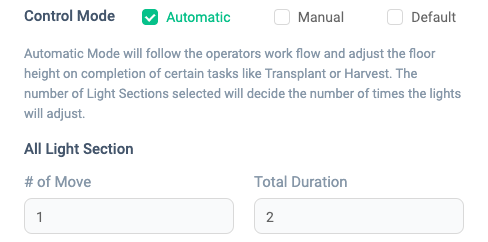
Once you have completed entering all setting items, click "Save" to save.
Edit Sunrise Control
When to use:
Used when editing the contents of Sunrise Control.
Users:
Manager
Screen Images:
- menu

- Sunrise Control list
Detail Specifications:
- Click the "Sunrise Control Profile" button at the top right of the screen, and then click "Sunrise Control Profile." The Sunrise Control list screen will be displayed.
- From the list, click the "Edit" button displayed to the right of the name of the profile you want to edit.
- The Sunrise Control editing screen will be displayed with the preset values, so edit the settings as you wish.
- If the profile to be edited is being used by Sunrise, the following warning screen will be displayed.
- You will need to select a new start date to apply your edits to Sunrise. Let's choose.
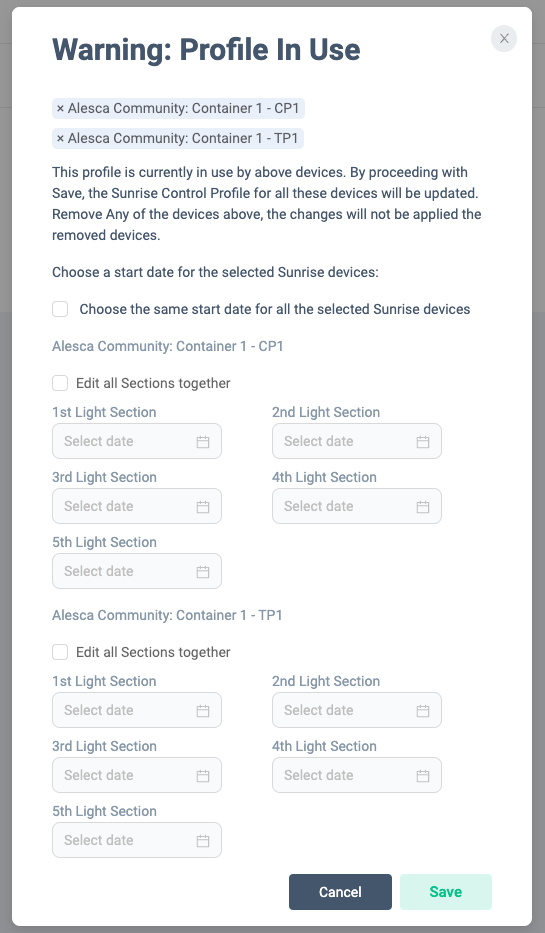
- If you want to set the same start date for all Sunrises, check the following checkbox.
- If you want to set the same start date for all shelves, check the following checkbox.

- You will need to select a new start date to apply your edits to Sunrise. Let's choose.
- Click "Save" when you are finished editing.
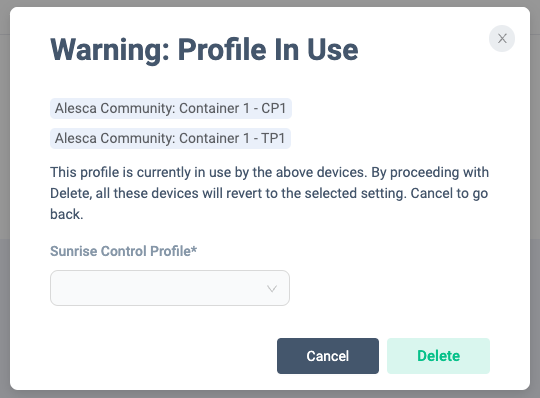
Delete Sunrise Control
When to use:
Used when deleting Sunrise Control.
Users:
Manager
Screen Images:
- menu

- Sunrise Control list
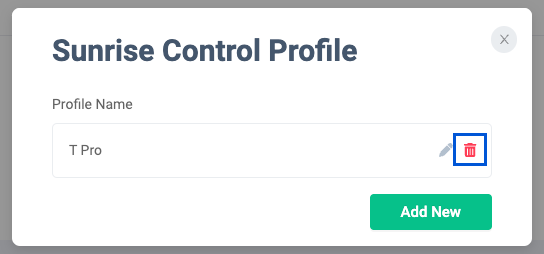
Detail Specifications:
- Click the "Sunrise Control Profile" button at the top right of the screen, and then click "Sunrise Control Profile." The Sunrise Control list screen will be displayed.
- From the list, click the "Delete" button displayed to the right of the name of the profile you want to delete.
- If the profile to be deleted is being used by Sunrise, the following warning screen will be displayed. Set up a replacement profile and click Delete.
Applying Sunrise Control
When to use:
Used when applying Sunrise Control profiles to Sunrise.
Users:
Manager
Screen Images:
Detail Specifications:
-
Click on the Sunrise record you want to apply or change the profile to display the height status screen. Click the "Edit" button located in the upper right corner. The Sunrise Control application screen will be displayed.
-
Select the profile you want to apply this time from "Profile Name". The values of the selected profile will be reflected in each input item.
-
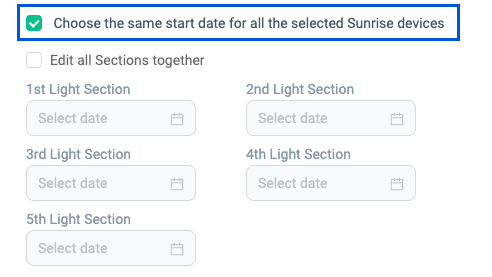
Enter the "Start Date" for all sections. If you want to apply all sections from the same date, you can do so by clicking "Edit all Sections together".

-
When you have completed the input, click "Update". The profile has been applied to Sunrise.
Check Sunrise upgrade history
When to use:
Use this to check the upgrade history of Sunrise's firmware version.
Users:
Manager
Screen Images:
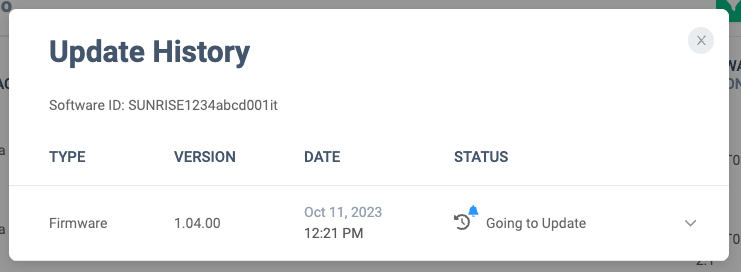
Detail Specifications:
- Click "View Update History" from the Sunrise menu to check the firmware upgrade history. Past upgrade history is displayed.