Farm Profile
Site
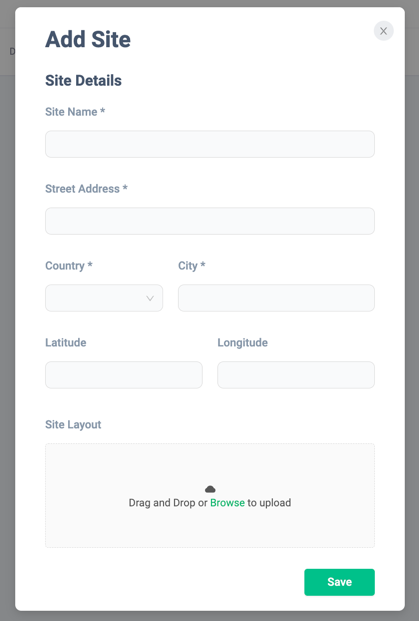
Add site
When to use:
This is used when the farm installation is complete and the software starts managing the farm. Register the site data as part of the farm registration process.
Users:
Manager
Screen Images:
Detail Specifications:
- Click the "+" button at the top right of the farm profile screen to display the site addition screen. On the screen that appears, enter the site name and address, which are required fields, and click "Save."
- Entering longitude and latitude is optional, but by entering them you will be able to check weather information on the dashboard. If necessary, check and enter the longitude and latitude of the area where the site will be located.
- You can save site layout files. Only PDF files can be saved as file formats. File names can only be 50 characters or less, including the extension.
- Saved site layout files can now be downloaded from the site record.
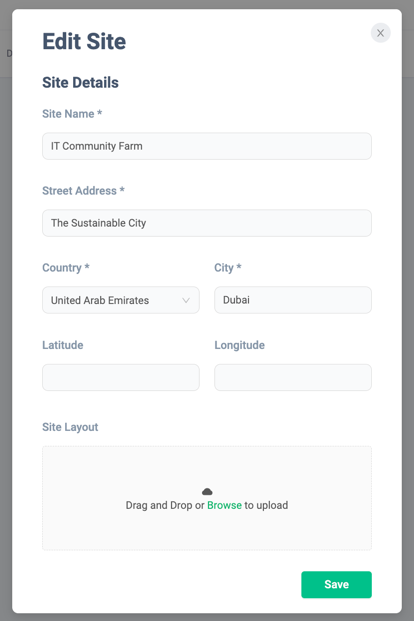
Edit site
When to use:
Used when editing site information.
Users:
Manager
Screen Images:

Detail Specifications:
- Click "Edit" from the three-dot menu located at the right end of the site record you want to edit. The site editing screen will then be displayed with the information for the site currently being registered filled in.
- Change the input contents of the items you want to edit and click "Save".
- Required items and specifications for each item are the same as Add site.
Archive site
When to use:
Used to temporarily stop using the site and archive site information.
Users:
Manager
Screen Images:

Detail Specifications:
- Click "Archive" from the three-dot menu located at the right end of the record of the site you want to archive. The target site will then be archived.
- Archived sites can be deleted.
Unarchive site
When to use:
Used to unarchive site information.
Users:
Manager
Screen Images:

Detail Specifications:
- Click "Unarchive" from the three-dot menu located at the right end of the record of the site you want to unarchive. The target site will be unarchived.
Delete site
When to use:
Used to delete information on the site.
Users:
Manager
Screen Images:

Detail Specifications:
- Make sure the status of the site you want to delete is Archived. Only archived sites can be deleted.
- Click "Delete" from the three-dot menu located at the right end of the record for the site you want to delete. A deletion confirmation dialog will be displayed, so click "OK". Site deletion is complete.
- If you delete a site, all facility, zone, and subzone data included in the site will also be deleted. Please be careful when deleting.
- When you delete a site, the layout files saved on the site will also be deleted. Please be sure to download it in advance if you need it. Restoration after deletion is not possible.
Facility
Add facility
When to use:
Use this to add data once the container is installed and the software can begin managing the facility.
Users:
Manager
Screen Images:
![]()
Detail Specifications:
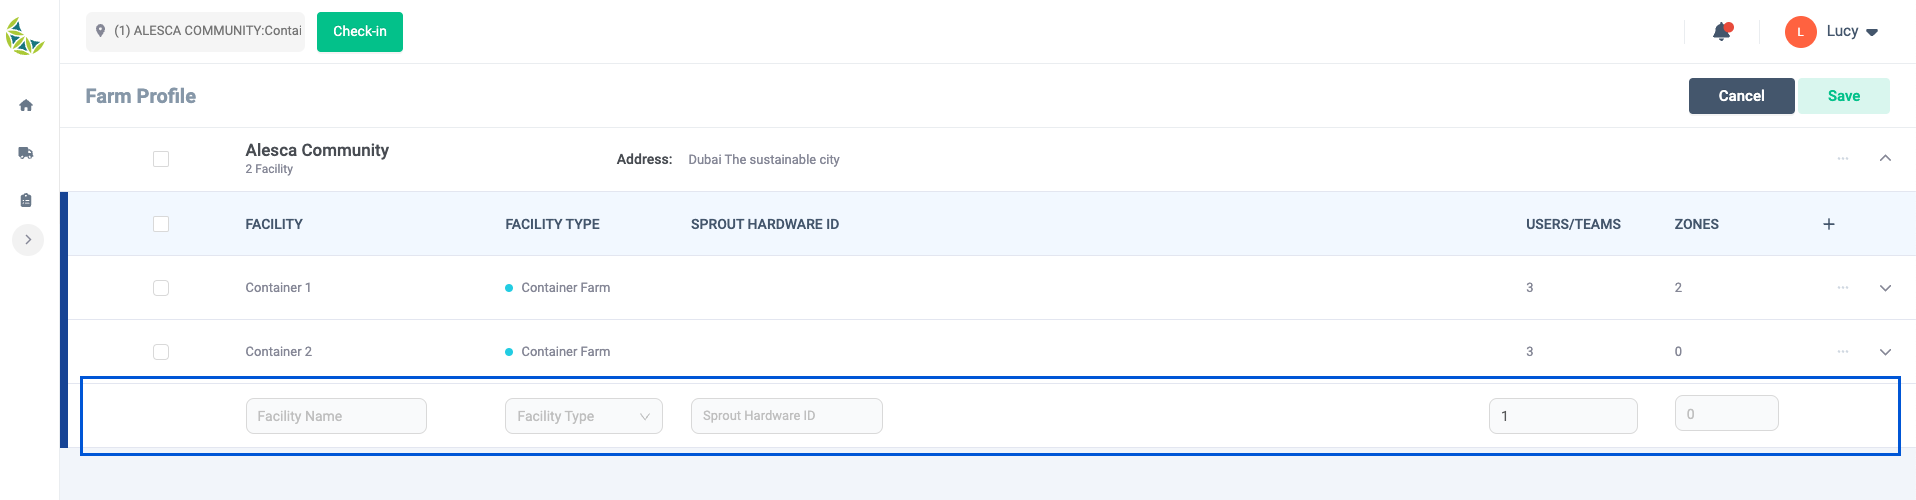
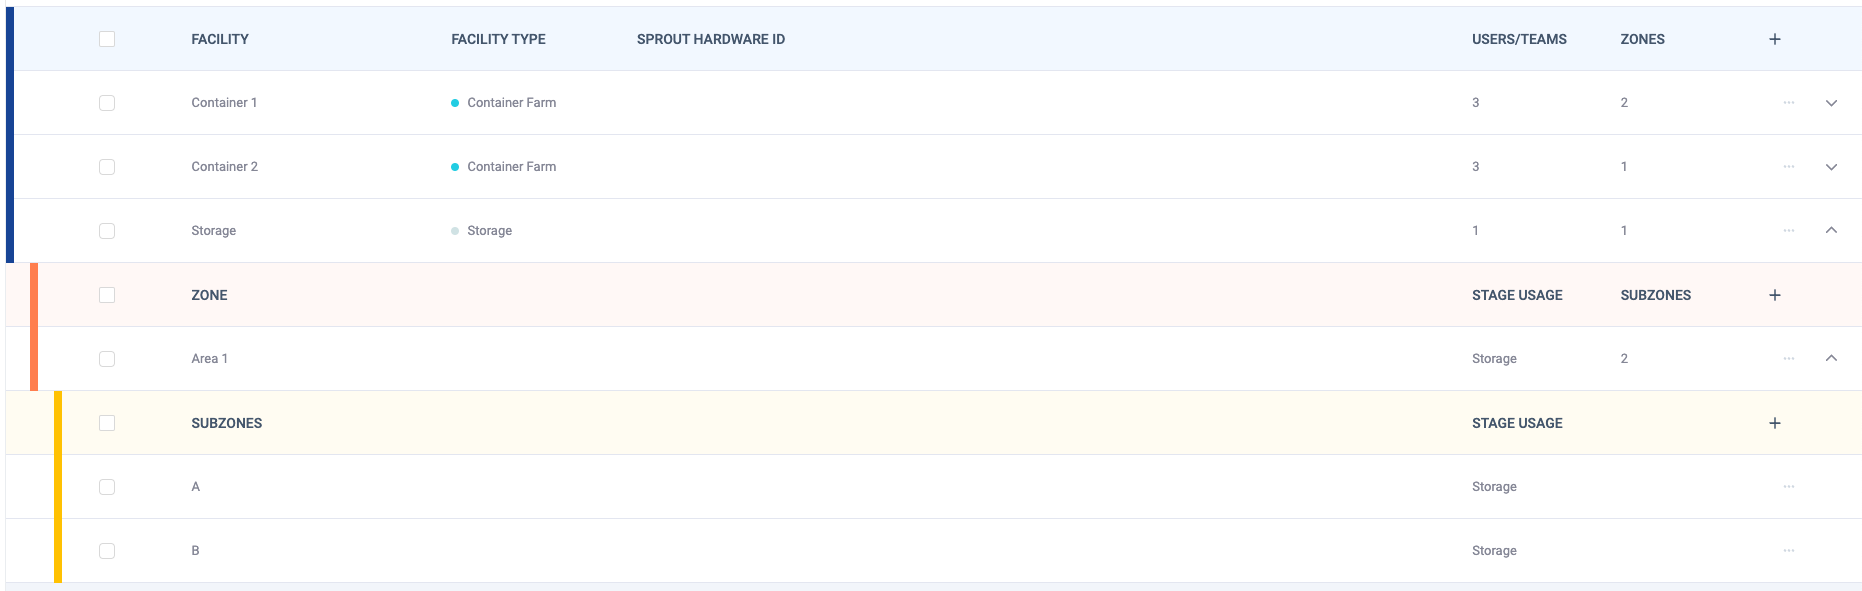
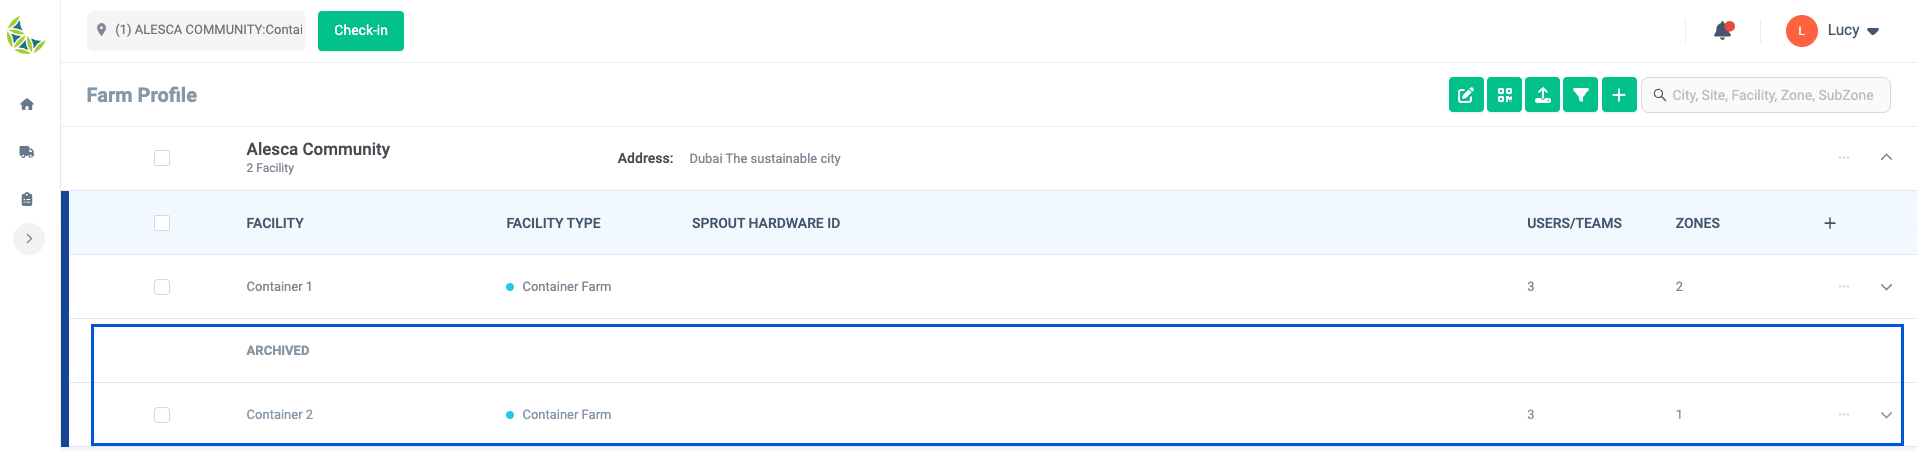
- Facility manages data in a format that looks like it belongs to the site. Expand the record for the site where you want to add the facility. When expanded, data for facilities belonging to the site will be displayed.
- Click the "+" button located on the right side of the facility header. Then, the data input items required to register the facility will be displayed.
- Enter the name of the facility and select the purpose of the facility and the users who will be operating it. *Entering zones is optional, but if you wish to continue registering zones that belong to the facility, enter the number of zones to be registered. After saving the facility, it will automatically switch to zone input.
- Once all input is complete, click the "Save" button at the top right of the screen.
The SPROUT HARDWARE ID selection item will display a list of IDs that match the barcode of the device distributed to your account.
If you do not see the ID you want to register, the device may not have been distributed by Alesca or may already be assigned to another facility and zone.
- If you select
StorageorMoving Cartfor the facility purpose, the input items for the zone and subzone to which it belongs will differ as follows.- Device allocation is no longer possible and input of the maximum quantity of subzones to which it belongs is no longer required.
- The usage of zones and subzones is fixed to the same usage as the facility and cannot be changed.
Archive facility
When to use:
Use this when you want to temporarily stop using a facility and change it to archive status.
Users:
Manager
Screen Images:
![]()
Detail Specifications:
- Click "Archive" from the three-dot menu located at the right end of the facility record you want to archive. The facility is changed to archived state and appears in the archive table.
Unarchive facility
When to use:
It is used to change the status of a facility to active when resuming use of a facility that has been temporarily suspended.
Users:
Manager
Screen Images:
![]()
Detail Specifications:
- Click "Unarchive" from the three-dot menu located at the right end of the record for the facility you want to unarchive. The facility will be unarchived.
- If the target facility includes zones or subzones that are in archived state, their status will also be changed to active state at the same time.
Delete facility
When to use:
Used to stop using the facility and delete facility data from the software.
Users:
Manager
Screen Images:
![]()
Detail Specifications:
- Click "Delete" from the three-dot menu located at the right end of the record for the facility you want to delete. A deletion confirmation dialog will appear, so click OK. Facility deletion is complete.
- If a
SPROUT HARDWARE IDwas assigned to the deleted facility, the assignment will be cancelled. Assign it to other facilities or zones as needed. - The facility to be deleted must be in archive state.
Zone
Add zone
When to use:
Use this to register data to start zone management using software after the installation of C Pro or T Pro is complete.
Users:
Manager
Screen Images:
![]()

Detail Specifications:
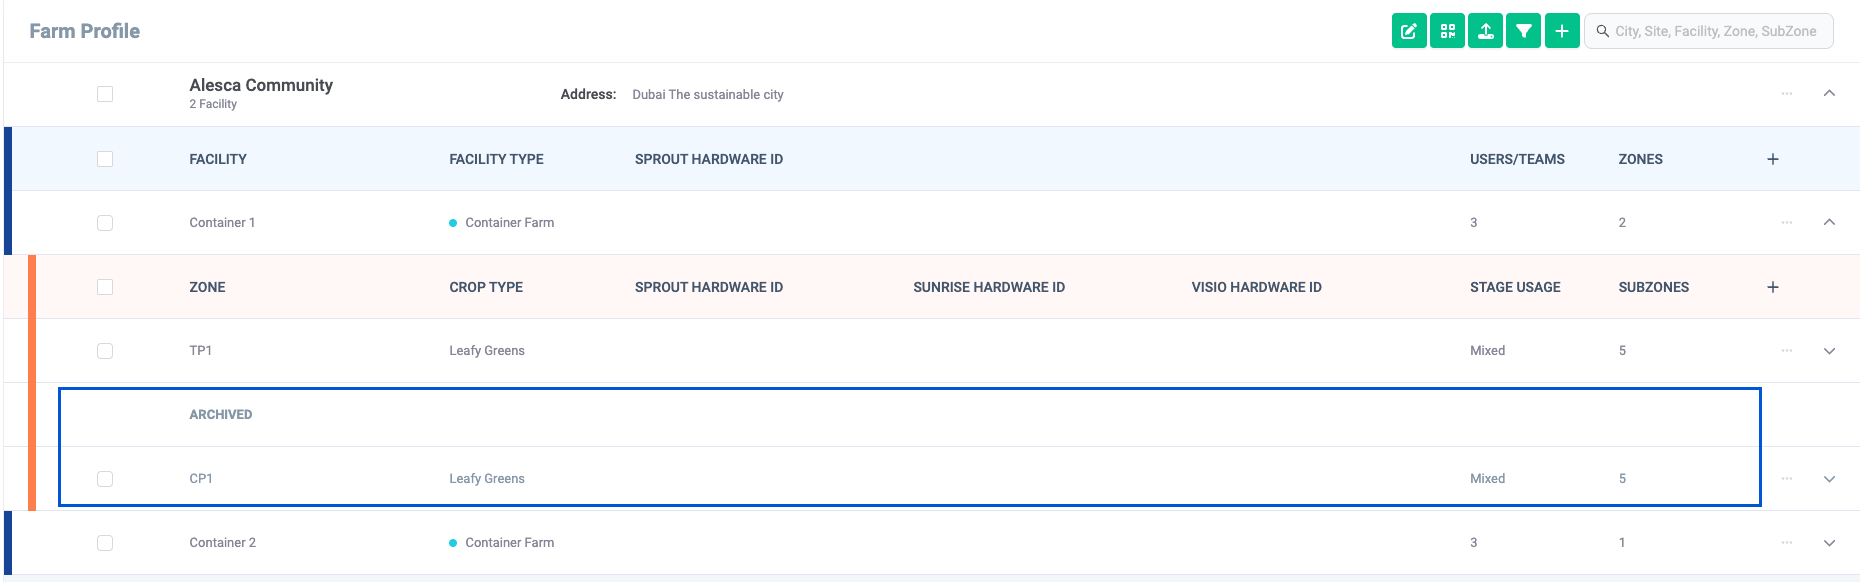
- Zones manage data in a format that looks like it belongs to a facility. Expand the record for the facility to which you want to add the zone. When expanded, data for zones belonging to the facility will be displayed.
- Click the "+" button located on the right side of the zone header. The data entry fields required to register the zone will then be displayed.
- Multiple zones can be registered at once. Click the "+" button for the number of entries you want to register.
- You can delete extra records by clicking the "-" button located at the right end of the record.
- Enter the zone name and select the type of vegetables you plan to grow and the purpose.
- Duplicate zone names cannot be used within the same facility.
- The type of vegetable and its purpose will be referenced when registering subzones. This applies to the default value when adding a subzone, but it can be changed.
- Entering subzones is optional, but if you want to continue registering subzones that belong to a zone, enter the number of subzones to be registered. After saving the zone, it will automatically switch to subzone input.
- Once all input is complete, click the "Save" button at the top right of the screen.
The SPROUT HARDWARE ID, SUNRISE HARDWARE ID, and VISIO HARDWARE ID selection items will display a list of IDs that match the barcode of the device distributed to your account.
If you do not see the ID you want to register, the device may not have been distributed by Alesca or may already be assigned to another facility and zone.
Archive zone
When to use:
Use this when you want to temporarily stop using a zone and change it to archive status.
Users:
Manager
Screen Images:
![]()
Detail Specifications:
- Click "Archive" from the three-dot menu located at the right end of the record in the zone you want to archive. The zone is changed to archived state and appears in the archive table.
Unarchive zone
When to use:
Used to change the zone status to active when resuming use of a zone that has been temporarily suspended.
Users:
Manager
Screen Images:
![]()
Detail Specifications:
- Click "Unarchive" from the three-dot menu located at the right end of the record in the zone you want to unarchive. The zone is unarchived.
- If the target zone includes subzones in archived state, their state will also be changed to active state at the same time.
Delete zone
When to use:
Used to stop using a zone and delete zone data from the software.
Users:
Manager
Screen Images:
![]()
Detail Specifications:
- Click "Delete" from the three-dot menu located at the right end of the record in the zone you want to delete. A deletion confirmation dialog will appear, so click OK. Zone deletion is complete.
- If
SPROUT HARDWARE ID,SUNRISE HARDWARE ID,VISIO HARDWARE IDwas assigned to the deleted zone, the assignment will be cancelled. Assign it to other facilities or zones as needed. - The zone to be deleted must be in archived state.
Subzone
Add subzone
When to use:
Use this to register data to start managing subzones using software after installing C Pro or T Pro.
Users:
Manager
Screen Images:
![]()
Detail Specifications:
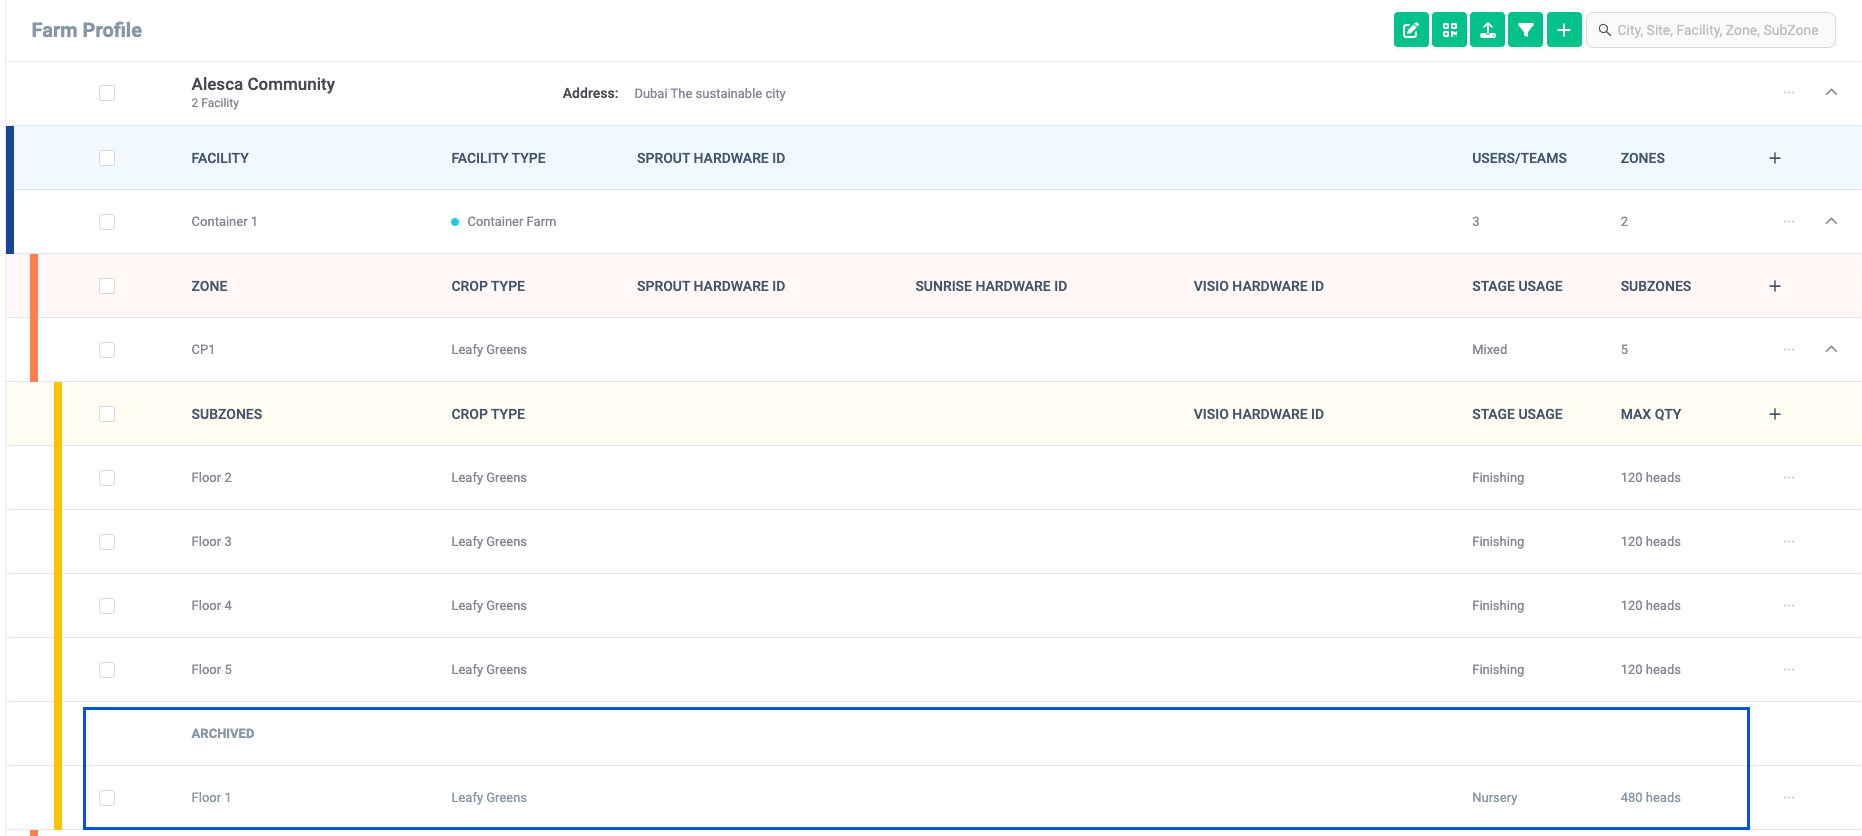
- Subzones manage data as if they belong to a zone. Expand the record for the zone to which you want to add the subzone. When expanded, data for subzones belonging to the zone will be displayed.
- Click the "+" button located at the right end of the subzone. Then, the data input items required to register the subzone will be displayed.
- Multiple subzones can be registered at once. Click the "+" button for the number of entries you want to register.
- You can delete extra records by clicking the "-" button located at the right end of the record.
- Enter the name of the subzone, select the type of vegetables you plan to grow and their purpose, and enter the maximum quantity.
- Subzone names cannot have duplicate names within the same zone.
- Once all input is complete, click the "Save" button at the top right of the screen.
Among the information registered in the subzone, the type, purpose, and maximum quantity of vegetables are important information as they will be referenced when using other functions of the software.
Archive subzone
When to use:
Use this when you want to temporarily stop using a subzone and change it to archive status.
Users:
Manager
Screen Images:
![]()
Detail Specifications:
- Click "Archive" from the three-dot menu located at the right end of the record in the subzone you want to archive. The subzone is changed to archived state and appears in the archive table.
Unarchive subzone
When to use:
Used to change the status of a subzone to active when resuming use of a zone that has been temporarily suspended.
Users:
Manager
Screen Images:
![]()
Detail Specifications:
- Click "Unarchive" from the three-dot menu located at the right end of the record in the subzone you want to unarchive. The subzone is unarchived.
Delete subzone
When to use:
Used to stop using a subzone and delete zone data from the software.
Users:
Manager
Screen Images:
![]()
Detail Specifications:
- Click "Delete" from the three-dot menu located at the right end of the record of the subzone you want to delete. A deletion confirmation dialog will appear, so click OK. Subzone deletion is complete.
- If a
VISIO HARDWARE IDwas assigned to the deleted subzone, it will be unassigned. Assign it to other zones or subzones as needed. - Subzones to be deleted must be in archived state.
Edit farm
When to use:
Use this when you want to edit registered farm information in bulk.
Users:
Manager
Screen Images:
![]()
Detail Specifications:
- Facilities, zones, and subzones can be edited in bulk. First, expand the record for the facility, zone, or subzone that you want to edit. The expanded data will be subject to bulk editing.
- Once the records have been expanded, click the "Edit Farm Profile" button at the top right of the screen. The item to be edited becomes editable, so let's change the value.
*The frame of the item whose value has been changed turns orange.

- Once you have finished changing the values, click "Save" at the top right of the screen. Note that before applying the edited contents, the edited values are verified. As a result of verification, if there are any items that need to be edited again, the frame of the relevant item will be displayed in red.
- If you expand an unexpanded record before applying edits, the edits will be saved.
- If you move to another screen before applying the edits, a dialog will appear asking if you want to apply the edits you have made up to that point.
Download barcode
When to use:
Used to obtain the original data when creating barcodes that indicate area information.
Users:
Manager
Screen Images:
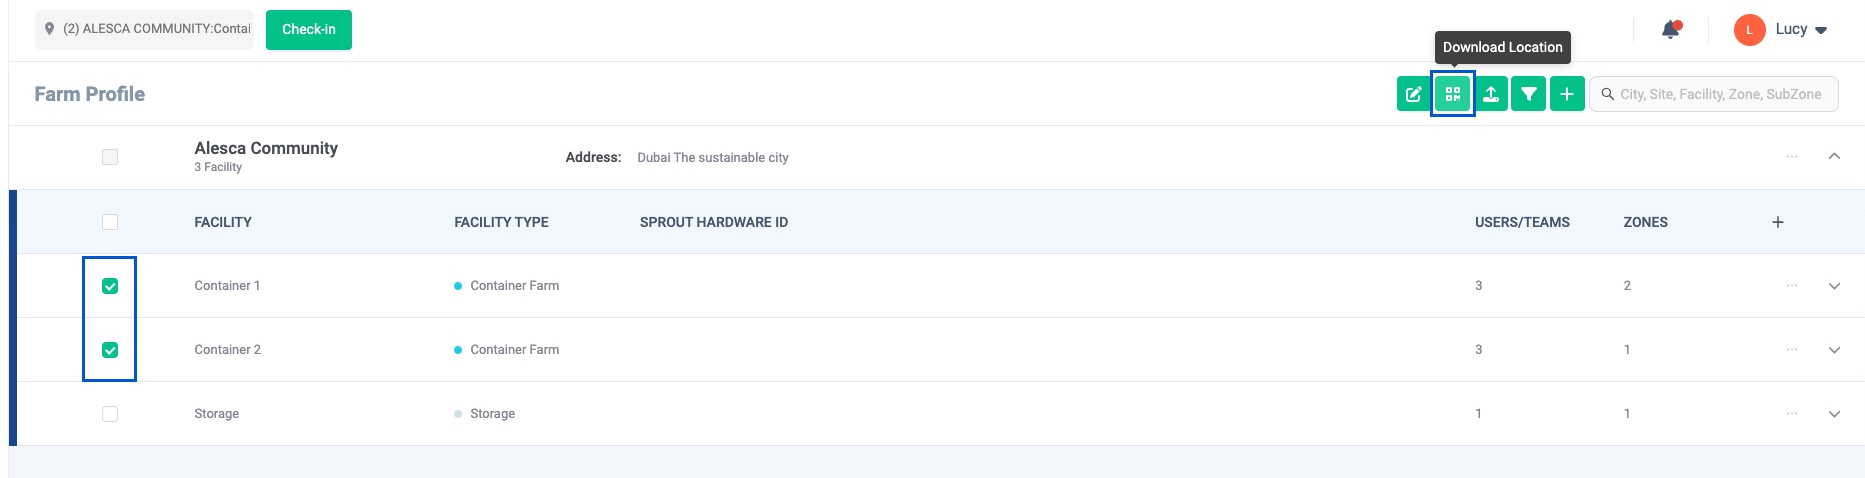
Detail Specifications:
- Check the checkbox of the area you want to output for barcode creation. The unit of check is only the facility if it is a facility, and only the zone if it is a zone.
- The output data differs as follows depending on the level of the checked item.
- For facilities: Data of all zones and subzones to which it belongs will be output.
- For zones: All subzones to which it belongs will be output.
- For subzones: Only the selected subzones will be output.
- The output data will be a list of records with facility, zone, and subzone names connected with ".", and will be a CSV format file.
Farm Filtering
When to use:
Used when expanding or converging records at once. For example, if you want to check all farm information in zones, it would take time to expand them one by one. In such cases, you can expand records by zone at once.
Users:
Manager
Screen Images:
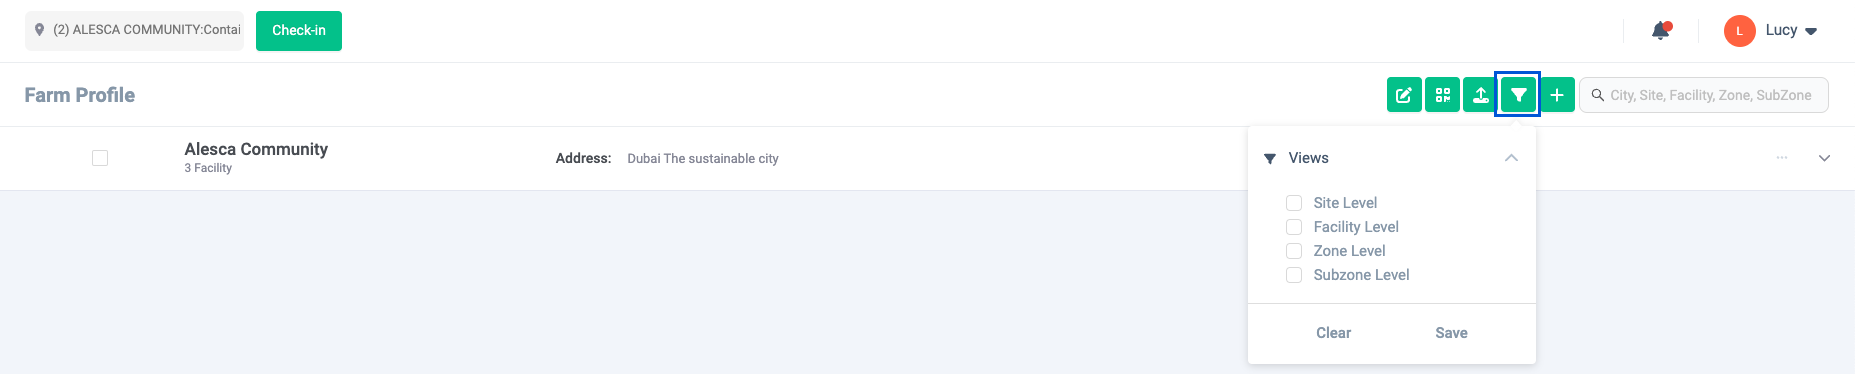
Detail Specifications:
- Select the site, facility, zone, subzone, level you want to deploy and click Save. Records are expanded and displayed according to the selected level.