User Management
User
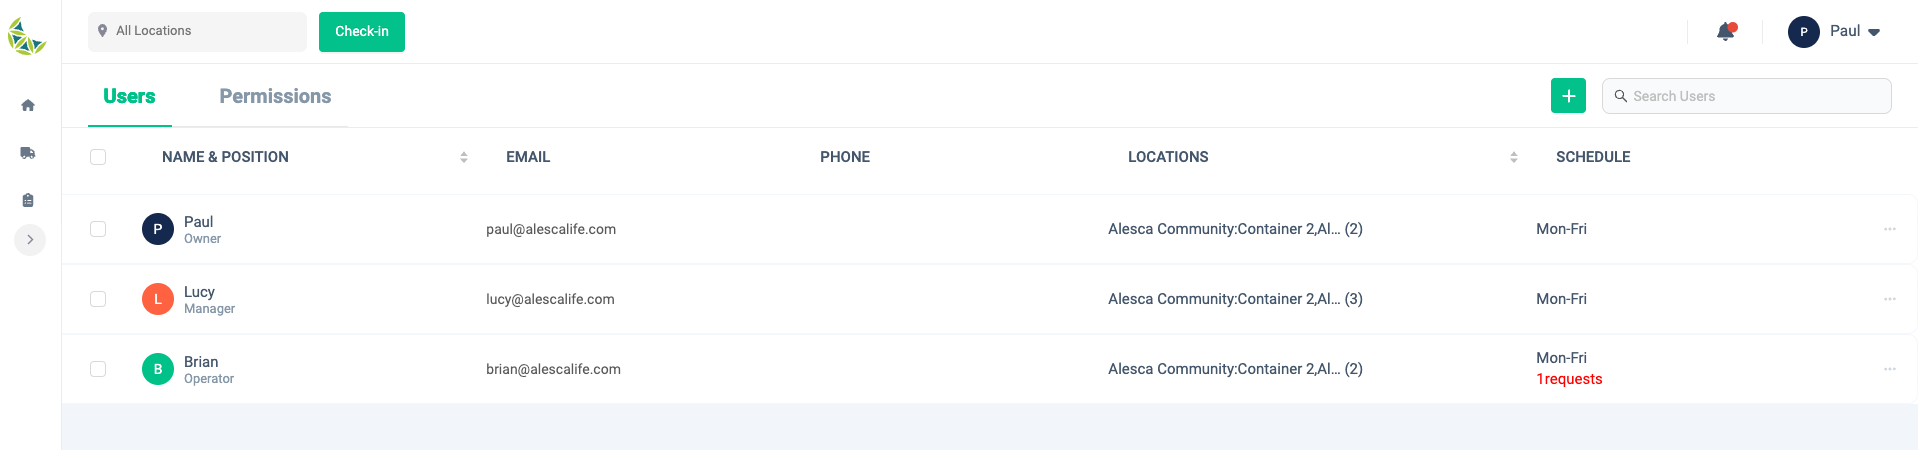
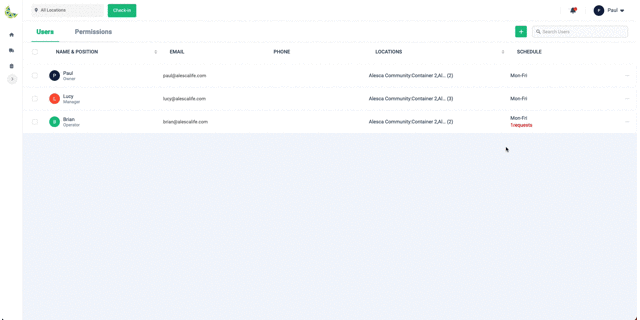
Show users
When to use:
Used when checking the list of users.
Users:
Manager
Screen Images:
Detail Specifications:
- You can check the list of users belonging to the same account.
- The user icon, name and role, email address, phone number, locations, and working days are displayed as user information.
- You can sort by name or area in ascending or descending order.
- You can search by name using the search box on the top right.
- A lock icon will be displayed for users who have not initialized their password.
- Archived users will see the archived label.
- For archiving, see #Archive User.
Add user
When to use:
Used when adding a new user to your account.
Users:
Manager
Screen Images:

Detail Specifications:
- Click the "+" button at the top right of the screen.
- Enter your name, role, default working schedule, operation locations, and email address. Phone number is optional.
- After entering your user information and clicking the "Send Invite" button, an account creation email will be sent to the email address you entered. Set your password using the link in the email you received.
- If you want to stop adding users, click the "X" in the top right corner.
Edit user
When to use:
Used when editing user information.
Users:
Manager
Screen Images:
Detail Specifications:
- Click "Edit" from the menu on the right side of the record of the user you want to edit.
- Email address cannot be edited.
- Once you have finished editing the user information, click the "Save" button.
- If you wish to stop editing user information, please click the "X" in the upper right corner.
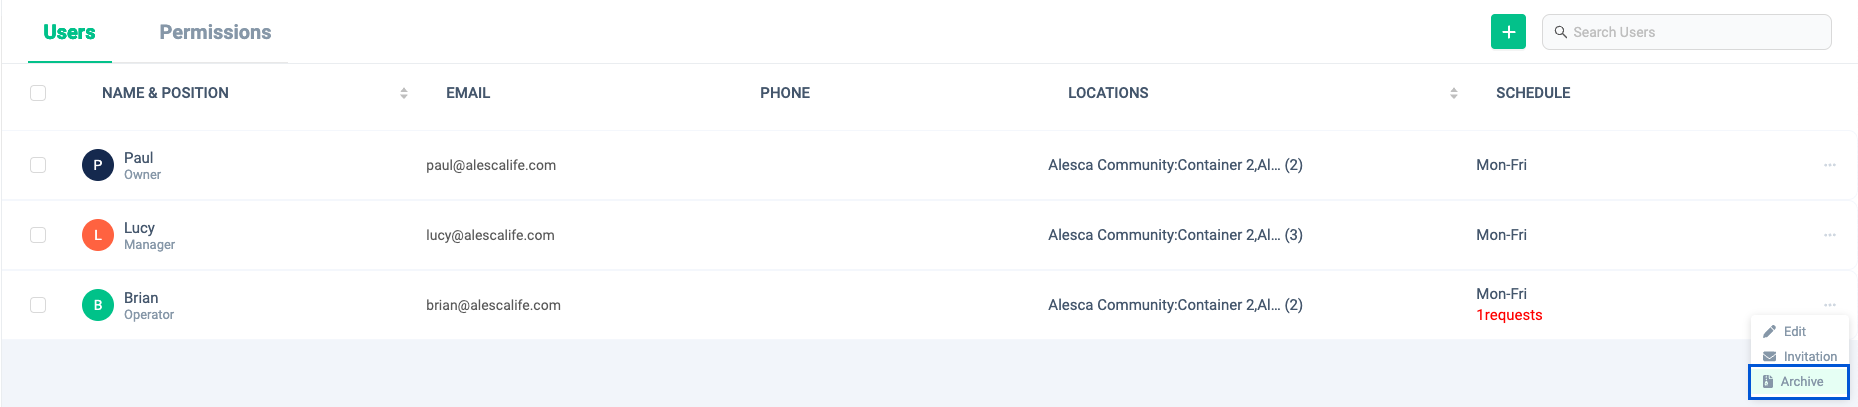
Archive user
When to use:
Use this when you want to change a user to archive status for reasons such as a long vacation.
Users:
Manager
Screen Images:
Detail Specifications:
- Click "Archive" from the menu on the right side of the record of the user you want to archive. A confirmation dialog will be displayed, so click "OK" after confirmation.
- If you archive a user, that user will no longer be able to log in, be assigned as a task owner, etc.
- Even if you archive a user, the user information remains in Orion.
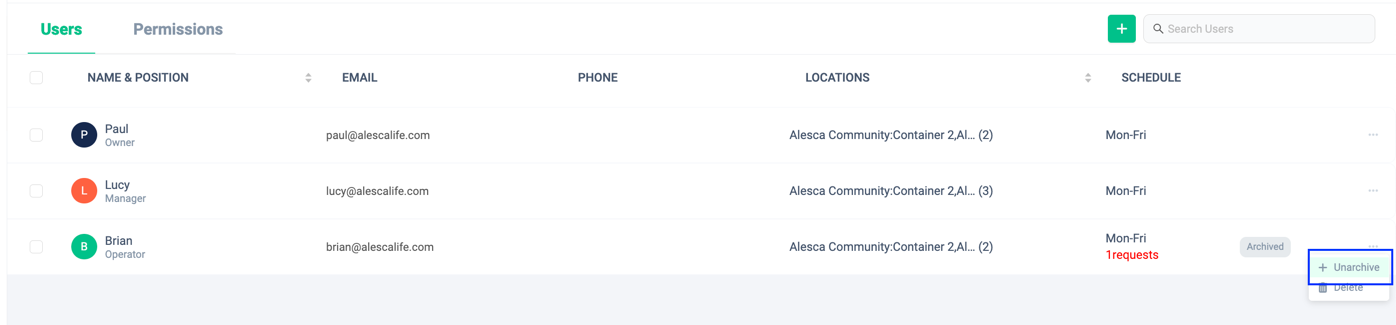
Unarchive user
When to use:
Use this when you want to change a user from archived state to active state.
Users:
Manager
Screen Images:
Detail Specifications:
- Click "Unarchive" from the menu on the right side of the record of the user you want to unarchive.
- Unarchiving a user allows that user to log in again and use Orion.
Delete user
When to use:
Use this when you want to delete a user.
Users:
Manager
Screen Images:
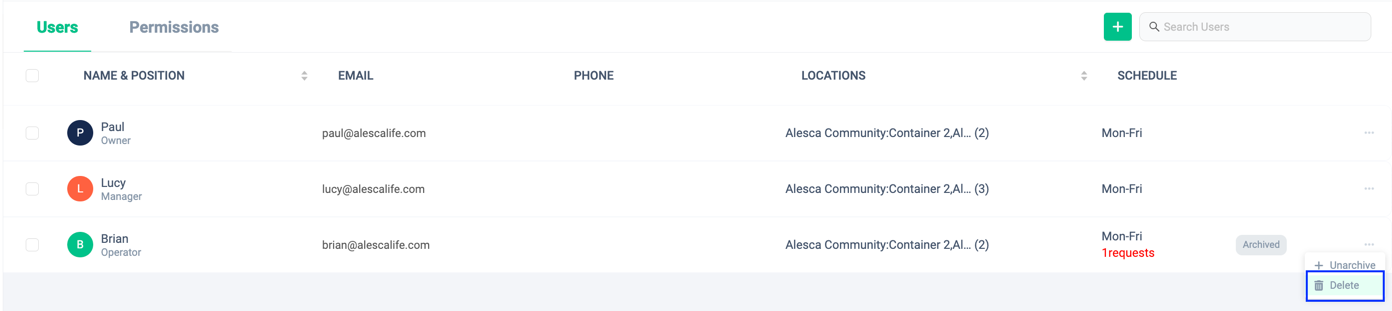
Detail Specifications:
- Click "Delete" from the menu on the right side of the record of the user you want to delete.
- Only archived users can be deleted.
- Click "Delete User" in the displayed message to complete user deletion.
- Deleted user information cannot be restored. If you want to keep user information, please use the archive function.
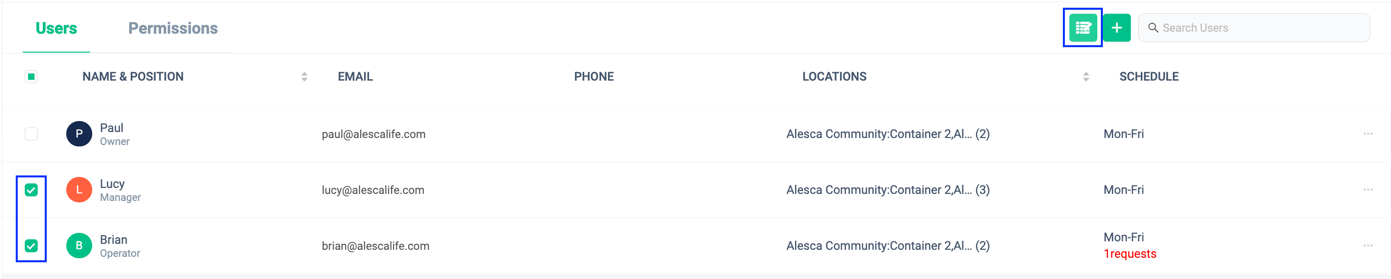
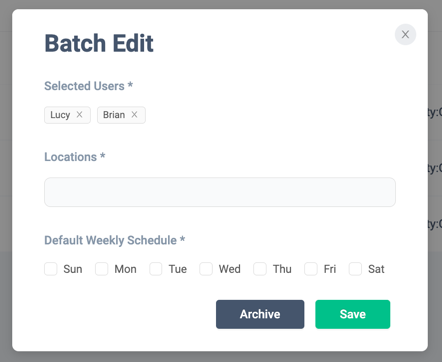
Edit users in bulk
When to use:
Use this when you want to edit user information in bulk.
Users:
Manager
Screen Images:
Detail Specifications:
- Click on the checkboxes of the users you want to bulk edit. Click the "Batch Edit" button that will appear at the top right of the screen.
- Information that can be edited at once is area and operation date.
- By clicking the "X" button to the right of the user name displayed on the batch editing screen, it is possible to exclude the user from being subject to batch editing.
- Click the "Save" button to apply the edited content to the user.
- Click the "Archive" button to archive users in bulk.
- If all selected users are archived users, you can delete them all at once. Click "Delete Permanently" to complete bulk deletion.
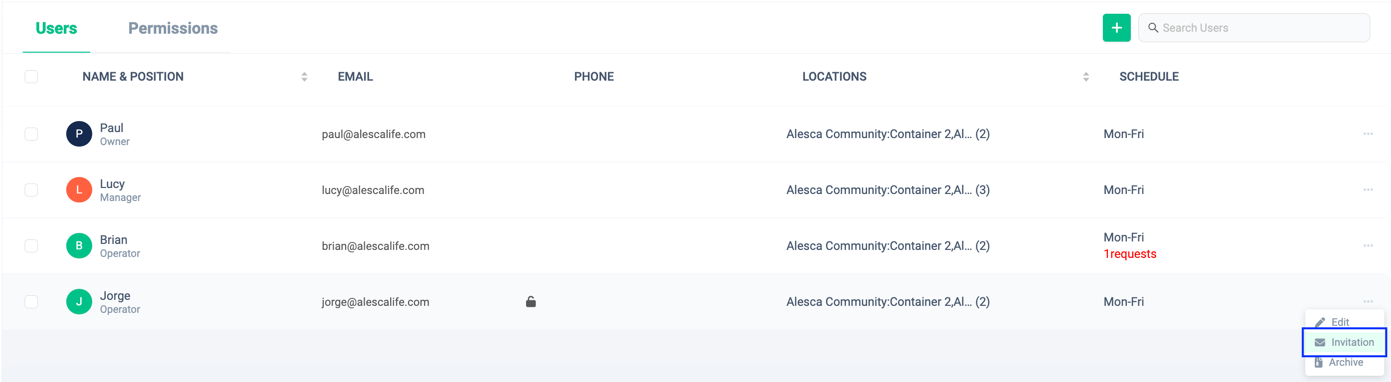
Resend invitation email
When to use:
Use this when you create a new user and send an invitation email, but the password setting link has expired, or the invitation email did not arrive for some reason, and you need to resend the invitation email.
Users:
Manager
Screen Images:
Detail Specifications:
- Click "Invitation" from the menu on the far right of the row of the user you want to send an invitation email to.
- A password setting email will be sent to the destination user.
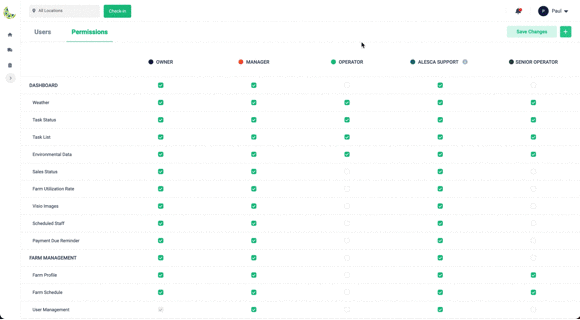
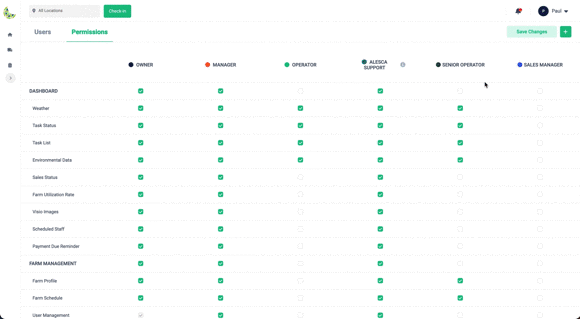
Permission management
Show permission list
When to use:
Used to check the list of permissions managed by an account.
Users:
Manager
Screen Images:
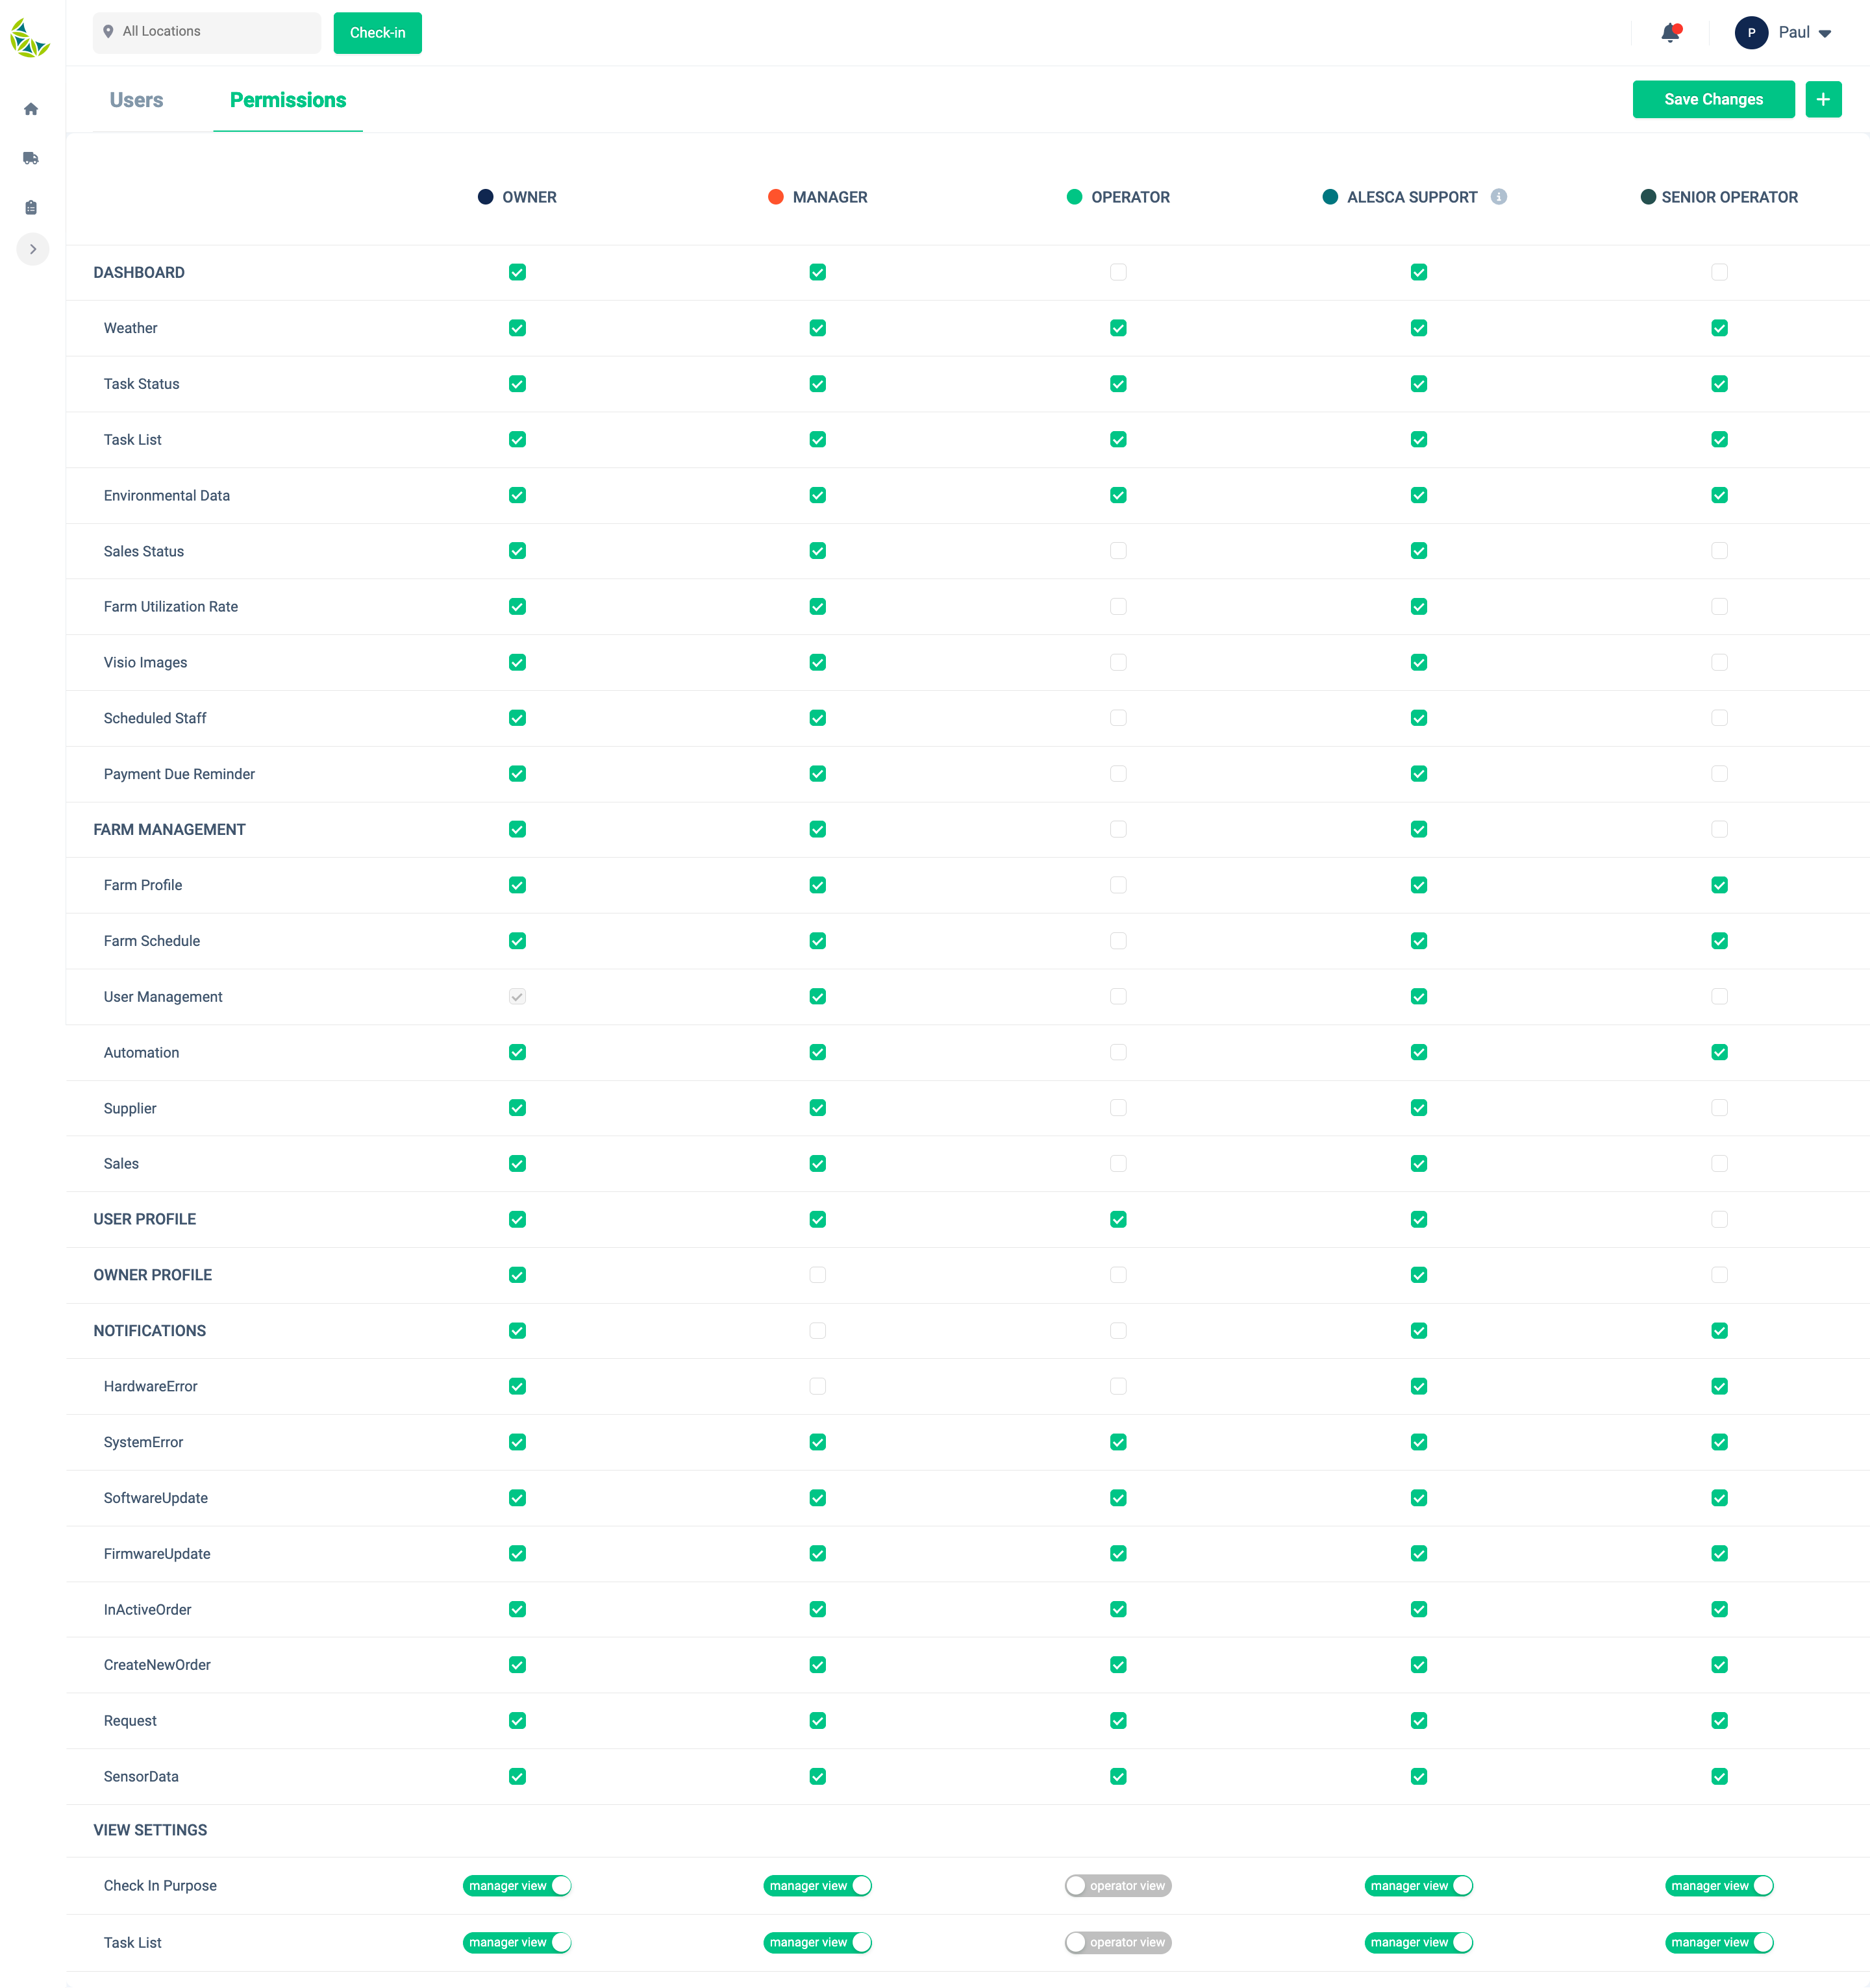
Detail Specifications:
- There are three categories of permissions:
FUNCTIONS,NOTIFICATIONS, andVIEW SETTINGS. Let's check them in order.FUNCTIONS: Access authority to each function. If access permissions are not granted, you will not be able to access the screen.NOTIFICATIONS: You can control whether you receive notifications or not.VIEW SETTINGS: You can control whether it is treated as manager permission or operator permission.
Add role
When to use:
Used when adding new roles, such as adding a new position.
Users:
Manager
Screen Images:
Detail Specifications:
- Click the "+" button at the top right of the screen to display the role addition screen.
- Enter a name for the role you want to add and choose a color to easily distinguish between roles.
- Click the "Save" button to complete the new role creation.
You can only create up to 6 new roles within your account.
Edit Role
When to use:
Used when editing role names and colors.
Users:
Manager
Screen Images:

Detail Specifications:
- Click on the name of the role you want to edit. The editing screen will then be displayed.
- Once you have finished editing the name and color, click the "Save Change" button.
The default roles Owner, Manager, Operator, and Alesca Support cannot be edited.
Delete role
When to use:
Used when deleting roles that are no longer needed.
Users:
Manager
Screen Images:
Detail Specifications:
- Make sure there are no users assigned the role you want to delete. Once a role is assigned to a user, it cannot be deleted.
- Once you have confirmed that there are no users assigned to the role you want to delete, click the name of the role you want to delete. The role editing screen is displayed.
- Click
Delete Role. A confirmation screen will appear, so click "OK".
There is a limit to the number of roles you can manage within your account. We recommend that you delete roles that are no longer needed unless there is a special reason.
Edit permissions
When to use:
Used when editing permissions.
Users:
Manager
Screen Images:
Detail Specifications:
- Manage access permissions to functions based on the checkboxes arranged in the role column.
- If checked, you have permission; if not, you do not have permission.
- Click the checkboxes to set the appropriate permissions for your role. Once you have completed setting the permissions, click the "Save Change" button at the top right of the screen.
- If you edit the permissions of a role assigned to you, you must log out of Orion. Follow the dialog to log out and log in again.