Farm Schedule
Grow Plan
Display grow plan schedule
When to use:
Use this to check the grow plan you have created.
Users:
Manager
Screen Images:
Detail Specifications:
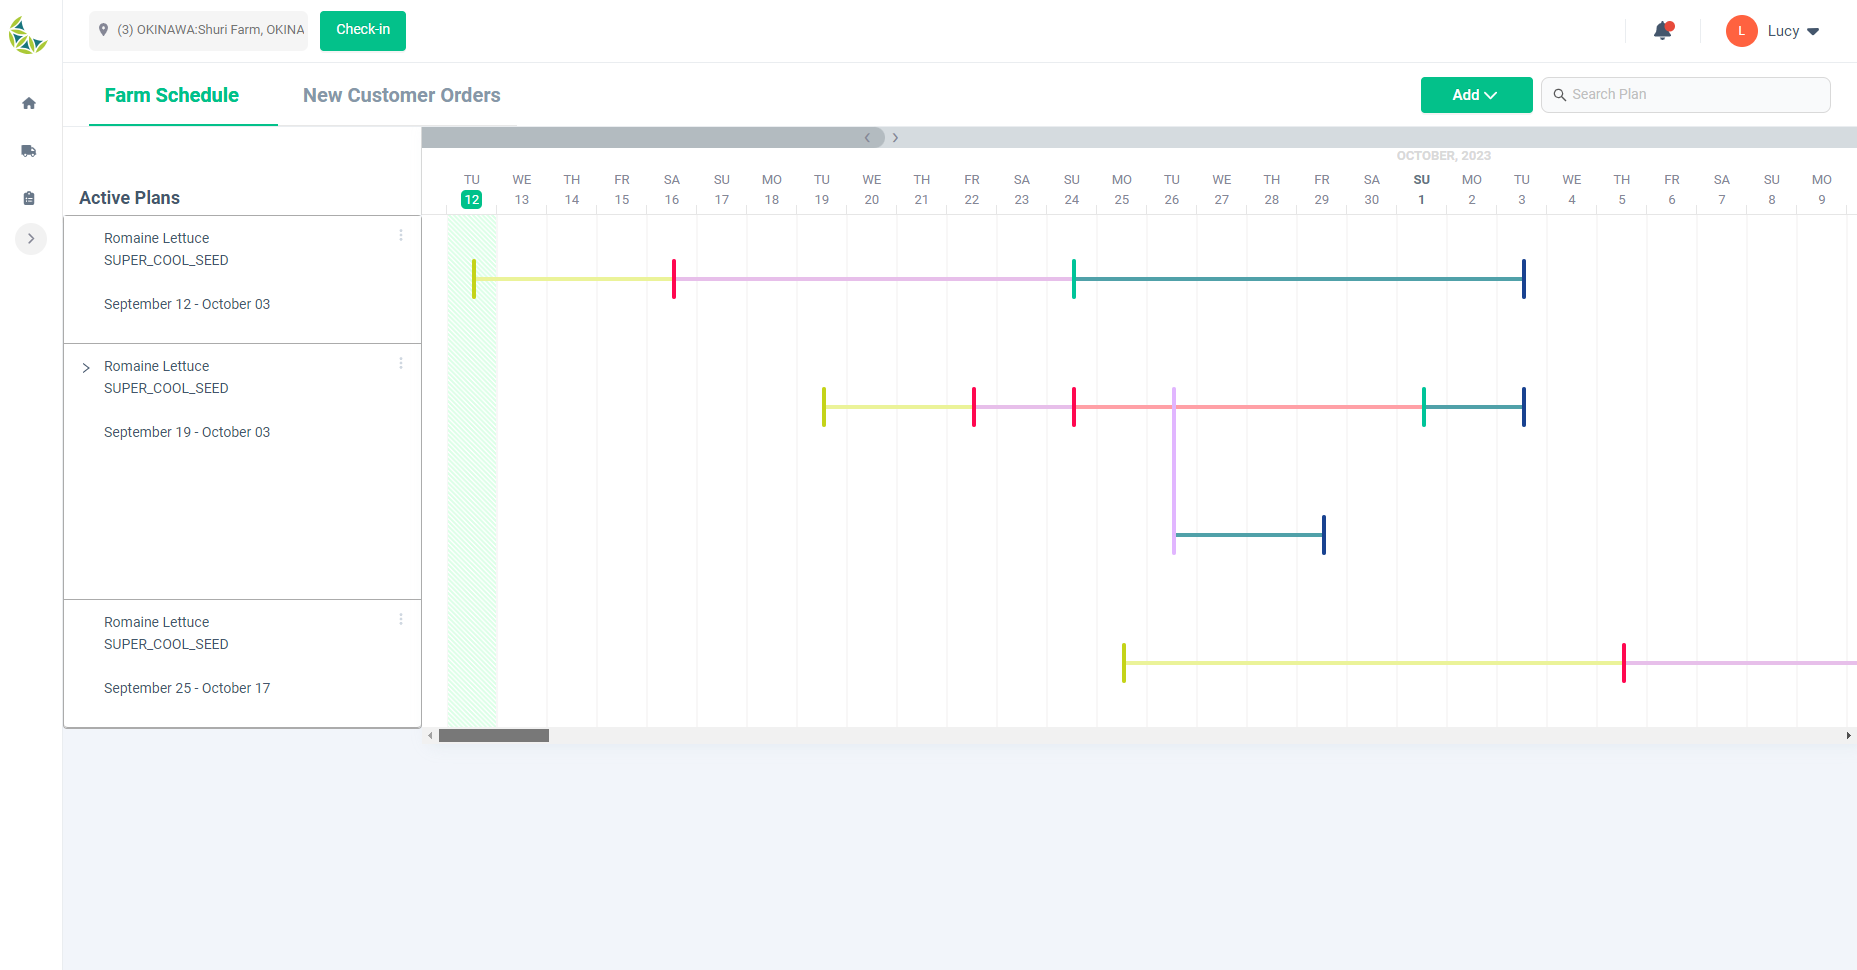
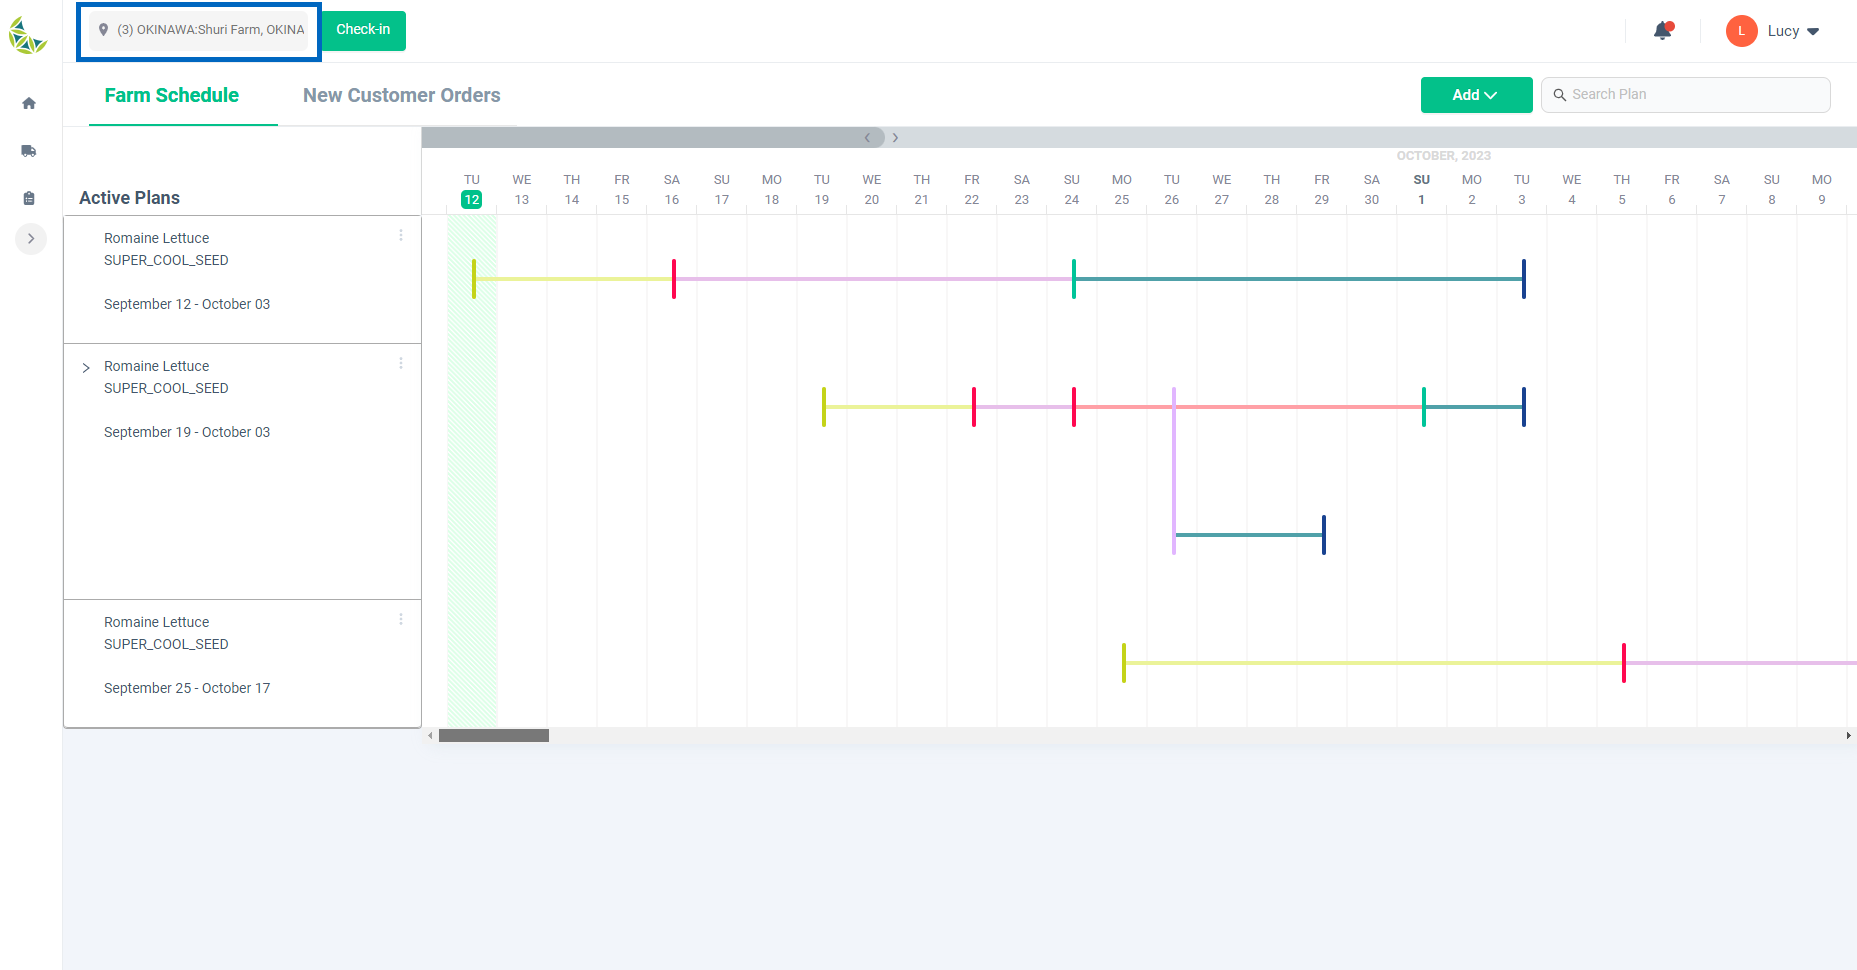
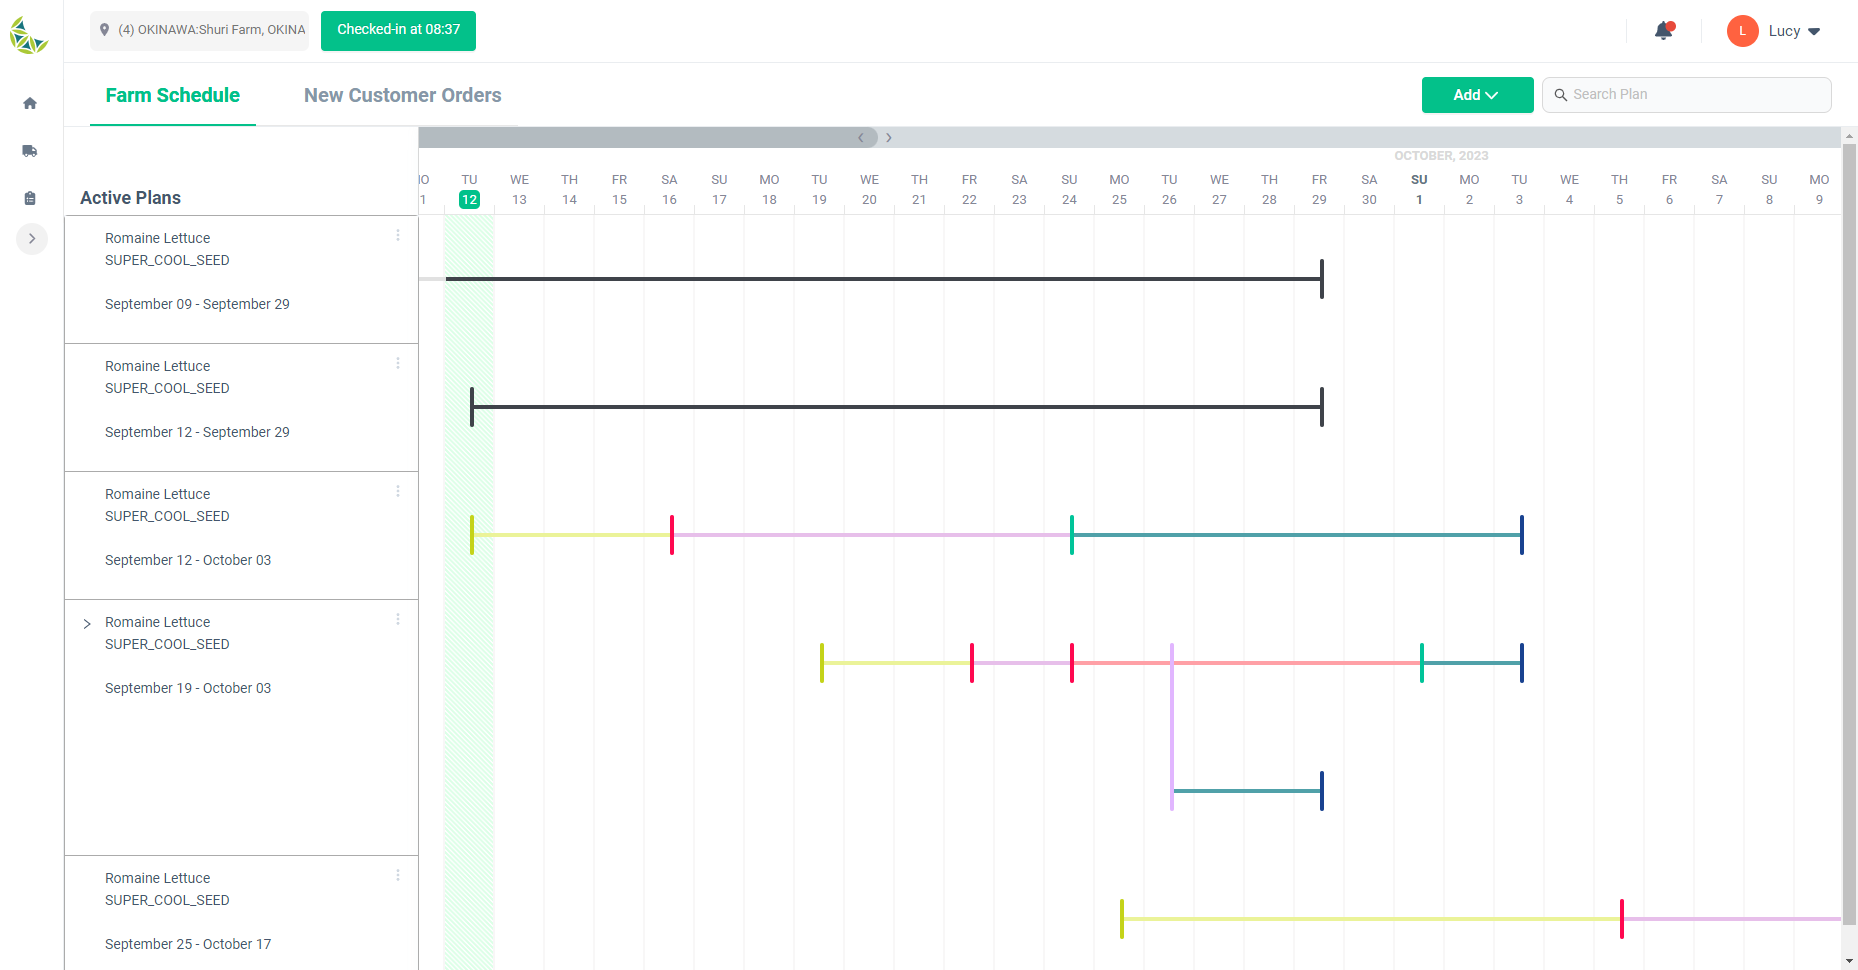
- This screen will be displayed when you go to "Farm Schedule" from the menu.
- Current and future grow plans are displayed in a list.
- Displays plans for cultivation in the area selected in the header.
Display grow plan schedule - Recurring Grow Plan
When to use:
Use this to confirm the repeated grow plan you have created.
Users:
Manager
Screen Images:
Detail Specifications:
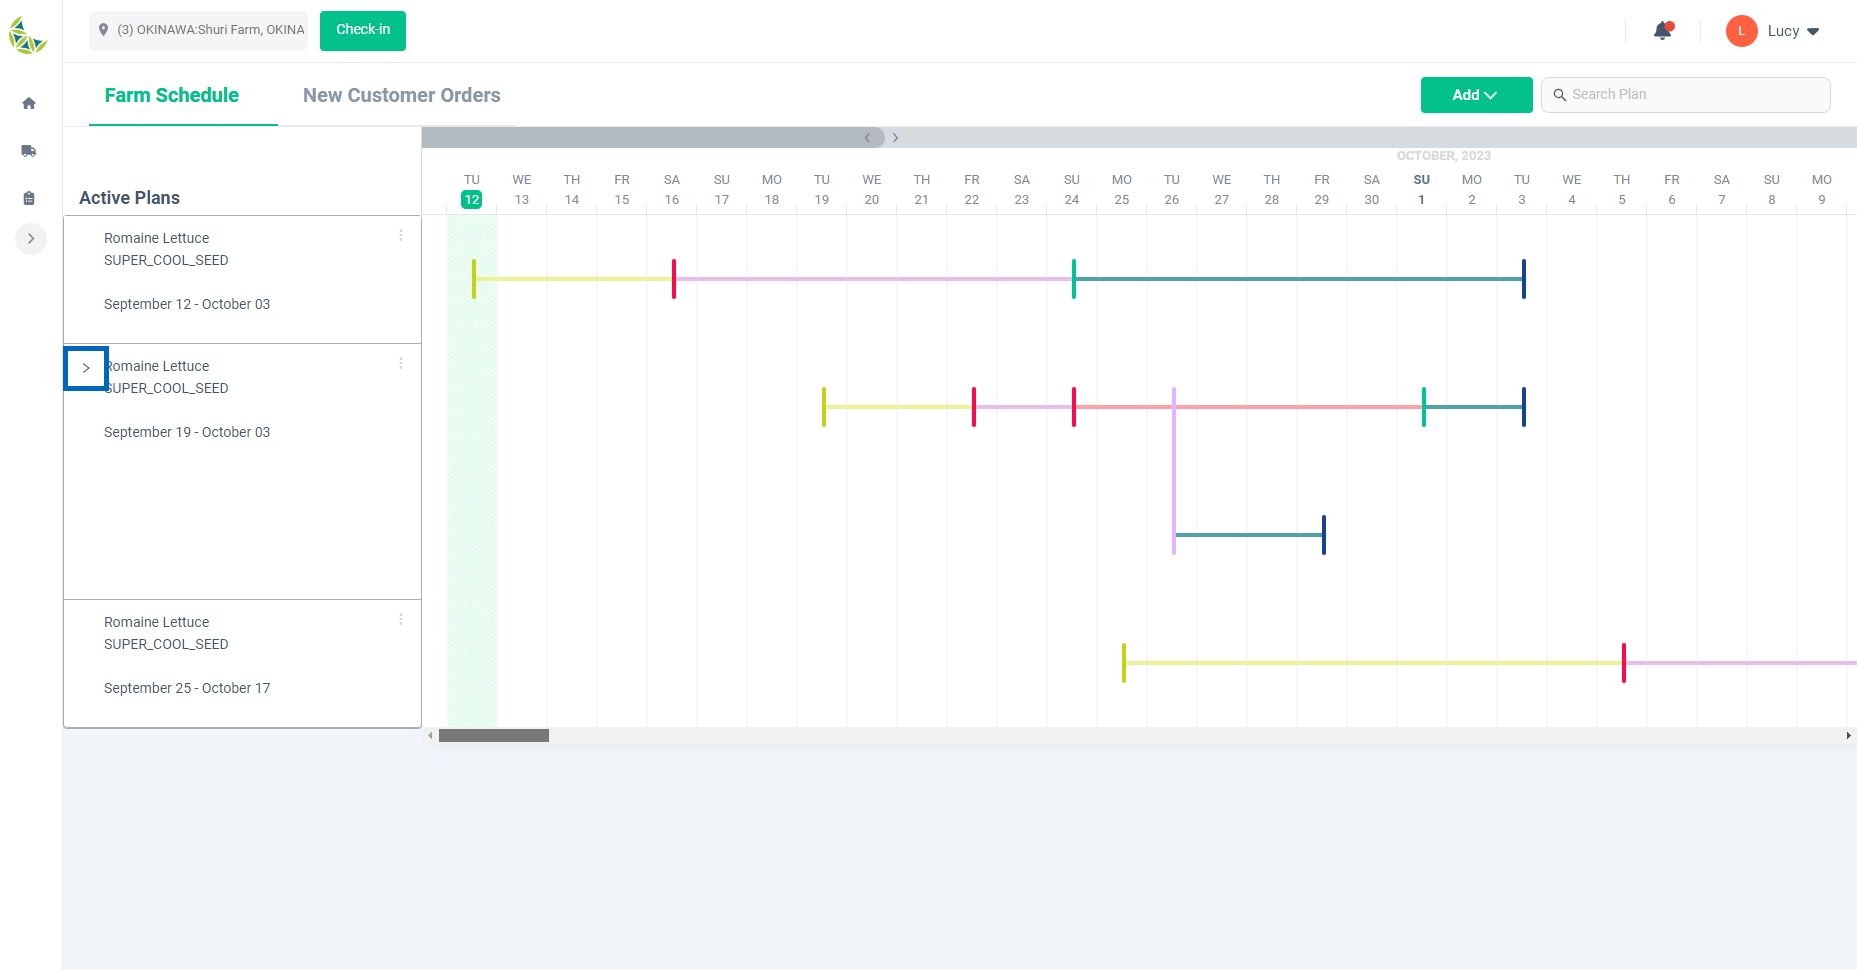
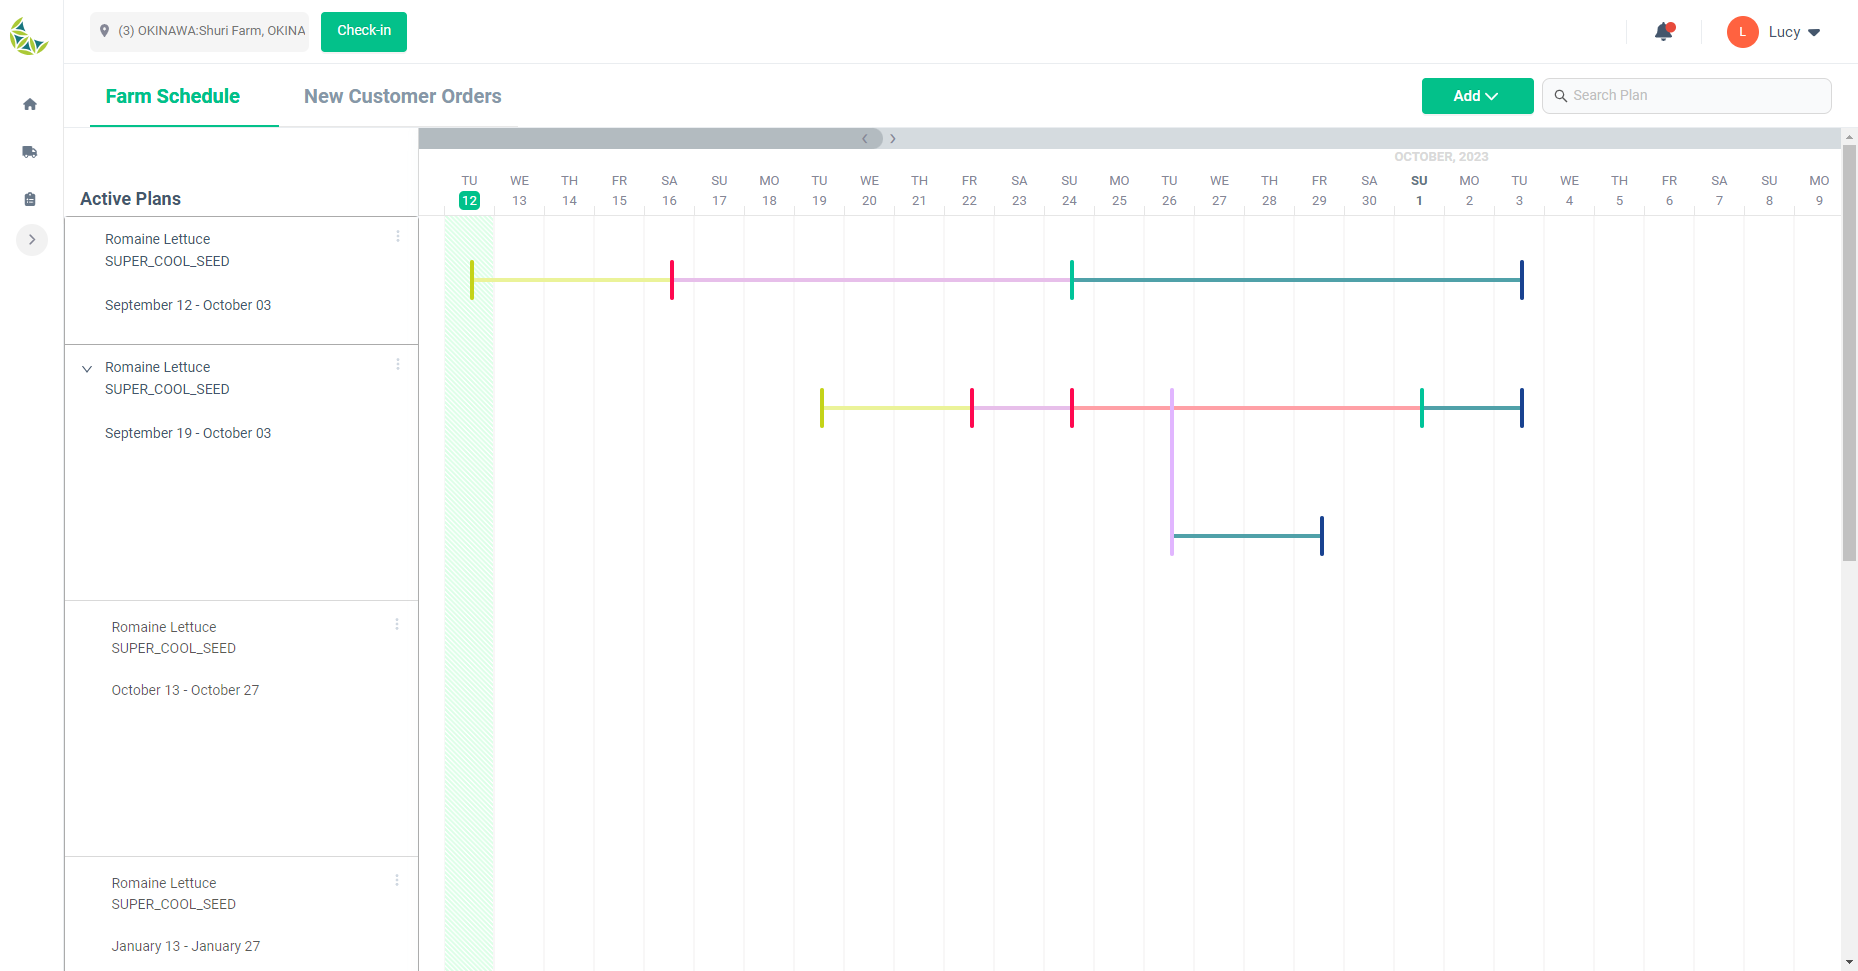
- Recurring grow plans are organized into groups, and the currently ongoing or nearest future grow plan within the group is initially displayed.
- You can view subsequent plans by clicking the ">" button on the plan details card above.
Display grow plan schedule - Display crop destroyed plans
When to use:
Used to confirm that the crops of the created grow plan have been discarded.
Users:
Manager
Screen Images:
Detail Specifications:
- Grow plans where the operator has discarded crops for any reason will be displayed in black.
Quick edit grow plan
When to use:
Use this when you want to edit the dates of each action after creating a grow plan.
Users:
Manager
Screen Images:
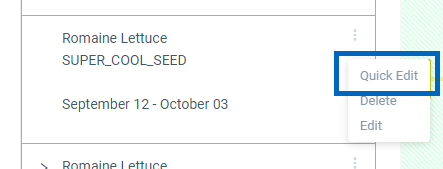
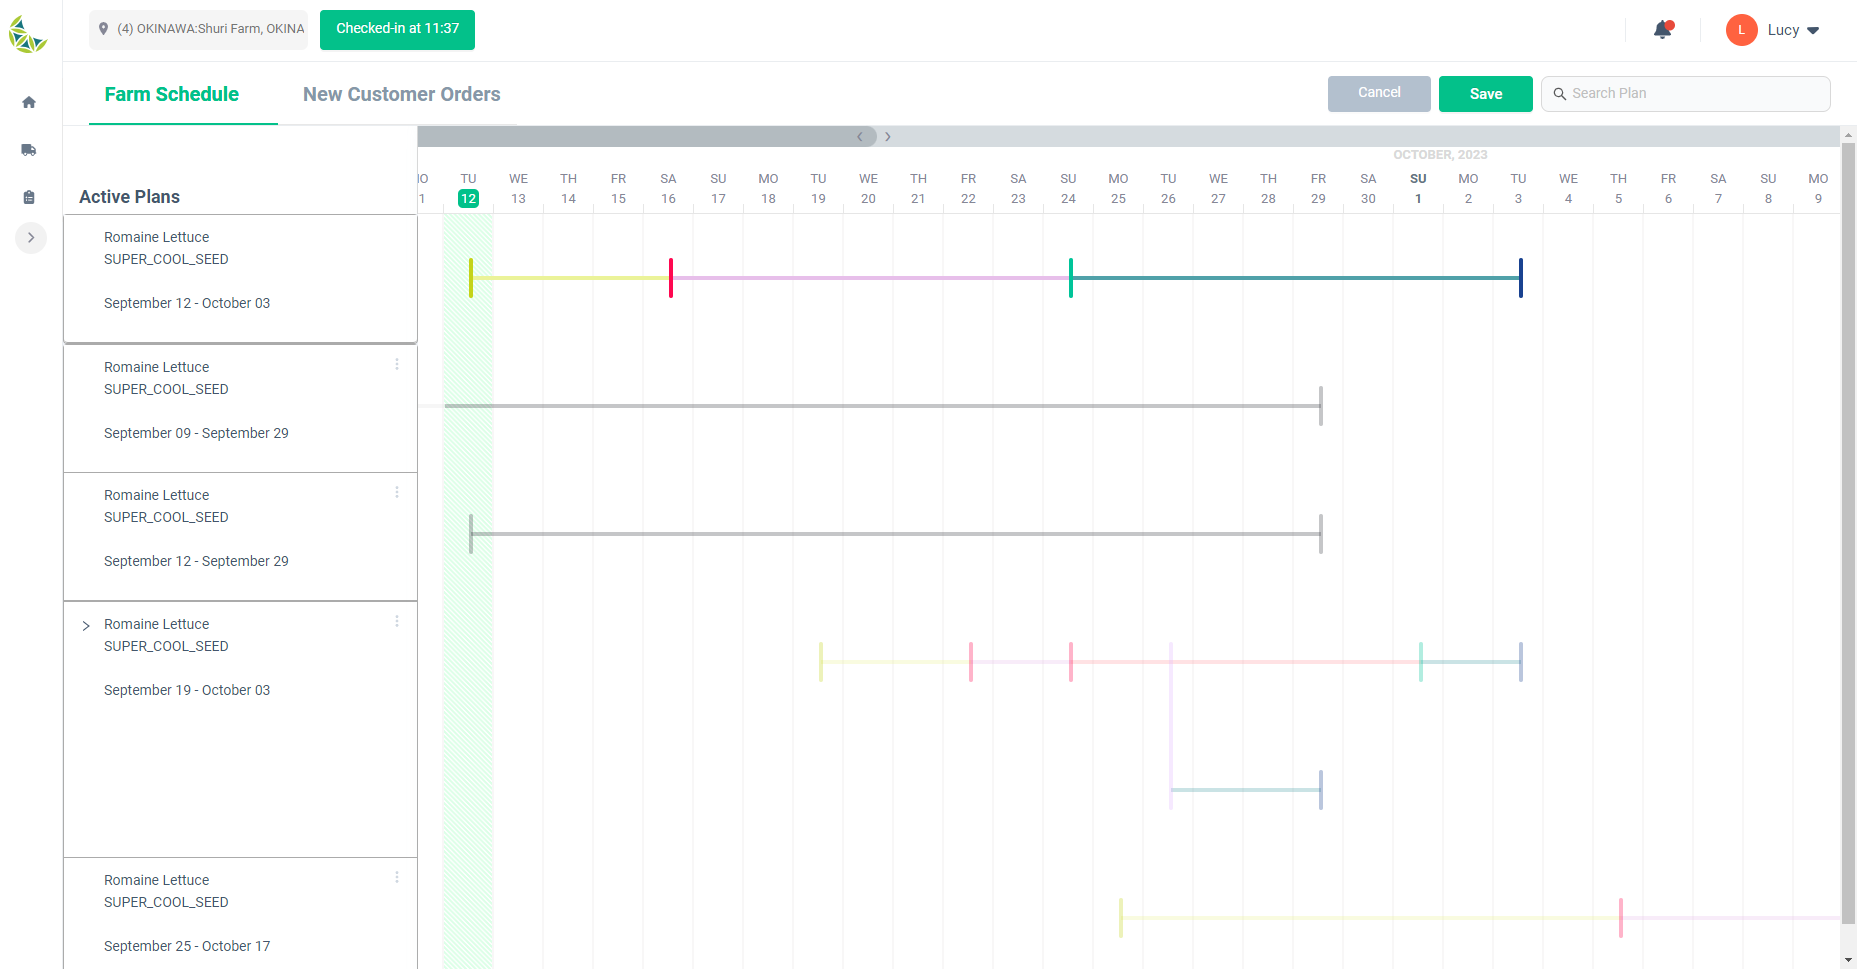
Screen after pressing "Quick Edit"
When changing the date of a single action

When changing the date of the entire plan

Detail Specifications:
- Select "Quick Edit" from the details card menu of the grow plan you want to edit. The plan for quick editing will then be displayed at the top of the screen.
- Changing the date of a single action
- You can change the date by clicking on the action and selecting it, then dragging and dropping it.
- You can drag and drop to the same date as the previous or next action.
- If the previous action does not exist, you can drag and drop it to the current date.
- If there is no next action, you can drag and drop to the last date on the displayed calendar.
- Date change for entire plan
- When you hover over a part of the plan, a red or black border will appear.
- If the start date of the plan is before the current date, it will be displayed as red and this feature will not be available.
- If the start date of the plan is after the current date, it will be displayed as black and this feature will be available.
- You can change the date of the entire grow plan by dragging and dropping the surrounding line.
- The drag and drop range is between the current date and the last date of the displayed calendar.
- When you hover over a part of the plan, a red or black border will appear.
- Normally, when creating or editing a plan, the date of the final action of the grow plan associated with the customer order cannot be changed, but it can be changed with quick editing.
*You can save your changes by clicking the "Save" button on the top right.
- Verify area availability and operator working days on the updated date. If there are no problems as a result of the verification, saving is complete.
- If there is a problem with assigning an area or operator, move on to assigning another area or operator. Follow the instructions to reassign and save.
- Areas and operators reassign the information before quick editing, so changing the date of the action may result in the area having no free space or falling outside the operator's working day.
Delete grow plan
When to use:
This is used when a grow plan is no longer needed for some reason, such as when a customer order is canceled or a grow plan is created by mistake.
Users:
Manager
Screen Images:
Detail Specifications:
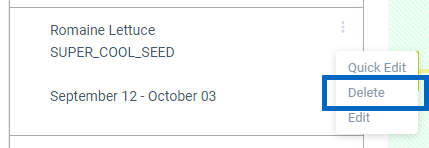
- Select "Delete" from the details card menu of the grow plan you want to delete.
- If the deletion target is part of a repeated grow plan, you can select the deletion range from the following.
- Delete only the selected grow plan.
- Delete any subsequent repeated grow plans including the selected grow plan.
- When you delete a grow plan, the tasks created by it will also be deleted at the same time.
- Please note that when deleting a grow plan, the achievements of tasks completed up to the point of deletion will be deleted.
- It is impossible to restore a grow plan after deletion.
Add grow plan
When to use:
Used when creating grow plans that are not tied to customer orders.
Users:
Manager
Screen Images:

Detail Specifications:
- Click the "Add" button in the farm schedule header and select "Grow Plan".
- You will then be taken to the screen where you can select seeds and customers to use in your grow plan.
Add grow plan - Choose seed
When to use:
Use this when selecting seeds to use in the grow plan you create.
Users:
Manager
Screen Images:
Detail Specifications:
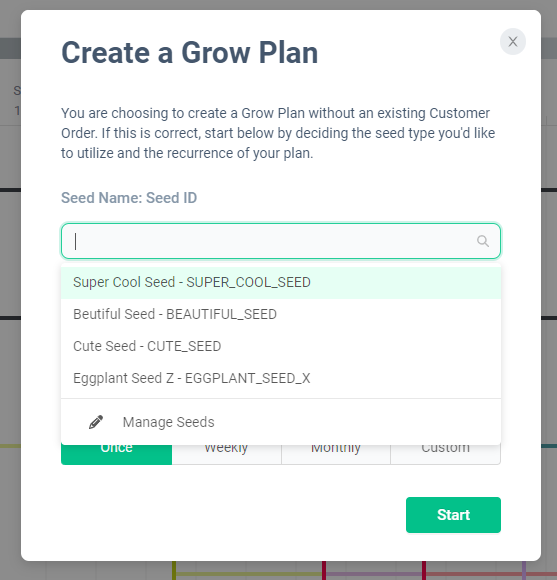
- Can be selected on the screen displayed after Add Grow Plan.
- Please select the appropriate seed in the "Seed Name: Seed ID" field.
- If the seeds you plan to use are not displayed, click "Seed Management" and you will be redirected to the "Product" tab on the "Purchase Management" page in a separate tab. Please register new seeds from the "Add Product" button.
Add grow plan - Choose customer
When to use:
Used when selecting customers for the grow plan to be created.
Users:
Manager
Screen Images:
Detail Specifications:
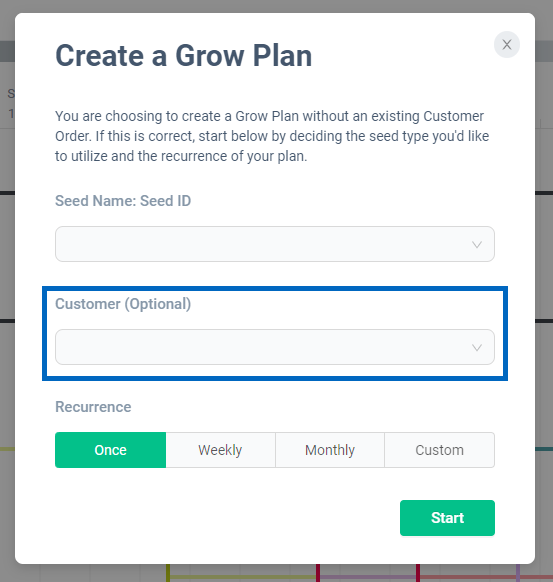
- Can be selected on the screen displayed after Add Grow Plan.
- Please select the applicable customer in the "Customer (optional)" field.
- As the label says, this is an optional setting field. It is also possible to set customers in subsequent steps when creating a grow plan.
Add grow plan - Set repeat
When to use:
Used when setting the number of repetitions for the grow plan to be created.
Users:
Manager
Screen Images:
Repeat count: Once
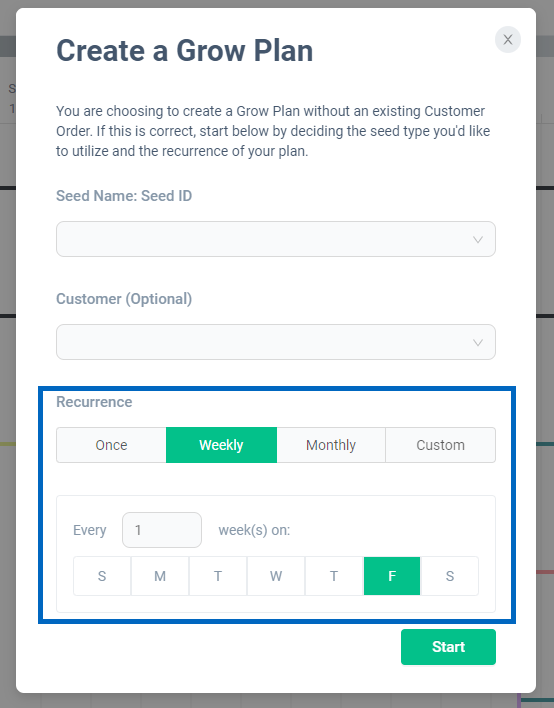
Repeat count: Weekly
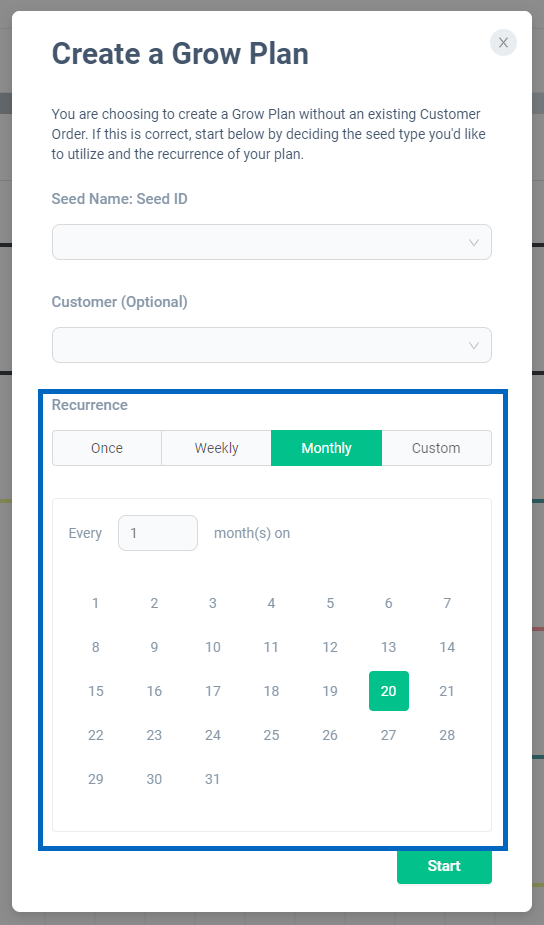
Repeat count: Monthly
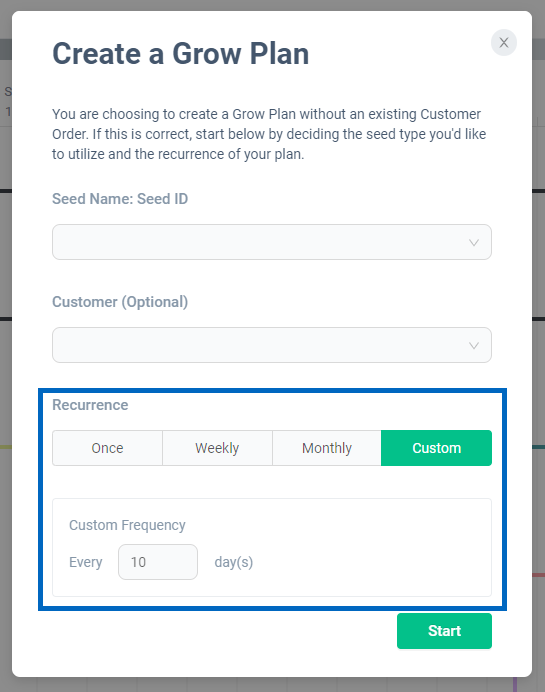
Repeat count: Custom
Detail Specifications:
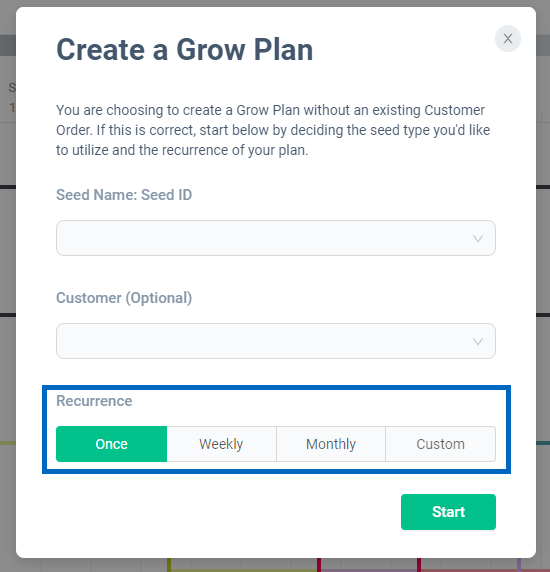
- It can be set on the screen displayed after Add grow plan.
- Please set any value in the "Number of repetitions" field.
- Once: Create a one-time grow plan with no repeats.
- Weekly: Create a grow plan where the final action is placed on any day of the week for any given week.
- Monthly: Create a grow plan in which the final action is placed on any date in any month.
- Custom: Create a grow plan where the final action is placed on any date.
Add grow plan - Choose grow plan template
When to use:
Select a grow plan template to be used in the grow plan to be created, or use it when not applying a template.
Users:
Manager
Screen Images:
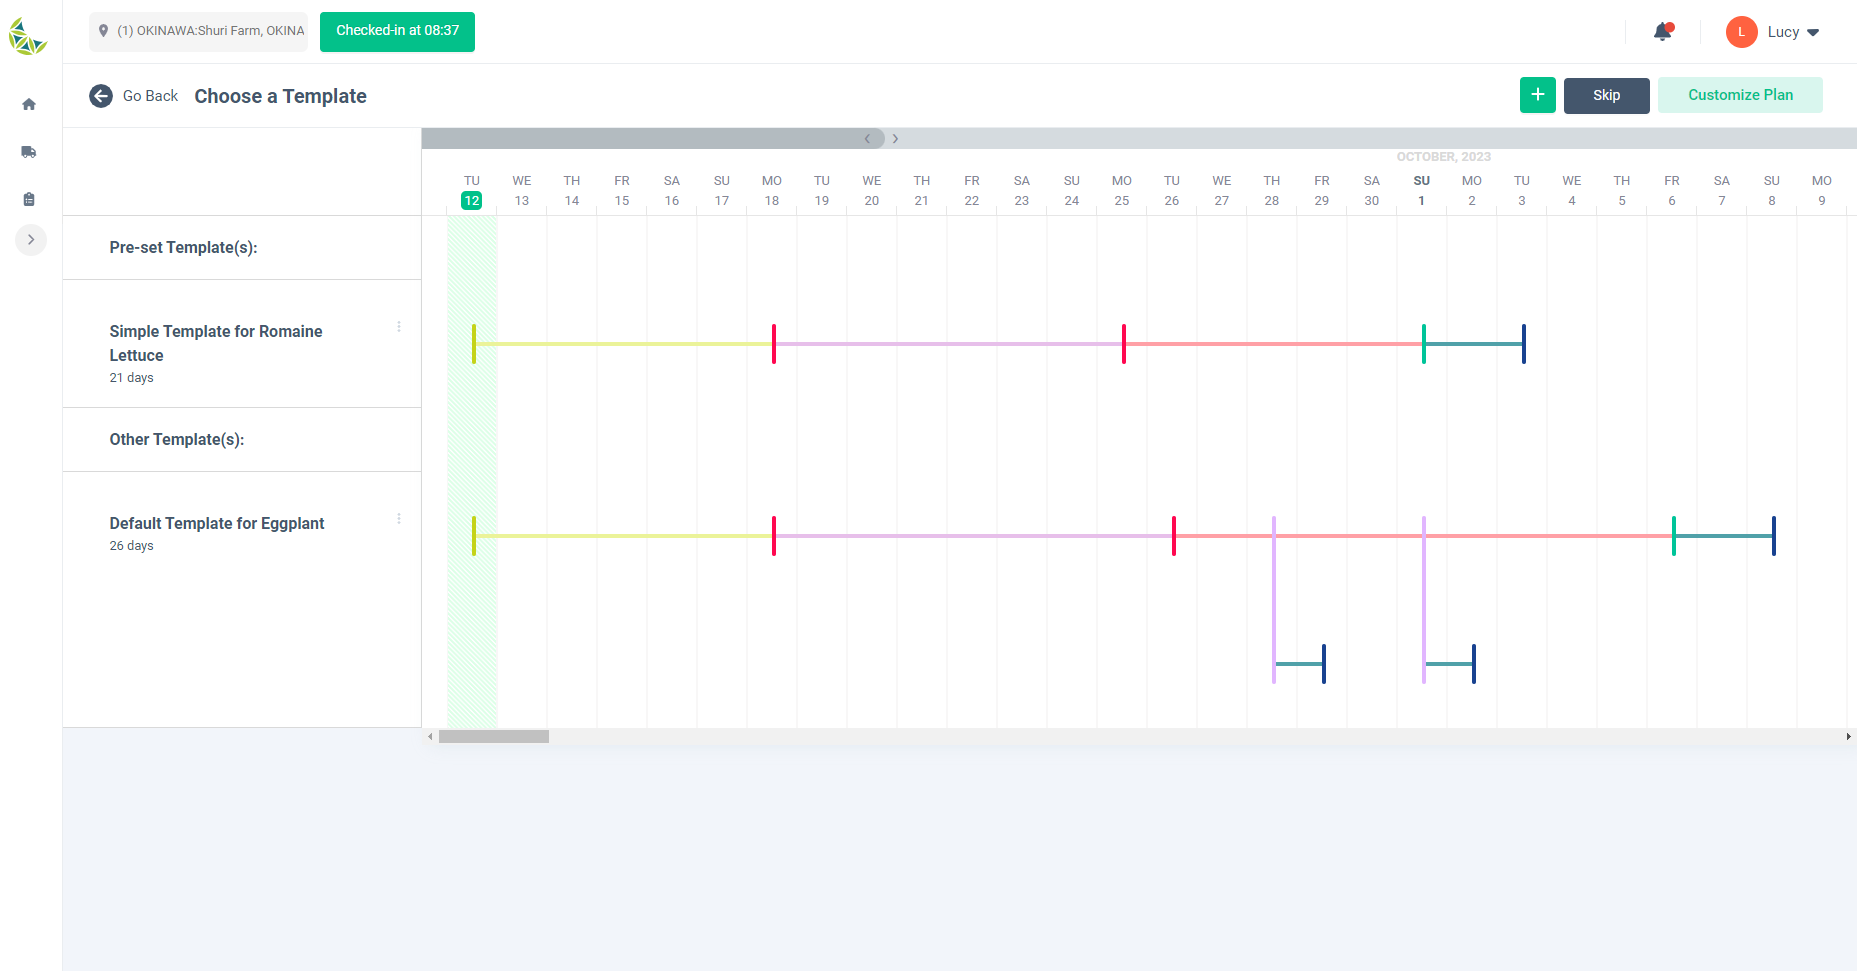
Do not apply template with "Skip" button

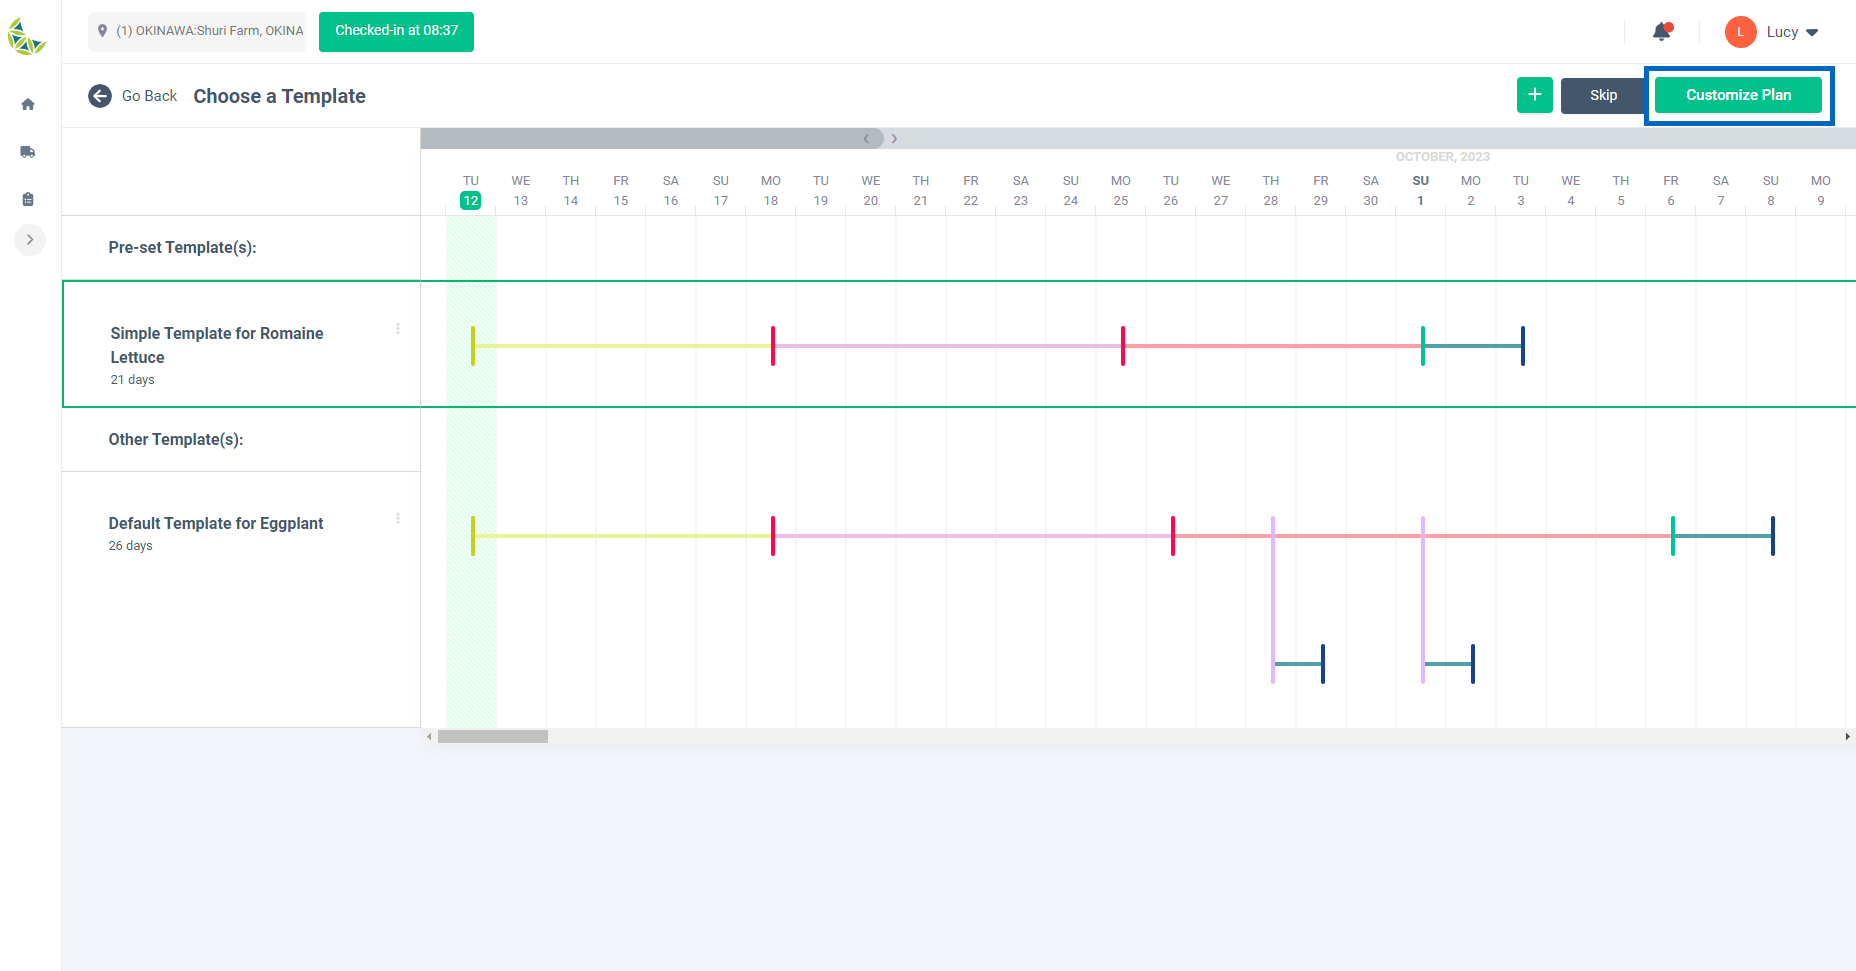
Apply the template with the "Customize Plan" button
Detail Specifications:
- Screen transition
- When creating a grow plan that is not linked to customer orders, Add grow plan - Choose seed, Add grow plan - Choose customer or Add grow plan - Set repeat.
- When creating a grow plan linked to a customer order, after Add grow plan linked to a customer order - Selection of seeds You can select it on the screen that appears.
- "Previously used templates" displays templates used or created for the same crop.
- "Other templates" displays templates used or created for different crops.
- By pressing the "Skip" button, you can create a grow plan without applying the template.
- By selecting the appropriate template and pressing the "Customize Plan" button, you can apply the specified template and create a grow plan.
- When creating a grow plan that is not tied to a customer order, the template will be applied based on the current date.
- When creating a grow plan linked to a customer order, the template will be applied based on the first delivery date. If there is not enough time between the current date and the first delivery date to fit the template, the template is not applicable.
Add grow plan - Choose grow plan template - Add grow plan template
When to use:
Used when creating a new grow plan template.
Users:
Manager
Screen Images:

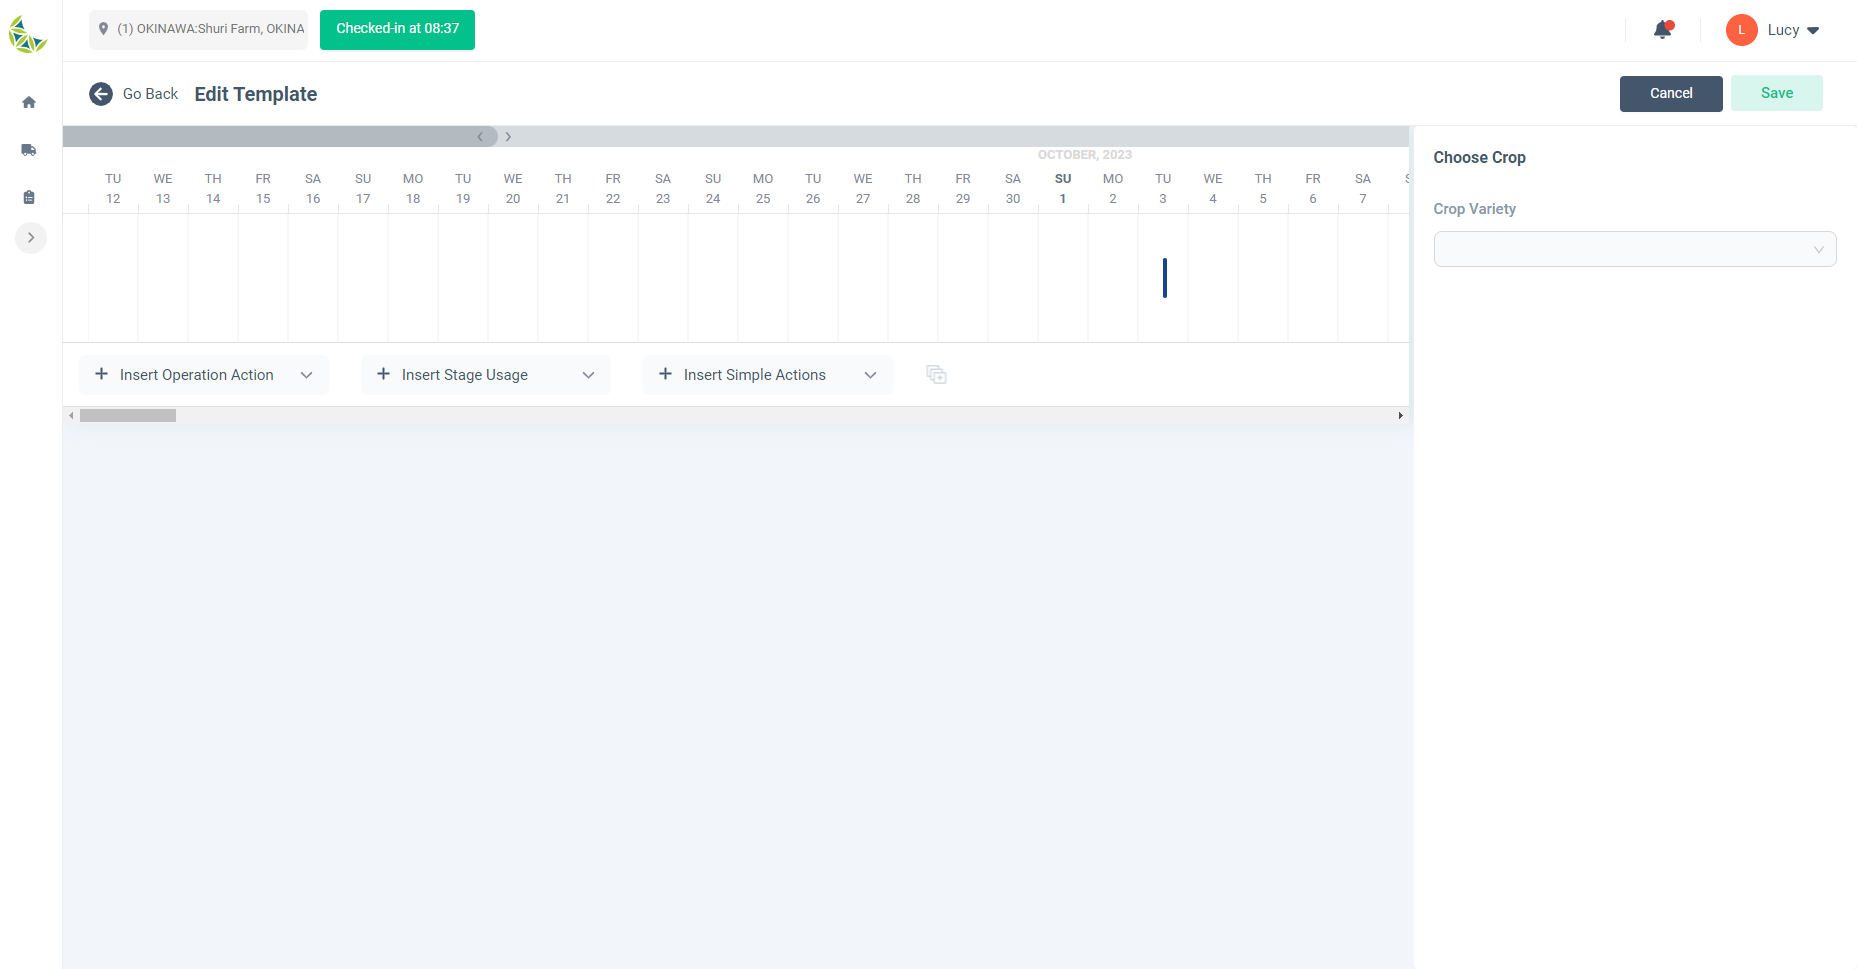
Initial status screen
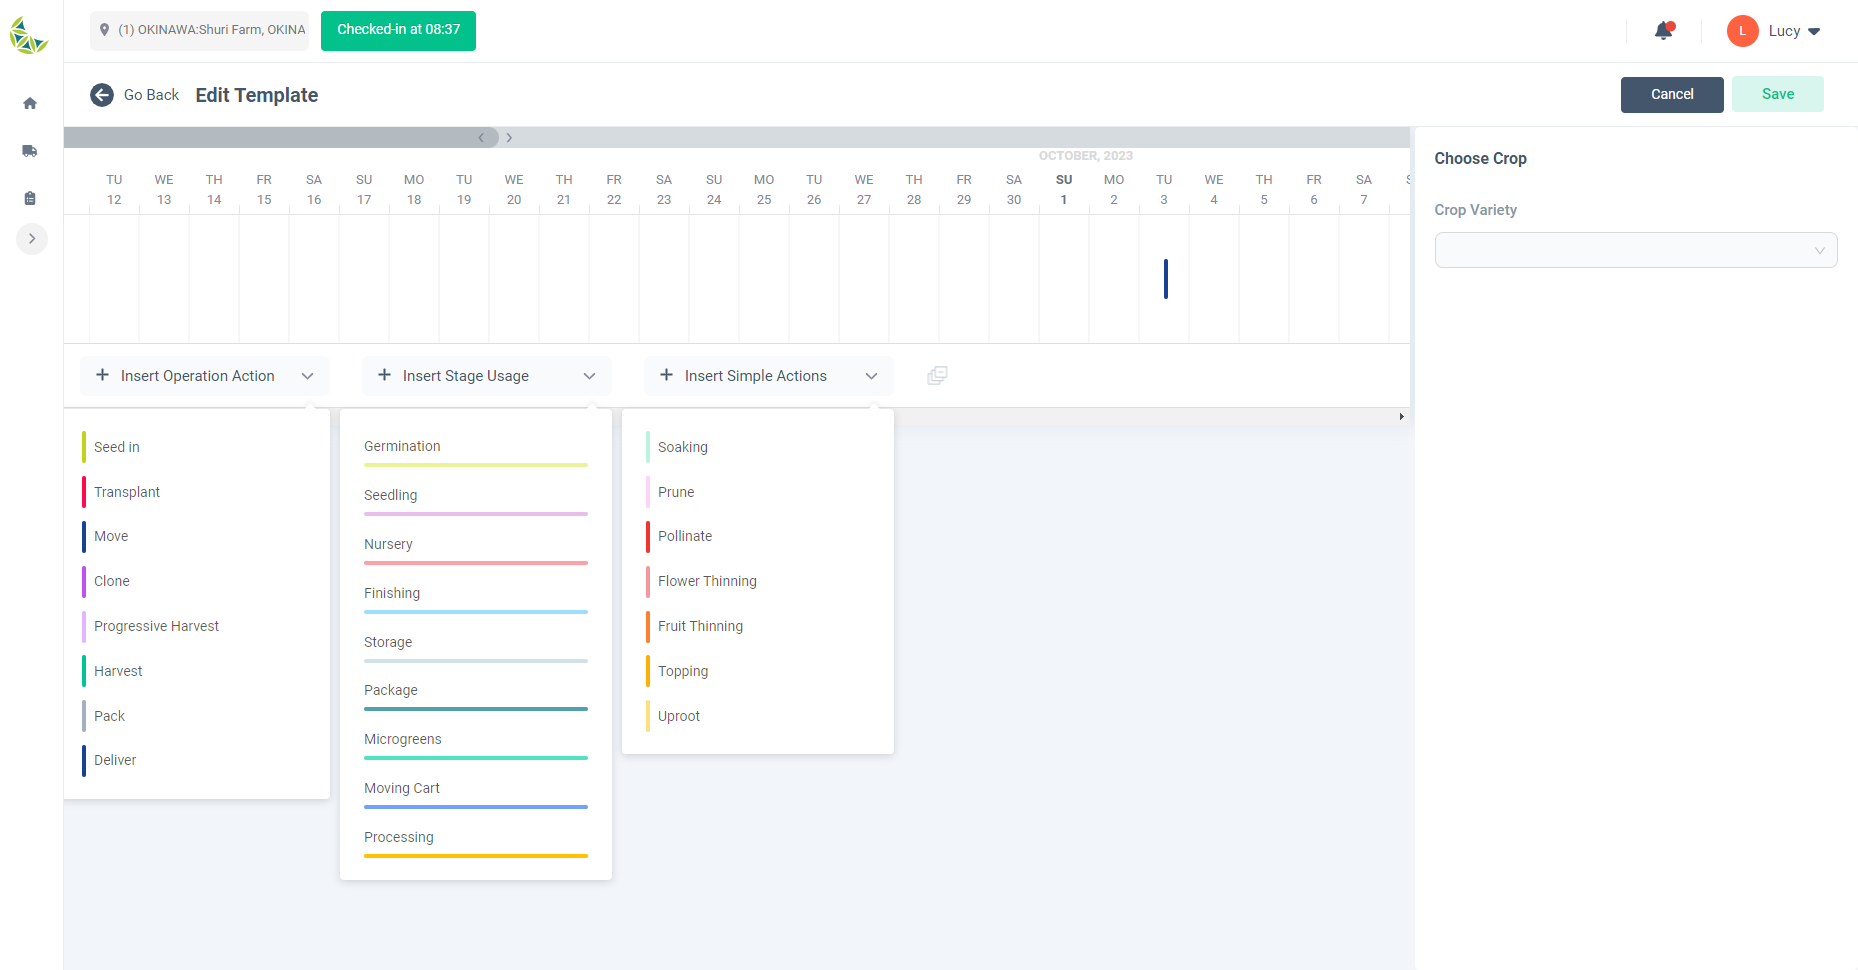
Opening/closing "Operation Action", "Stage Usage", and "Simple Action"
Detail Specifications:
- On the grow plan template selection screen, press the "+" button to move to the template creation screen.
- On the initial status screen, the delivery action is placed 3 weeks after the current date.
- Click "Operation Action", "Stage Usage", and "Simple Action" at the bottom of the calendar to open each list, and add new actions and stages by dragging and dropping on any date.
- Create a template with any date, set the crop information on the right side, and press the "Save" button to save the template. After saving, move to the previous screen.
- Click the "Back" and "Cancel" buttons to discard the template information being created and move to the previous screen.
Add grow plan - Choose grow plan template - Edit grow plan template
When to use:
Use this when editing a grow plan template that has already been created.
Users:
Manager
Screen Images:


Detail Specifications:
- Click "Edit" from the grow plan template card menu to be edited.
- After that, the target timeline will be available for drag and drop, so please change the date.
- You can drag and drop to the same date as the previous or next action.
- If there is no next action, you can drag and drop to the last date on the displayed calendar.
- After completing the changes, press the "Save" button at the top right of the screen.
- Click the "Cancel" button to discard the template information being edited and move to the previous screen.
- Template first action is not drag and drop possible. Make changes based on the first action.
Add grow plan - Choose grow plan template - Rename grow plan template
When to use:
Used when changing the name of a grow plan template that has already been created.
Users:
Manager
Screen Images:
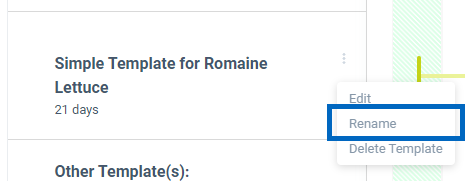
New name setting screen

Detail Specifications:
- Click the "Rename" button from the grow plan template card menu to be edited.
- A screen will appear where you can set a new name, so enter any value and press "Save".
Add grow plan - Choose grow plan template - Delete grow plan template
When to use:
Used when deleting a created grow plan template.
Users:
Manager
Screen Images:
Detail Specifications:
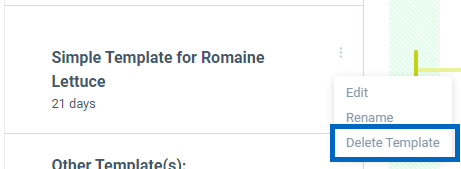
- Click the "Delete template" button from the grow plan template card menu to be edited.
Add grow plan - Build grow plan
When to use:
It is used when arranging actions and stages in a grow plan, setting dates, and setting quantities and weights.
Users:
Manager
Screen Images:
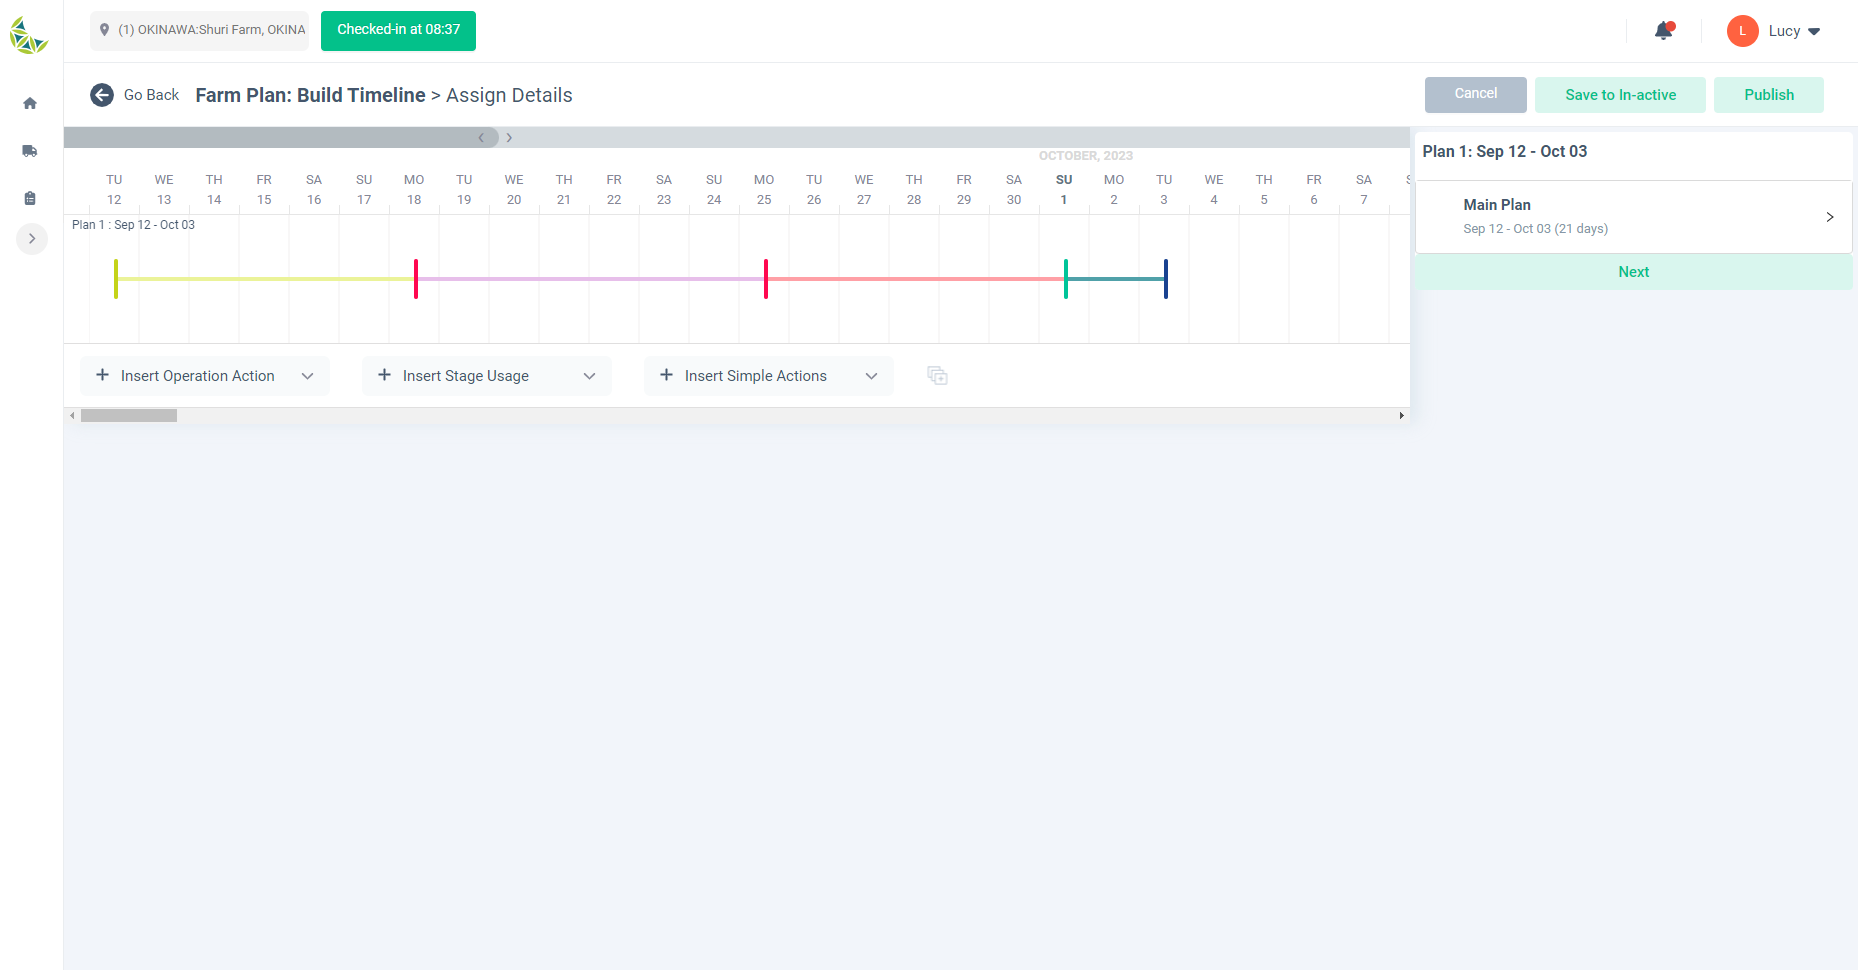
Initial display screen - when no template is applied

Initial display screen - when applying template
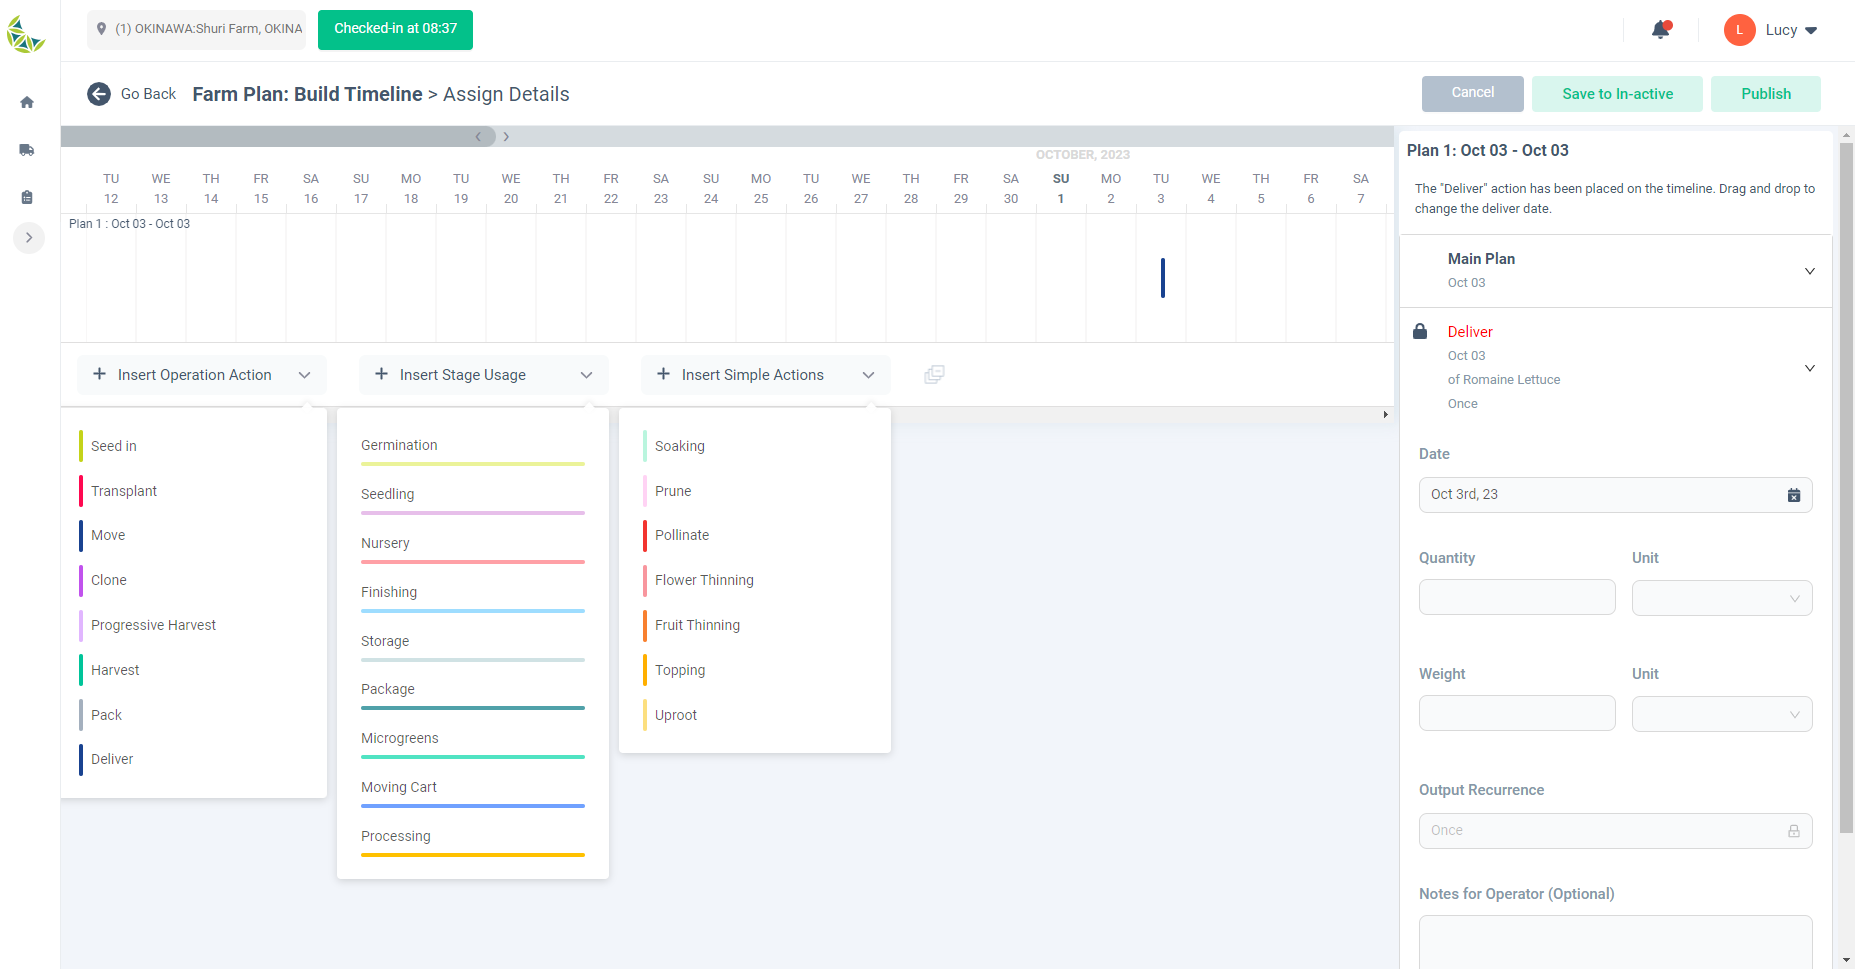
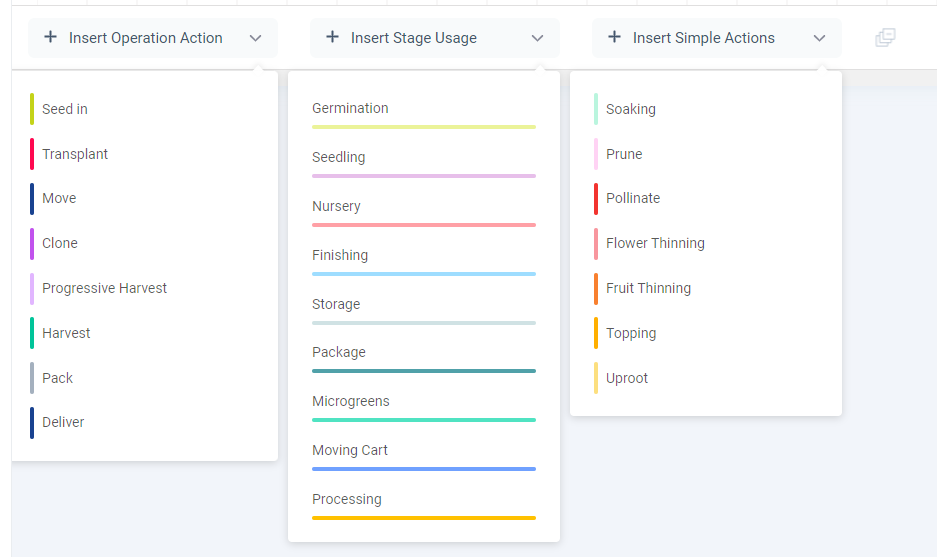
Opening/closing "Operation Action", "Stage Usage", and "Simple Action"
Detail Specifications:
- Initial state screen
- When creating a grow plan that is not tied to customer orders
- If you have not applied the grow plan template, the delivery action is placed 3 weeks after the current date.
- If a grow plan template is applied, the template is applied based on the current date.
- When creating grow plans linked to customer orders
- If you have not applied the grow plan template, the delivery action is placed on the first delivery date.
- If a grow plan template is applied, the template is applied based on the first delivery date.
- When creating a grow plan that is not tied to customer orders
- Regarding the display period of the calendar
- When creating a grow plan that is not tied to a customer order, the calendar will be displayed until one year from the current date.
- When creating grow plans linked to customer orders
- If a final delivery date is set, the calendar will display from the current date to the final delivery date.
- If no final delivery date is set, the calendar will be displayed until one year after the first delivery date.
- Added actions and stages
- Click "Operation Action", "Stage Usage", and "Simple Action" at the bottom of the calendar to open each list, and add new actions and stages by dragging and dropping on any date.
- It is possible to place actions between the current date and the date displayed on the calendar.
- Please create all operation actions except the final operation action so that they have a stage.
- It is impossible to change the order of actions after placing them.
- Change date of action
- You can change the date by dragging and dropping the placed action on the calendar.
- Behavior when moving differs depending on the lock state that can be set on the right side. The date of each action is changed based on the locked action.
- You can change the date by changing the "Start date" or "Interval" of the relevant action on the right side.
- It is possible to move between the day after the previous action and the day before the next action.
- It is possible to place actions between the current date and the date displayed on the calendar.
- You can change the date by dragging and dropping the placed action on the calendar.
- Action quantity/weight settings
- You can set the "Quantity" or "Weight" of the corresponding action on the right side.
- "Quantity" and "Unit" are required fields.
- When creating a grow plan associated with a customer order, the final action on the main branch is the date specified as the first delivery date. Therefore, the date cannot be changed. Additionally, the quantity and weight cannot be changed as the customer order information is inherited.
- Delete action
- You can delete an action by clicking the trash can icon on the right side.
- If you delete the first action in a subbranch, all subsequent actions in the subbranch will be deleted at the same time.
- Stage Usage change
- You can change it by dragging and dropping it from the "Stage Usage" list again to the stage part you want to change.
- If all required fields are filled in, the "Next" button at the bottom of the right side will be activated. Press this to move to the next page.
Add grow plan - Build grow plan - Expand/Fold action and stage usage
When to use:
Used to open and close the "Operation Action", "Simple Action", and "Stage Usage" lists all at once.
Users:
Manager
Screen Images:
Screen before batch opening

Screen after batch opening
Detail Specifications:
- "Operation Action", "Simple Action", and "Stage Usage" can be opened and closed by clicking each list.
- If you want to open and close all at once, press the icon next to the "Simple Action" list.
Add grow plan - Build grow plan - Confirm when adding more actions on the Delivery day
When to use:
Used when adding other actions to the date where the final action "Delivery" is placed.
Users:
Manager
Screen Images:
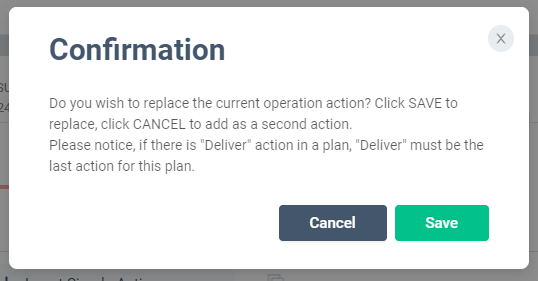
Add one action to the date where "Delivery" is placed
Add one action to the date where "Delivery" and one other action are placed
Detail Specifications:
- Add one action to the date where "Delivery" is placed
- A pop-up will appear asking if you want to replace the action you are adding with "Shipping".
- You can replace it by pressing the "Save" button.
- You can add a new action before "Delivery" by pressing the "Cancel" button.
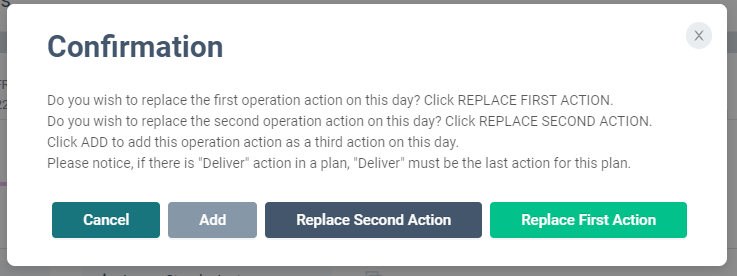
- Add 1 action to the date where "Delivery" and 1 other action are placed
- A pop-up will appear asking you how to arrange the actions you want to add.
- You can replace it with "Delivery" by clicking the "Replace 1st" button.
- By pressing the "Replace 2nd" button, you can replace it with the previous action of "Delivery"
- By pressing the "Add" button, you can add it as the first action on the same day.
- You can close this popup and discard your changes by clicking the "Cancel" button.
Add grow plan - Build grow plan - Timeline conflicts
When to use:
This will be displayed when placing an action or stage, or after completing the construction of a grow plan and pressing the "Next" button, if some timeline rules are not followed.
Users:
Manager
Screen Images:
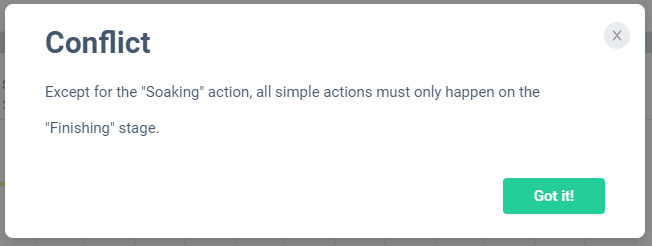
Detail Specifications:
- If some timeline rules are not followed, a conflict popup will be displayed.
- Please check the content of the conflict, press the "OK" button, and perform the settings again according to the content.
Add grow plan - Build grow plan - Duplicate simple actions
When to use:
Used to copy simple actions placed on the timeline.
Users:
Manager
Screen Images:
Copy content details settings popup

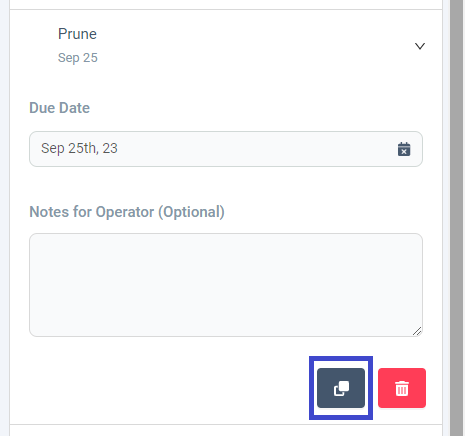
Detail Specifications:
- Click the copy icon of the corresponding simple action on the right side.
- If you set the copy content in the copy content detailed settings pop-up and press the "OK" button, you can copy the simple action with the specified content.
Add grow plan - Building grow plan - Add progressive harvest
When to use:
Use this when you want to add "Progressive Harvest" to the timeline.
Users:
Manager
Screen Images:
Detail Specifications:
- You can add "Harvest (Repeat)" to the branch you want to add by dragging and dropping it like other actions.
- "Harvest (repeat)" creates a new branch. This is called a sub-branch.
- Any action and stage can be placed on a sub-branch.
- It is not possible to place a 'harvest (iteration)' on a sub-branch created by another 'harvest (iteration)'.
- It is possible to place a "harvest (repeat)" on a sub-branch created by a "clone".
Add grow plan - Building grow plan - Duplicate progressive harvest
When to use:
Used when copying "Progressive Harvest" placed on the timeline.
Users:
Manager
Screen Images:
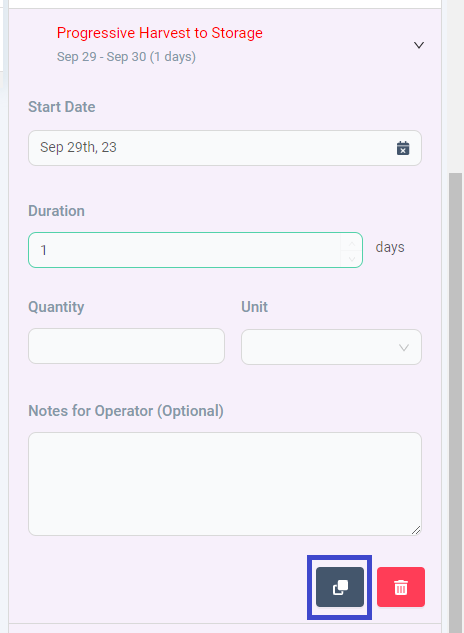
Copy content details settings popup
Detail Specifications:
- Click the copy icon for the corresponding "Harvest (Repeat)" on the right side.
- If you set the copy content in the copy content detailed settings pop-up and press the "OK" button, you can copy "Progressive Harvest" and the subsequent same sub-branch actions with the specified content.
Add grow plan - Building grow plan - Add clone
When to use:
Use this when you want to add a "Clone" to the timeline.
Users:
Manager
Screen Images:
Detail Specifications:
- You can add "clone" to the branch you want to add by dragging and dropping like other actions.
- "Clone" creates a new branch. This is called a sub-branch.
- Any action and stage can be placed on a sub-branch.
- It is not possible to place a 'Clone' on a sub-branch created by another 'Clone'.
- It is possible to place a "Clone" on a sub-branch created by "Progressive Harvest".
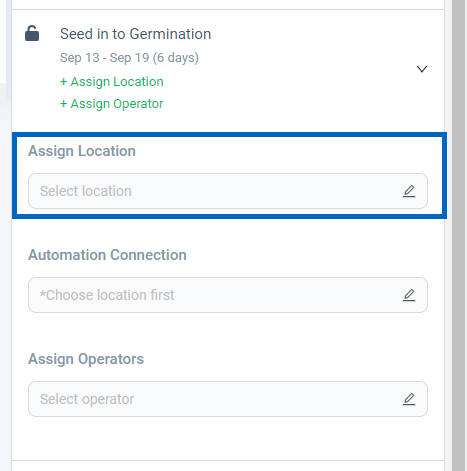
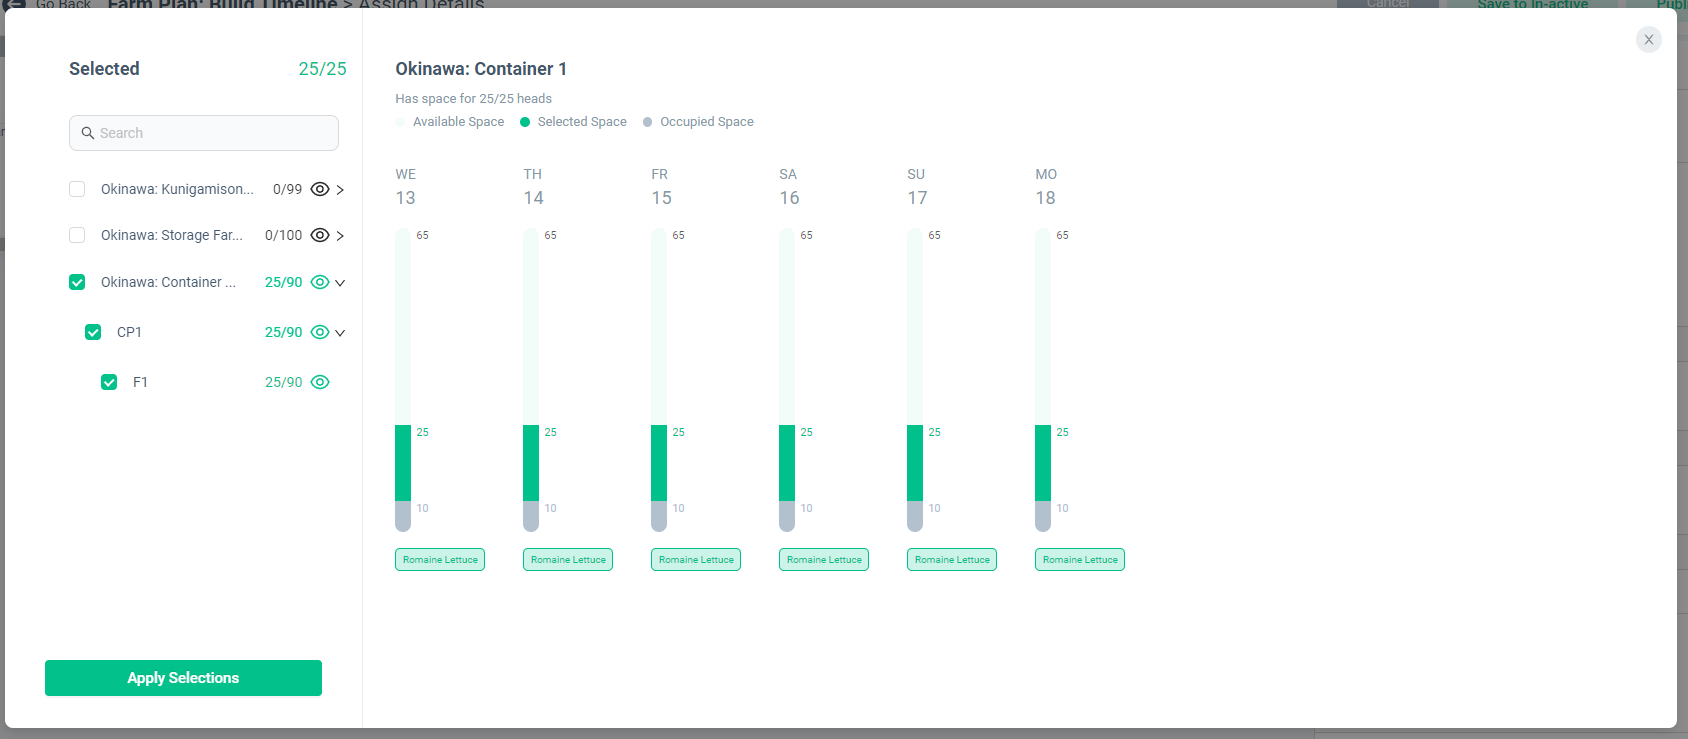
Add grow plan - Assign locations
When to use:
After completing the placement of actions and stages on the timeline and setting the quantity and weight, use this to allocate areas to each action.
Users:
Manager
Screen Images:
Screen after pressing the watch icon next to the area name
Detail Specifications:
- This means that Add grow plan - Build grow plan is completed, and you can go to the next page by pressing the "Next" button at the bottom of the right side.
- Click "Assign Location" for each action input item displayed on the right side. An area assignment pop-up will appear, select the appropriate area and press the "Reflect selection" button.
- You can check the available number, the number in use, and the number of allocated areas by clicking the watch icon next to the area name on the area allocation popup.
- The list of allocable areas will be displayed based on the subzone crop type and stage set on the Farm Profile page.
- The subzone that matches the crop type of the seed selected when creating the grow plan and matches the stage owned by the action will be displayed. Additionally, only those with free space will be displayed.
Add grow plan - Assign operators
When to use:
After completing the placement of actions and stages on the timeline and setting the quantity and weight, use this to assign operators to each action.
Users:
Manager
Screen Images:
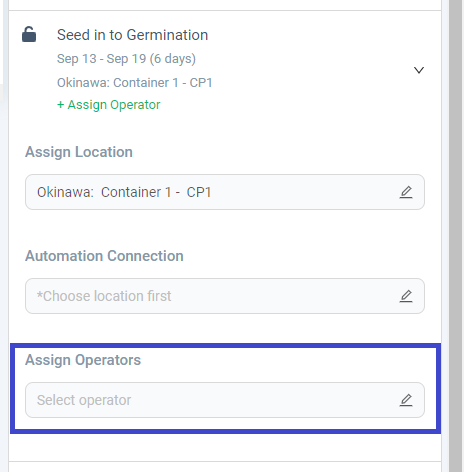
Detail Specifications:
- This means that Add grow plan - Build grow plan is completed, and you can go to the next page by pressing the "Next" button at the bottom of the right side.
- Click "Responsible person" for each action input item displayed on the right side. Operators that can be assigned in the relevant area on the relevant date will be displayed, so select the desired user.
- Users whose start date for the action is a working day and who have access rights to the selected area are listed as possible assignees.
Add grow plan - select customer
When to use:
Use this when you need to set the customer to whom the grown crops will be delivered.
Users:
Manager
Screen Images:

Detail Specifications:
- This means that Add grow plan - Building grow plan is completed, and you can go to the next page by pressing the "Next" button at the bottom of the right side.
- Click "Customer" under "Delivery" displayed on the right side. A list will be displayed, so select the customer you want to set as the delivery destination.
Add grow plan - Show and resolve conflicts
When to use:
During the process of repeatedly creating grow plans, it is used to verify whether areas and operators can actually be allocated for all plans, and to reset the settings based on the results.
Users:
Manager
Screen Images:
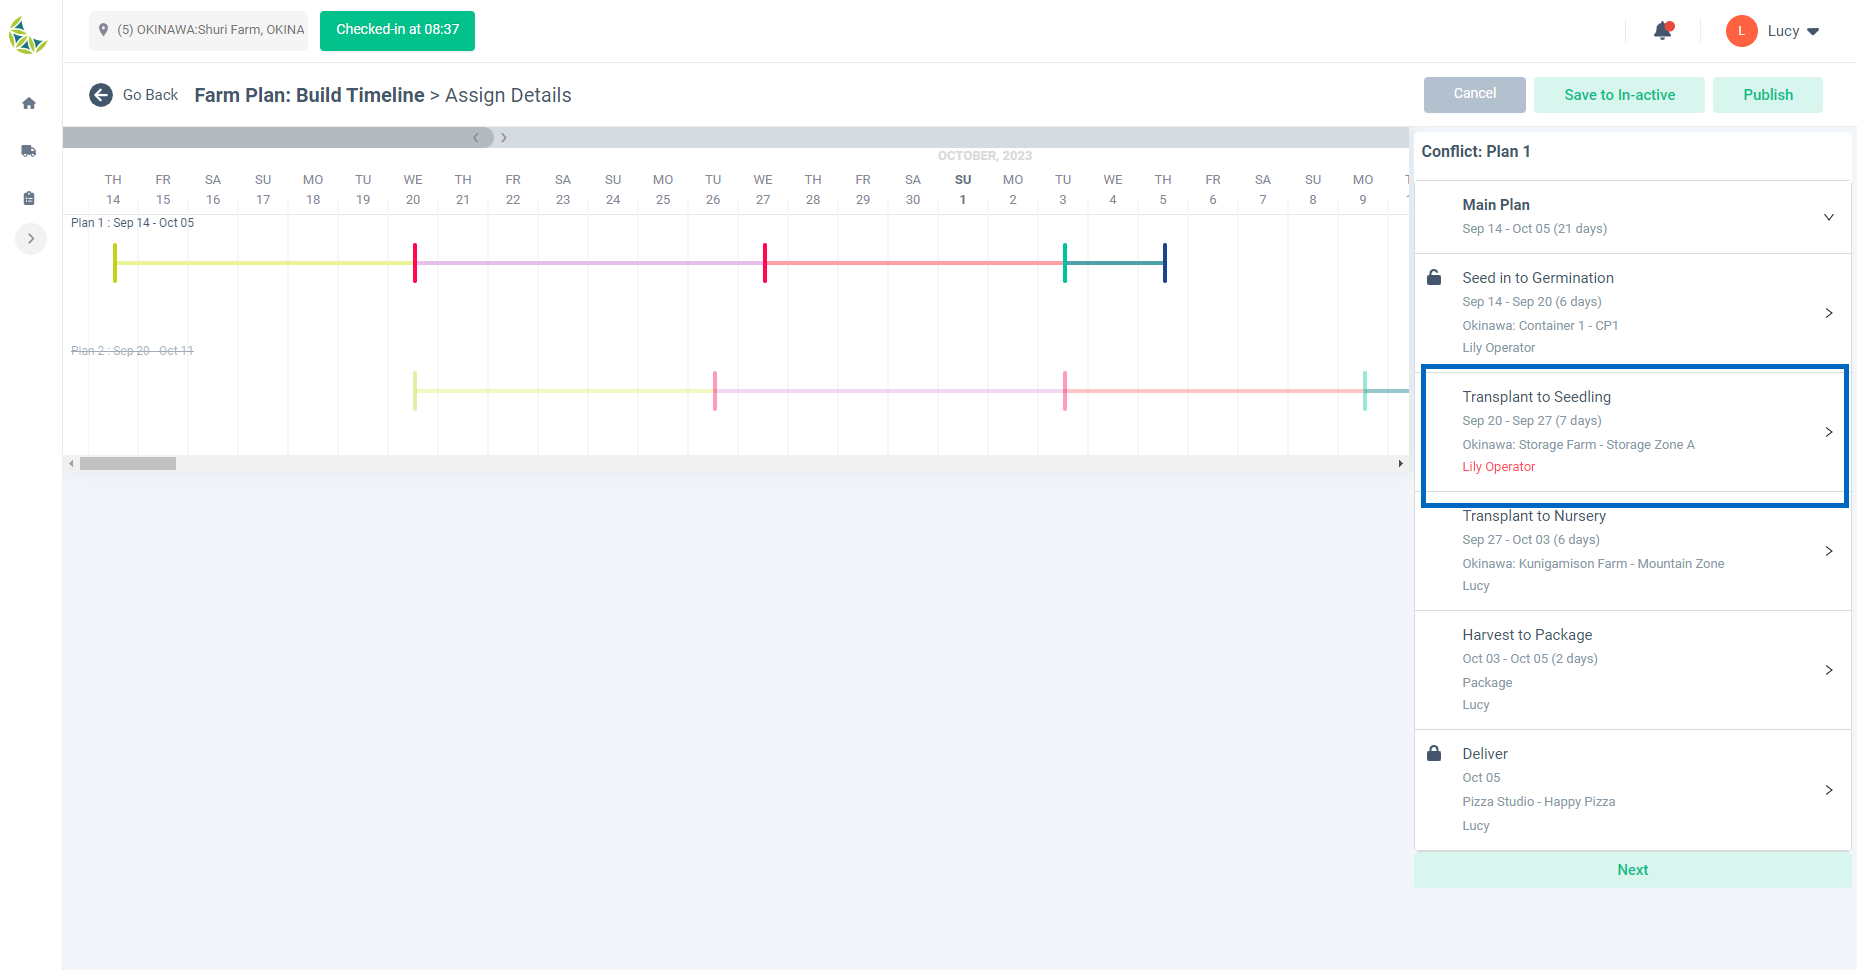
Detail Specifications:
- When creating a repeat grow plan, areas and operators may be assigned multiple times depending on the repeat frequency.
- After completing the provisional allocation of areas and operators, we will verify whether areas and operators can actually be allocated for all plans.
- If there are any areas or operators that cannot be allocated in the above verification, you will be redirected to a page where they can be allocated again.
- Reset the corresponding area or operator that cannot be assigned, and press the "Next" button. Continue this operation until all problems are resolved.
Add grow plan - Save grow plan template
When to use:
Use this to save the created grow plan timeline as a template.
Users:
Manager
Screen Images:
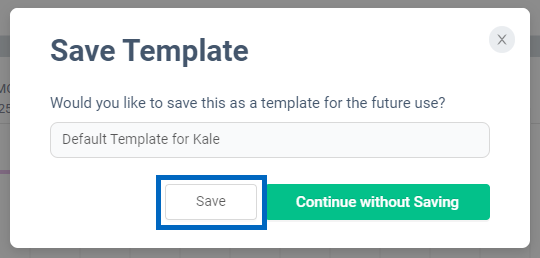
Detail Specifications:
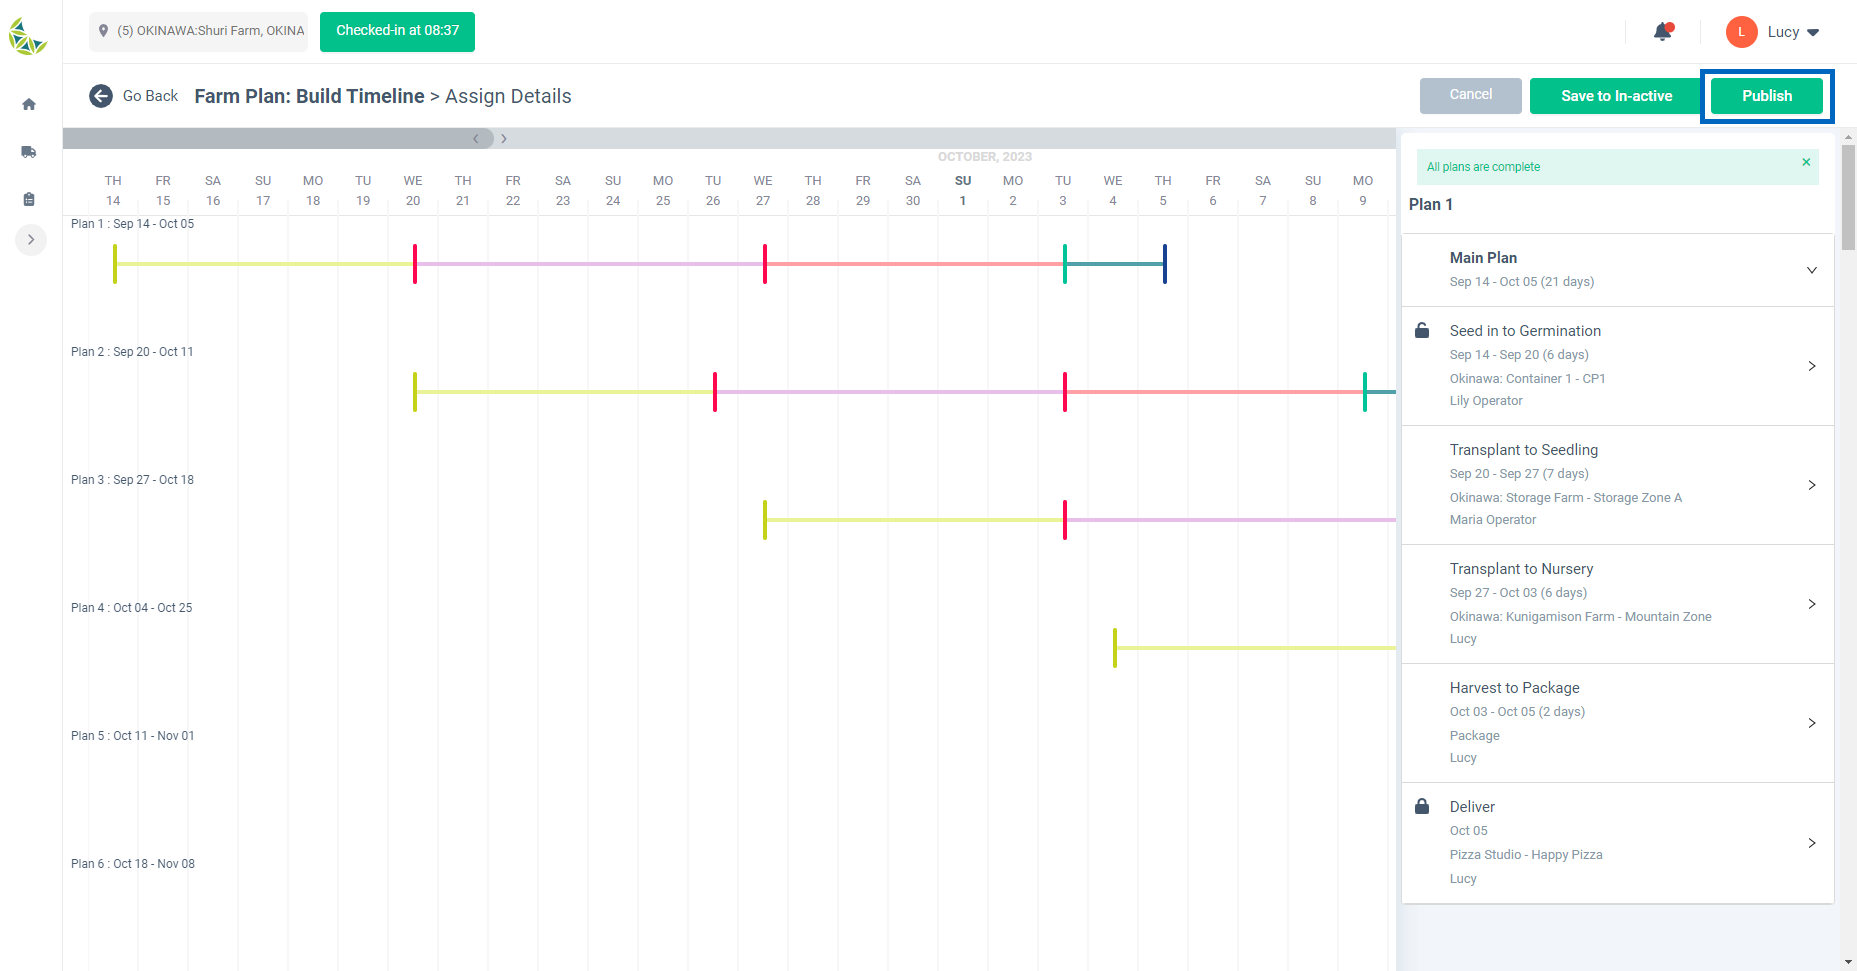
- When all the input items required for the grow plan are completed and the plan is ready to be saved, the "Save as disabled" button and the "Publish" button at the top right of the screen will become available.
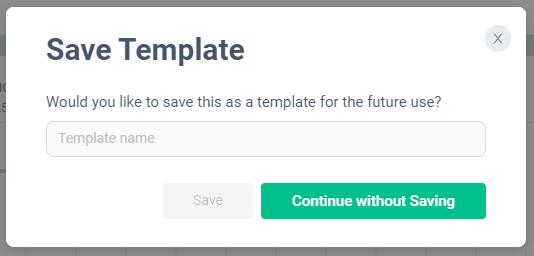
- When you press each button, a screen will appear asking whether you want to save the currently created grow plan timeline as a template. If you want to save it as a template, enter the template name and press "Save".
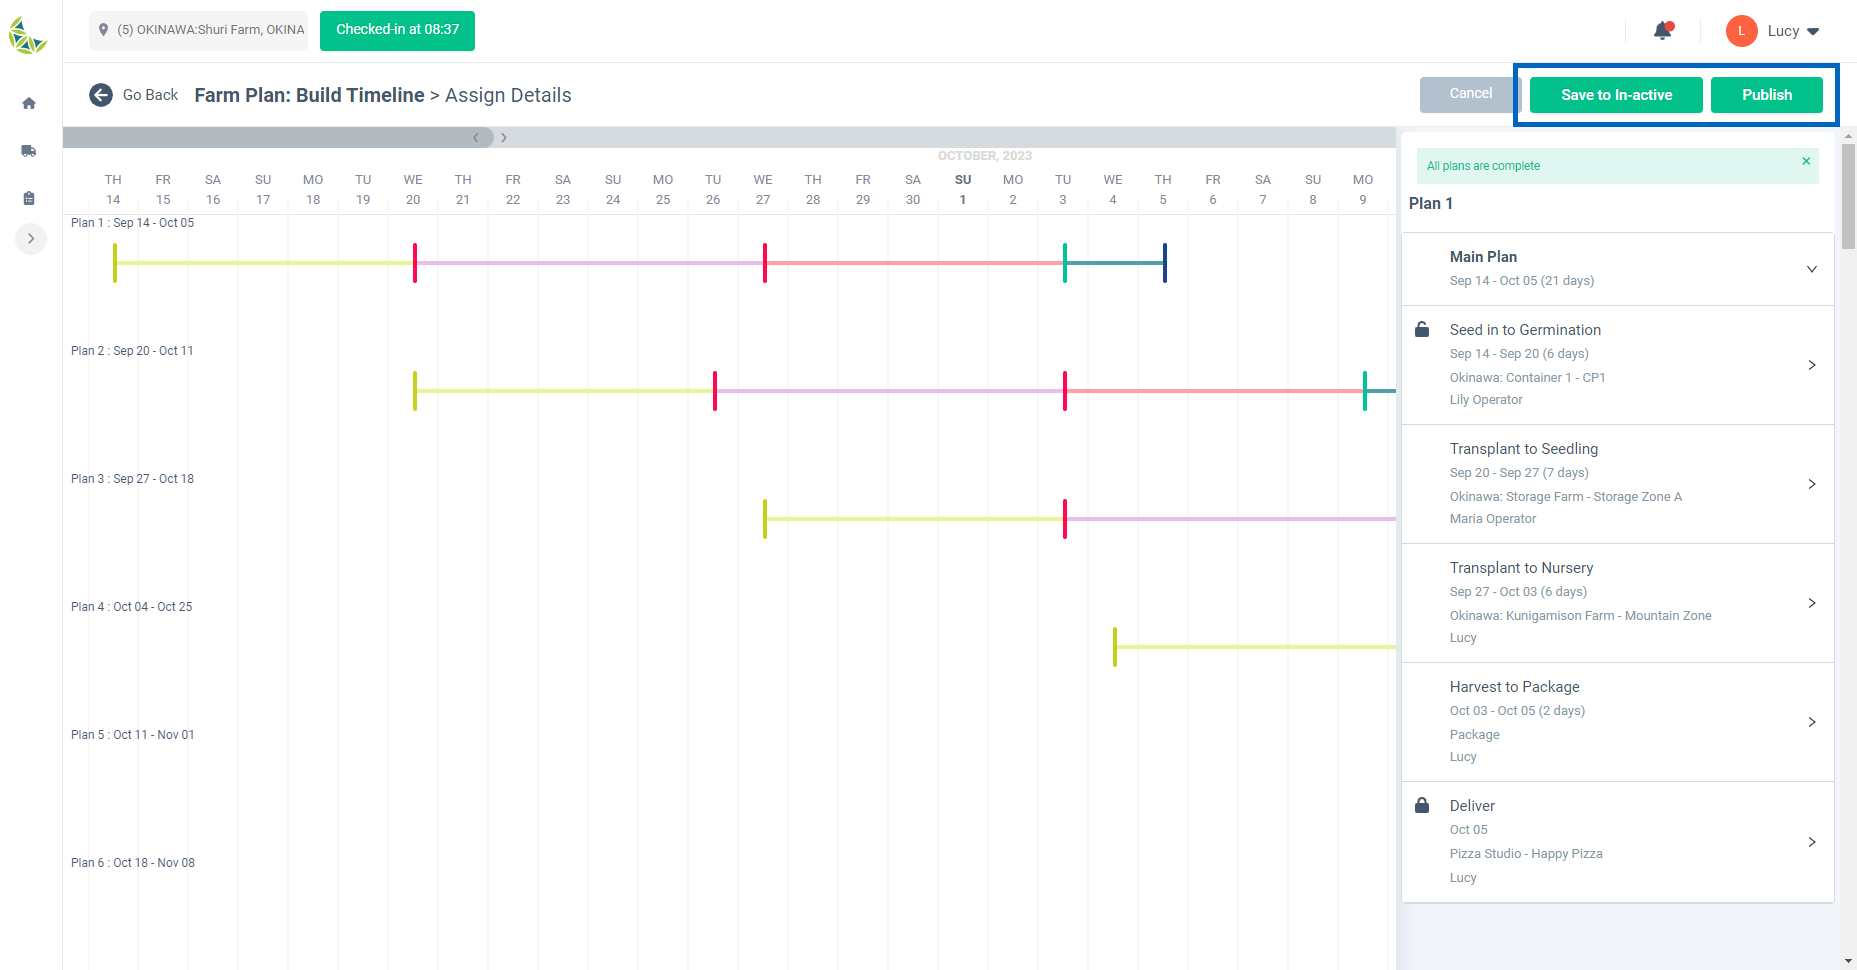
Add grow plan - Save grow plan as active plan
When to use:
Used to save the created grow plan in active state.
Users:
Manager
Screen Images:
Detail Specifications:
- Once you have completed all input items required for the grow plan and are ready to save it, you will be able to press the "Publish" button at the top right of the screen.
- When you press the "Publish" button, a screen will appear asking whether you want to save the currently created grow plan timeline as a template.
- If you want to save it as a template, enter the name of the template and press "Save".
- If you do not need to save it as a template, click "Continue without saving template".
Edit grow plan
When to use:
Use this when you want to edit the contents of the grow plan after creating it.
Users:
Manager
Screen Images:
Detail Specifications:
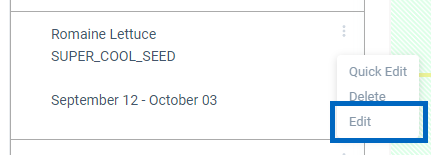
- Select "Edit" from the details card menu of the grow plan you want to edit.
- If the plan to be edited is part of a repeated grow plan, you can select the editing range from the following.
- Edit only the selected grow plan.
- Edit subsequent iterations of the grow plan, including the selected grow plan.
- The operations after moving to the edit screen are the same as those after #Add grow plan - Build grow plan.
- Action contents before the editing date cannot be edited. This is because modifying past action content means manipulating the results of completed tasks.
Add maintenance tasks
When to use:
Used when creating maintenance tasks that are not tied to grow plans.
Users:
Manager
Screen Images:

Detail Specifications:
- Click the "Add" button in the farm schedule header and select "Maintenance Task".
- Please refer to the manual "Operation" page for further details. Task List
Build grow plan session timeout
When to use:
After establishing a grow plan session, if 30 minutes pass without any screen operations, the session will be automatically disconnected. By disconnecting the session, other users can perform operations related to the grow plan.
Users:
Manager
Screen Images:
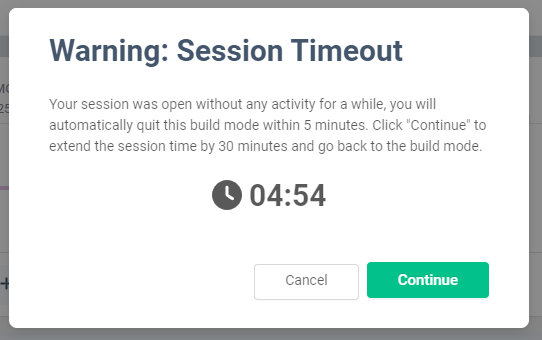
Screen after 25 minutes with no screen operations
Screen after 30 minutes without screen operation
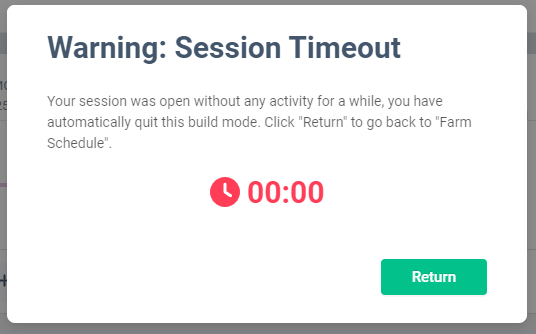
Detail Specifications:
- A session is established when the user performs operations related to grow plan. The operations to establish a session are as follows.
- Add grow plan
- Edit grow plan
- Quick edit of grow plan
- Only one session can be established at the same time per owner account.
- After establishing a session, the session will be automatically disconnected if 30 minutes pass without any screen operations.
- If 25 minutes pass without any screen operation, a warning screen will be displayed. If you want to extend the session, you can hold the session again for 30 minutes by clicking "Continue".
- If 30 minutes pass without any screen interaction, a screen will appear informing you that the session has been disconnected.
- If the session is disconnected, all input content will be discarded. be careful.
Multiple user build plan conflicts
When to use:
While a user belonging to the same owner account is establishing a grow plan session, other users cannot perform operations related to the grow plan.
Used to check the currently valid session information.
Users:
Manager
Screen Images:
Detail Specifications:
- A session is established when the user performs operations related to grow plan. The operations to establish a session are as follows.
- Add grow plan
- Edit grow plan
- Quick edit of grow plan
- In addition to the above operations, the existence of currently valid session information is verified when deleting a grow plan.
- Operations related to grow plans may take time. To avoid unexpected interference with area allocation, etc., when multiple users perform operations at the same time, restrictions are placed to prevent multiple users from performing operations at the same time.
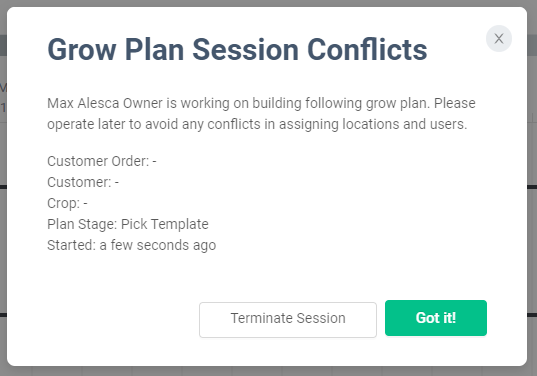
- If there is currently a valid session, the relevant session information will be displayed.
- Click the "OK" button to close the session information screen.
- Click the "End Session" button to discard the currently active session.
- If you press the "End session" button to discard the currently active session, all input contents of the user holding the session will be discarded. be careful.
Customer Order
Display customer orders for grow plan
When to use:
Used to confirm customer orders created on the "Sales" screen that require a farm schedule.
Users:
Manager
Screen Images:
Detail Specifications:
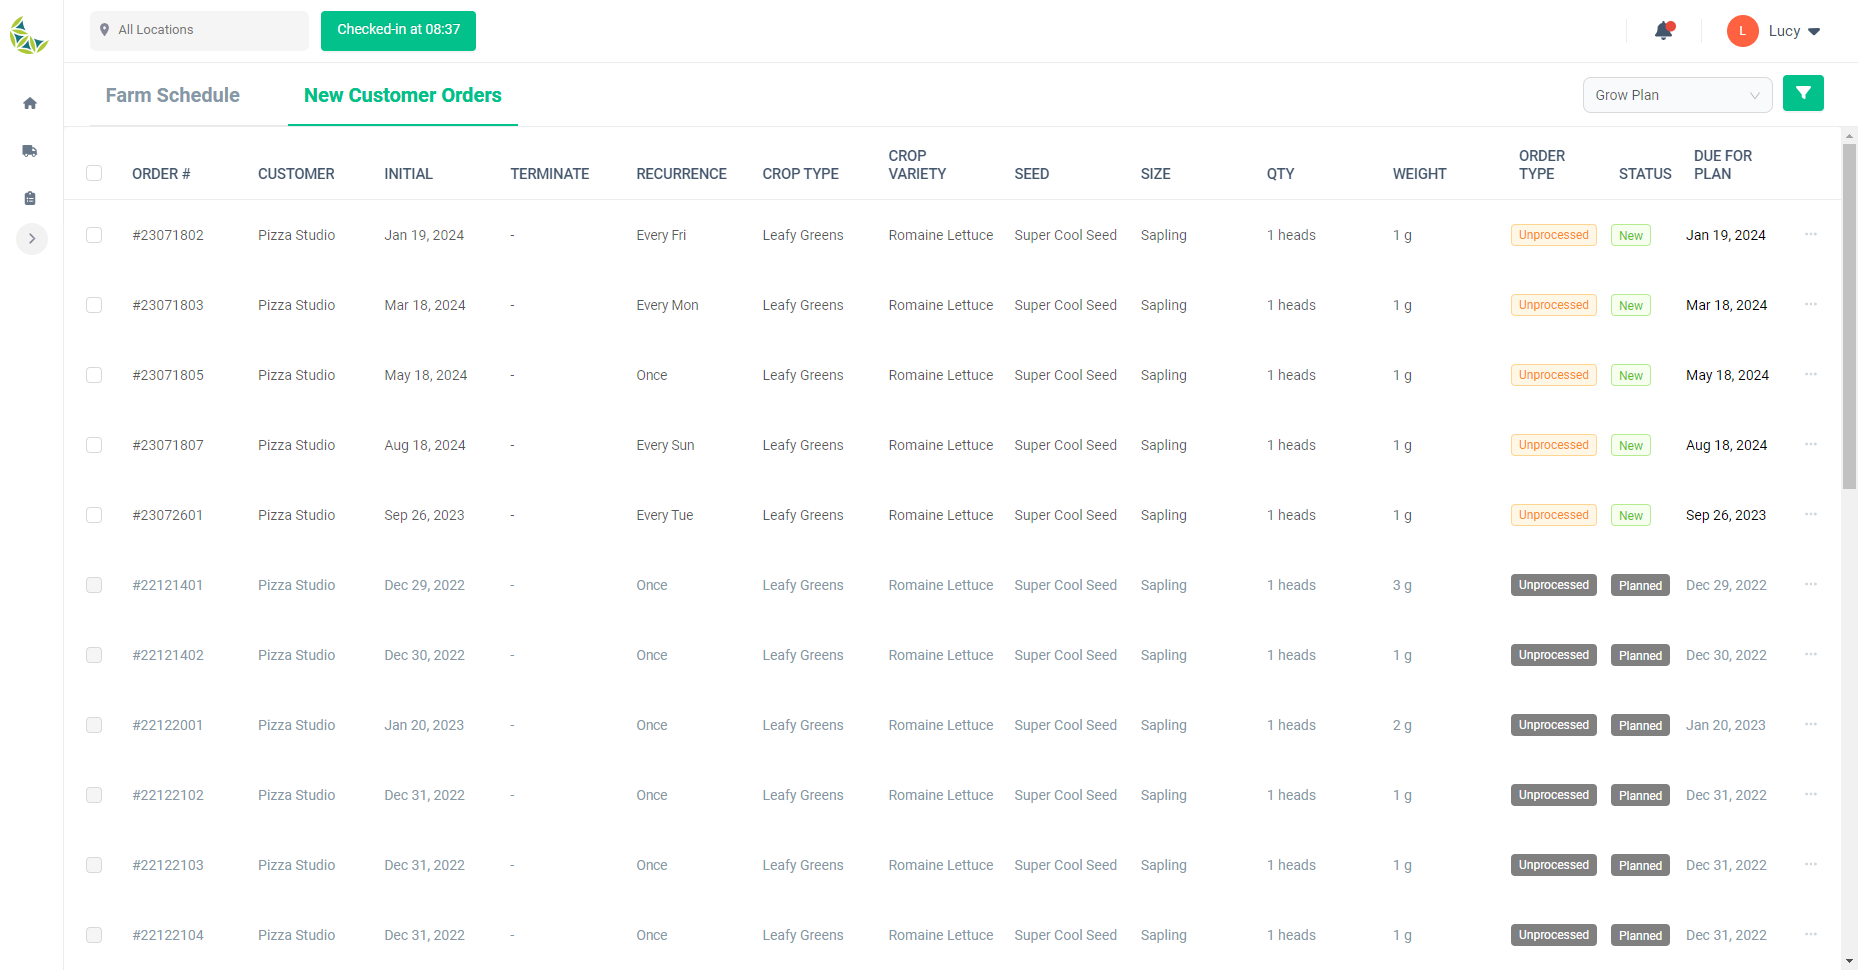
- This screen will be displayed when you go to the "New Customer Orders" tab on the "Farm Schedule" screen.
- A list of customer orders created on the "Sales Management" screen will be displayed. You can check the detailed information and status of your order, as well as whether there is a farm schedule associated with your order.
Delete customer order for grow plan
When to use:
After creating a grow plan linked to a customer order, it is used to delete the corresponding customer order.
Users:
Manager
Screen Images:

Detail Specifications:
- Click "Delete Order" from the customer order menu for which you have already created a grow plan.
- Even if you delete an order on this screen, the grow plan that has been created will not be deleted.
- If you would like to delete a customer order before creating a grow plan, you can do so from the "Sales" screen.
Combine orders for grow plan
When to use:
Used when merging customer orders with the same content.
Users:
Manager
Screen Images:
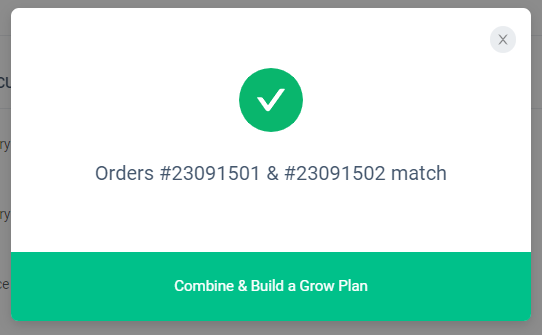
Screen if integration is possible
Screen when integration is not possible

Detail Specifications:
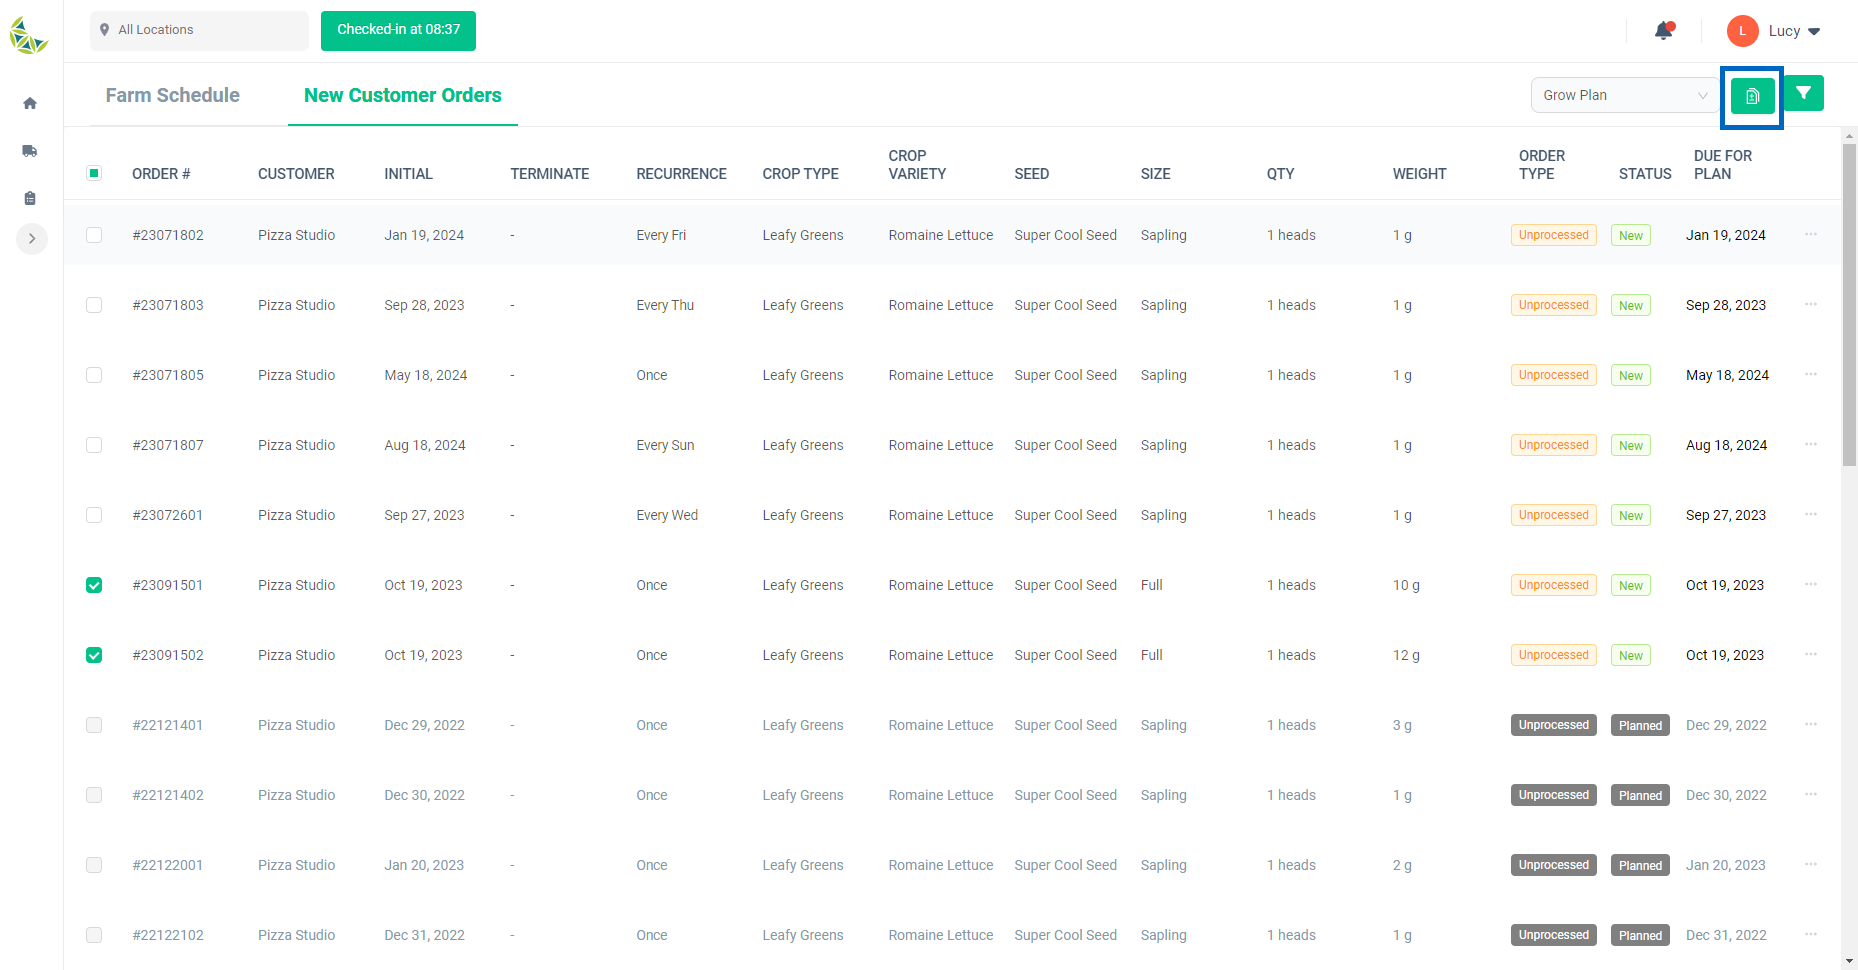
- It is possible to combine orders with the same first delivery date, end date, repeat count, crop, variety, seed, and size.
- Check the left end of each order information and press the "Merge orders" button displayed at the top right.
- If all of the above information is the same, a screen will appear informing you of this. Click “Combine & Build a Grow Plan”
- If there is a discrepancy in the above, the order number will be displayed in red.
Build grow plan with single order
When to use:
Used when creating grow plans linked to customer orders.
Users:
Manager
Screen Images:

Detail Specifications:
- If you want to create a grow plan linked to one customer order, press the "Create grow plan" button on the right-hand menu of the target order information.
- If you want to create a grow plan that is linked to multiple customer orders, you can also create the plan by performing Combine orders for grow plan.
- It is not possible to create a grow plan that is linked to a customer order whose "plan start deadline" has passed.
Build grow plan with single order - Choose seed
When to use:
Use this when selecting seeds to use in the grow plan associated with the customer order you create.
Users:
manager
Screen Images:
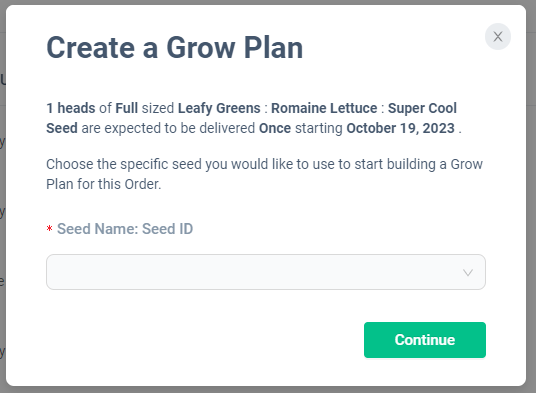
Detail Specifications:
- Can be selected on the screen that appears after Build grow plan with single order.
- Please select the appropriate seed in the "Seed Name: Seed ID" field.
- If the seeds you plan to use are not displayed, click "Seed Management" and you will be redirected to the "Product" tab on the "Supplier" page in a separate tab. Please register new seeds from the "Add Product" button.
- The subsequent operations are the same as when creating a grow plan that is not tied to customer orders. Please refer to Add grow plan - Choose grow plan template.