Register farm information
In order to use the software to manage your farm and the containers you own, you will need to register your farm information. This page explains how to register basic information related to the farm.
What is a farm?
The information about the farms and containers you own is collectively called a farm. A farm includes sites, facilities, zones, and subzones.
These are often expressed in a hierarchical structure as shown below. Please remember this concept as it is important when using Orion.
Site > Facility > Zone > Subzone
The following sections explain how to register sites and facilities. Don't worry, the explanations below will help you understand.
Now let's start by actually registering the site!
Register Site
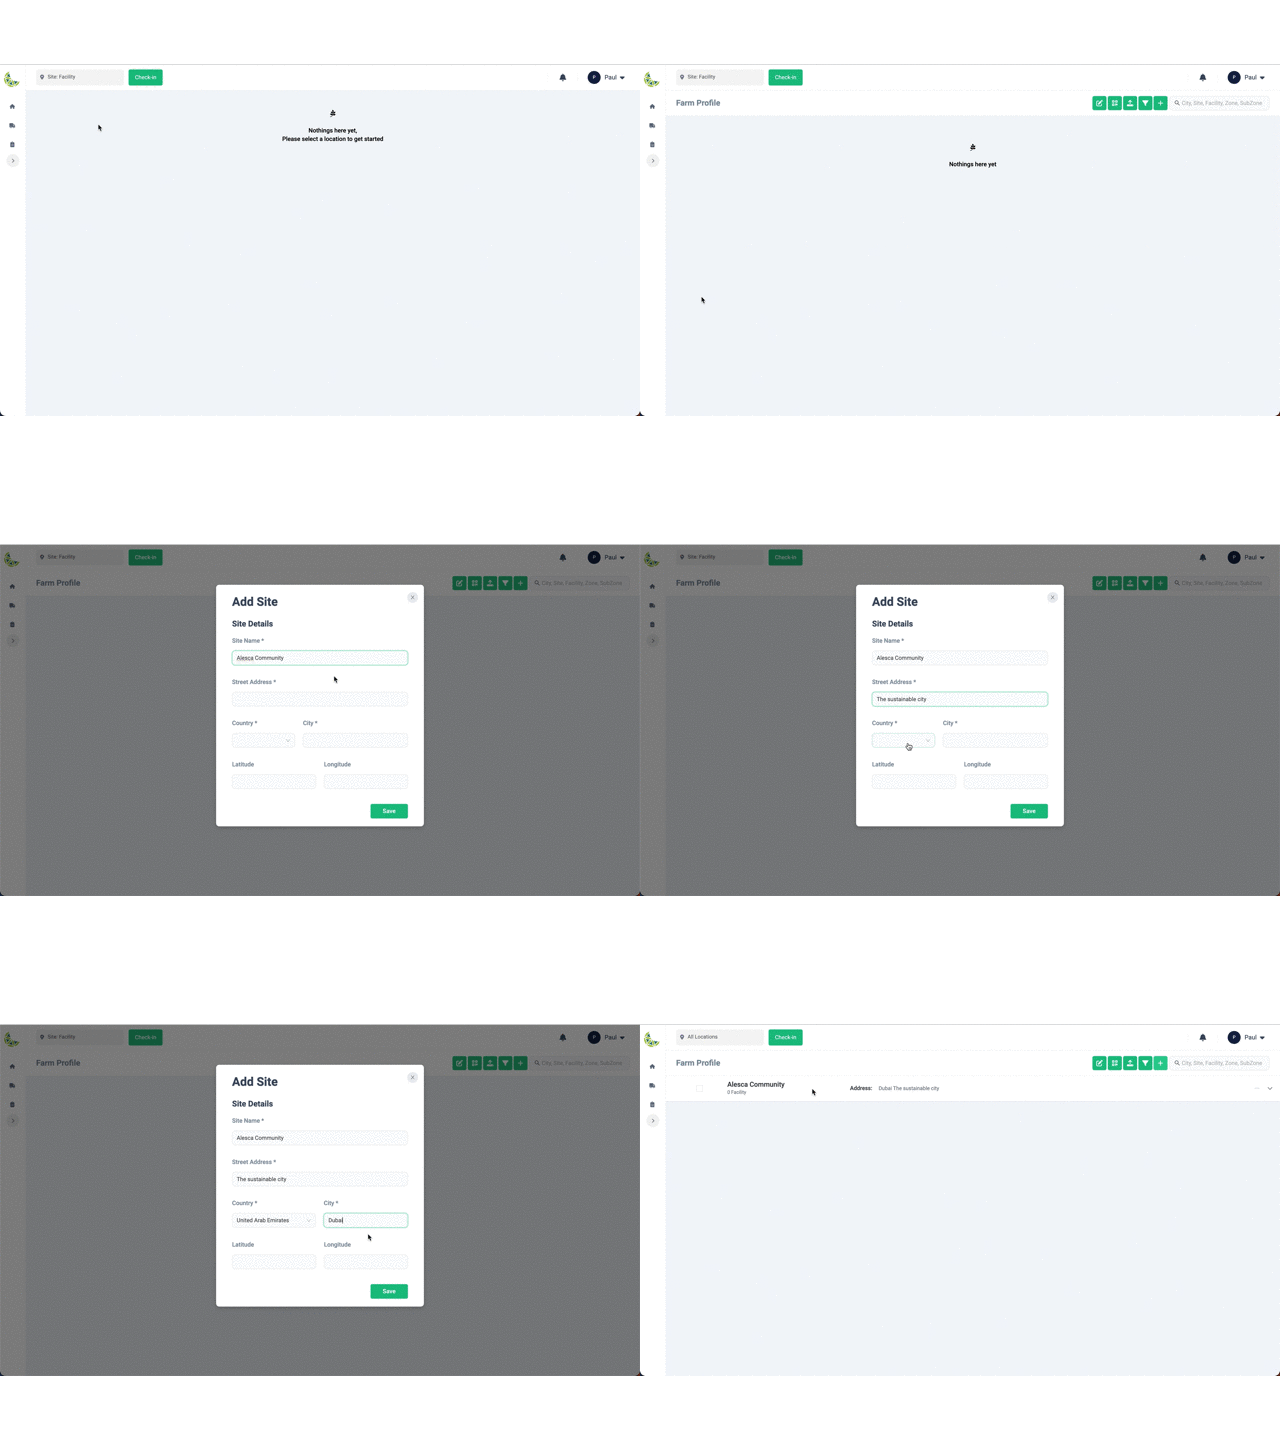
First, click "Farm Management" from the left menu, then click "Farm Profile". The farm profile screen will be displayed.
Click the "+" button at the top right of the screen. The Add Site screen will then be displayed. Enter the required items.
Required fields are Site Name, Street Address, Country, and City.
When you have completed entering all items, click "Save". Your site is now saved.
Latitude and Longitude are optional input items, but their values are used to display weather information. Enter them if necessary.

Next, let's register the facility.
Register Facility
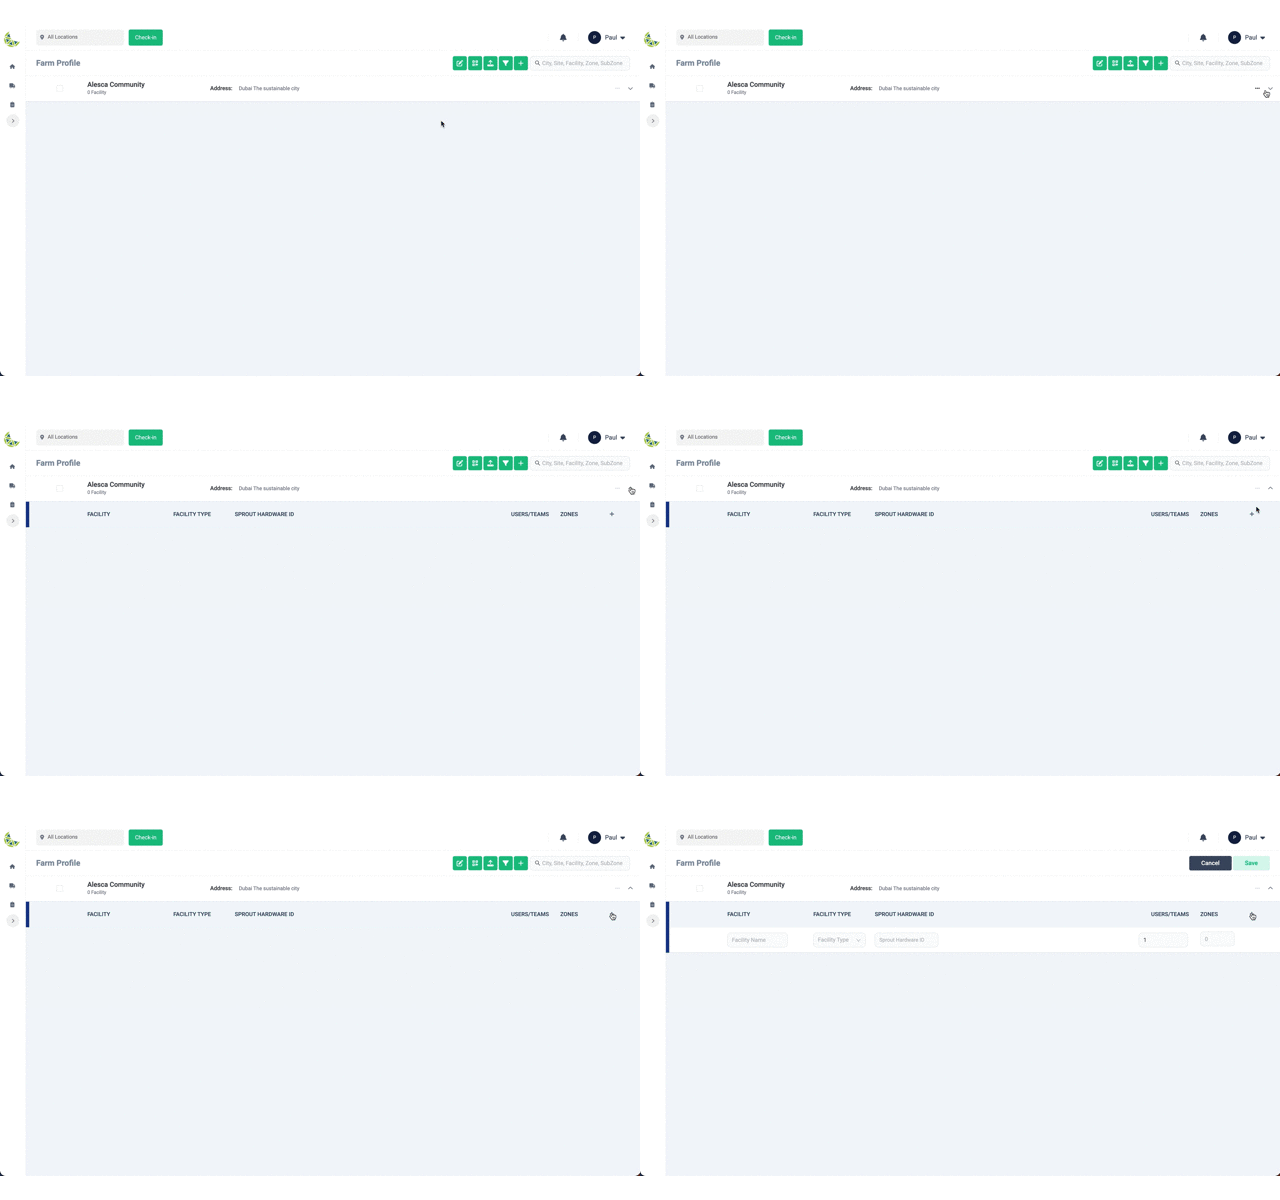
Once you have completed the site registration, proceed to register the facility! Facilities are managed as if they belong to a site. To register a facility, you must expand the site record. Click on the arrow down icon to the right of the site record. The facility header will then be displayed. Click the "+" button at the far right of the header.

Items for entering the information required to register the facility will be displayed. FACILITY, FACILITY TYPE, USERS/TEAMS are required fields, so please enter them.
You can select operators from USERS/TEAMS who are scheduled to work in this facility and give them access permissions. Choose as needed.
Once all input has been completed, the "Save" button at the top right of the screen will become clickable, so click it. Facility registration is now complete!
SPROUT HARDWARE ID displays only the hardware ID provided by Alesca.
A value entered in the facility's SPROUT HARDWARE ID means that a Sprout is attached to an actual container.
After completing the facility registration, you can continue to register the zone. In that case, enter the number of zones you want to add to ZONES. When saving the facility is completed, it will automatically switch to #Register Zone.
Next, let's register the zone.
Register Zone
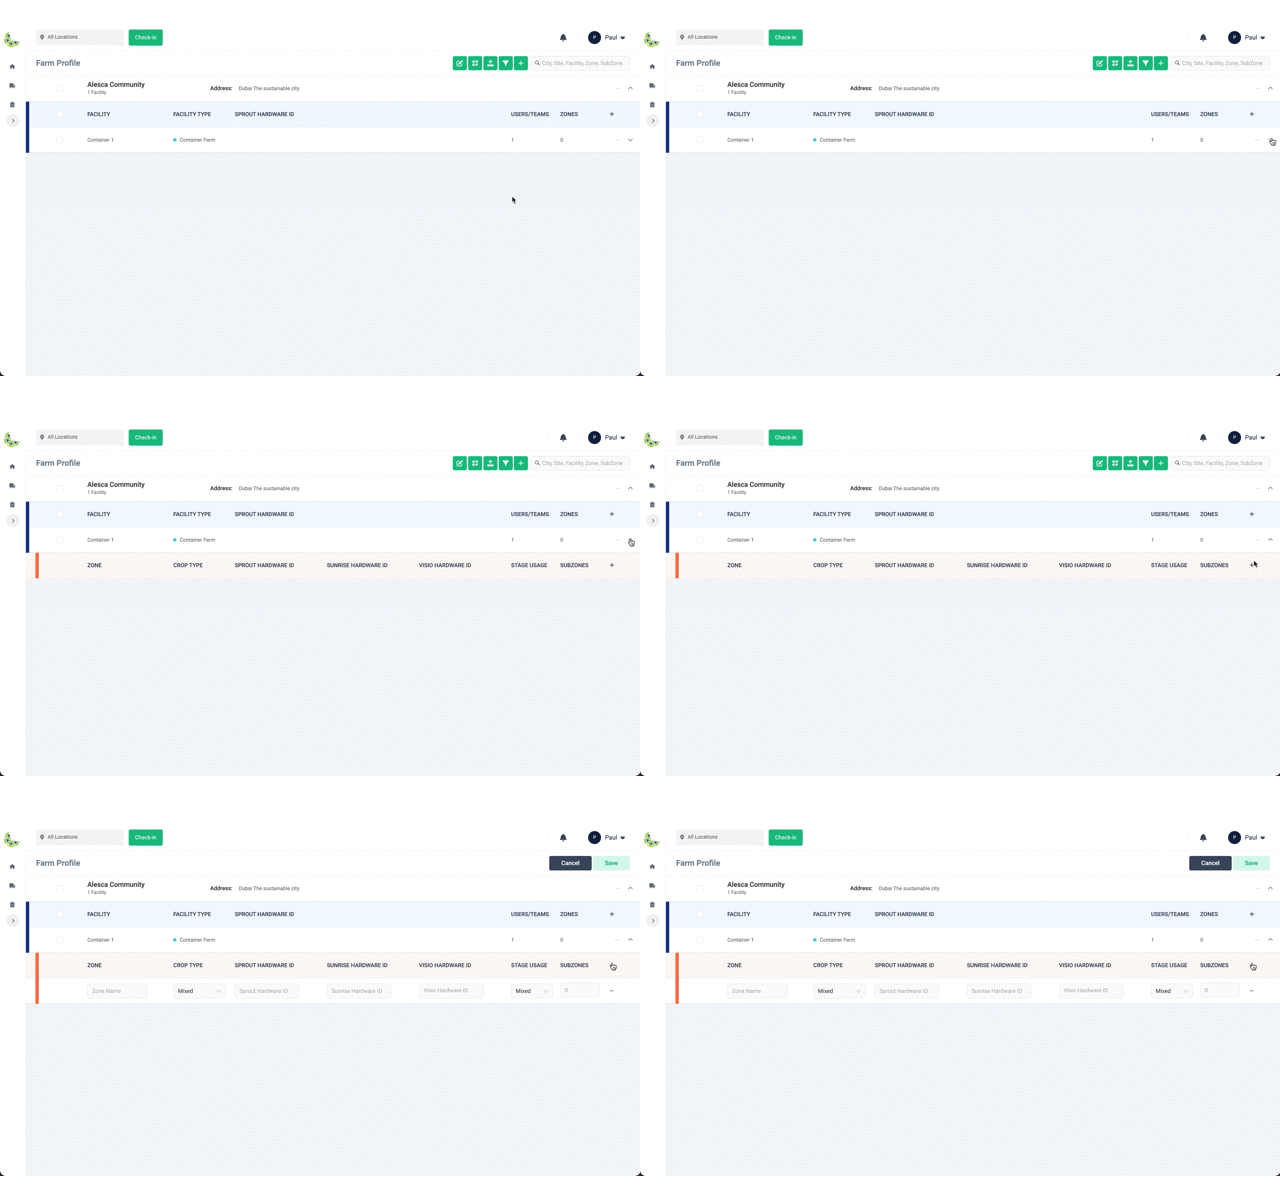
Once you have completed the facility registration, let's register the zone! Zones are managed as if they belong to a facility. You can add a zone to a facility using the same steps as when registering a facility to your site. Click the arrow-down icon on the far right of the facility record, then click the "+" button in the zone header that appears. It is possible to register multiple zones at once. Click the "+" button as many times as you want to register.

Items for entering the information required to register the zone will be displayed. ZONE is the only required field.
SPROUT HARDWARE ID, SUNRISE HARDWARE ID, VISIO HARDWARE ID only display the hardware ID provided by Alesca.
If a value is entered in the zone's SPROUT HARDWARE ID, it means that a Sprout is installed in the C Pro or T Pro.
After zone registration is complete, you can continue to register subzones. In that case, enter the number of subzones you want to add to SUBZONES. Once the zone has been saved, it will automatically switch to #Register subzone.
Also, if you specify CROP TYPE and STAGE USAGE when entering the zone, the values will be automatically selected when entering the subzone value.
Register Subzone
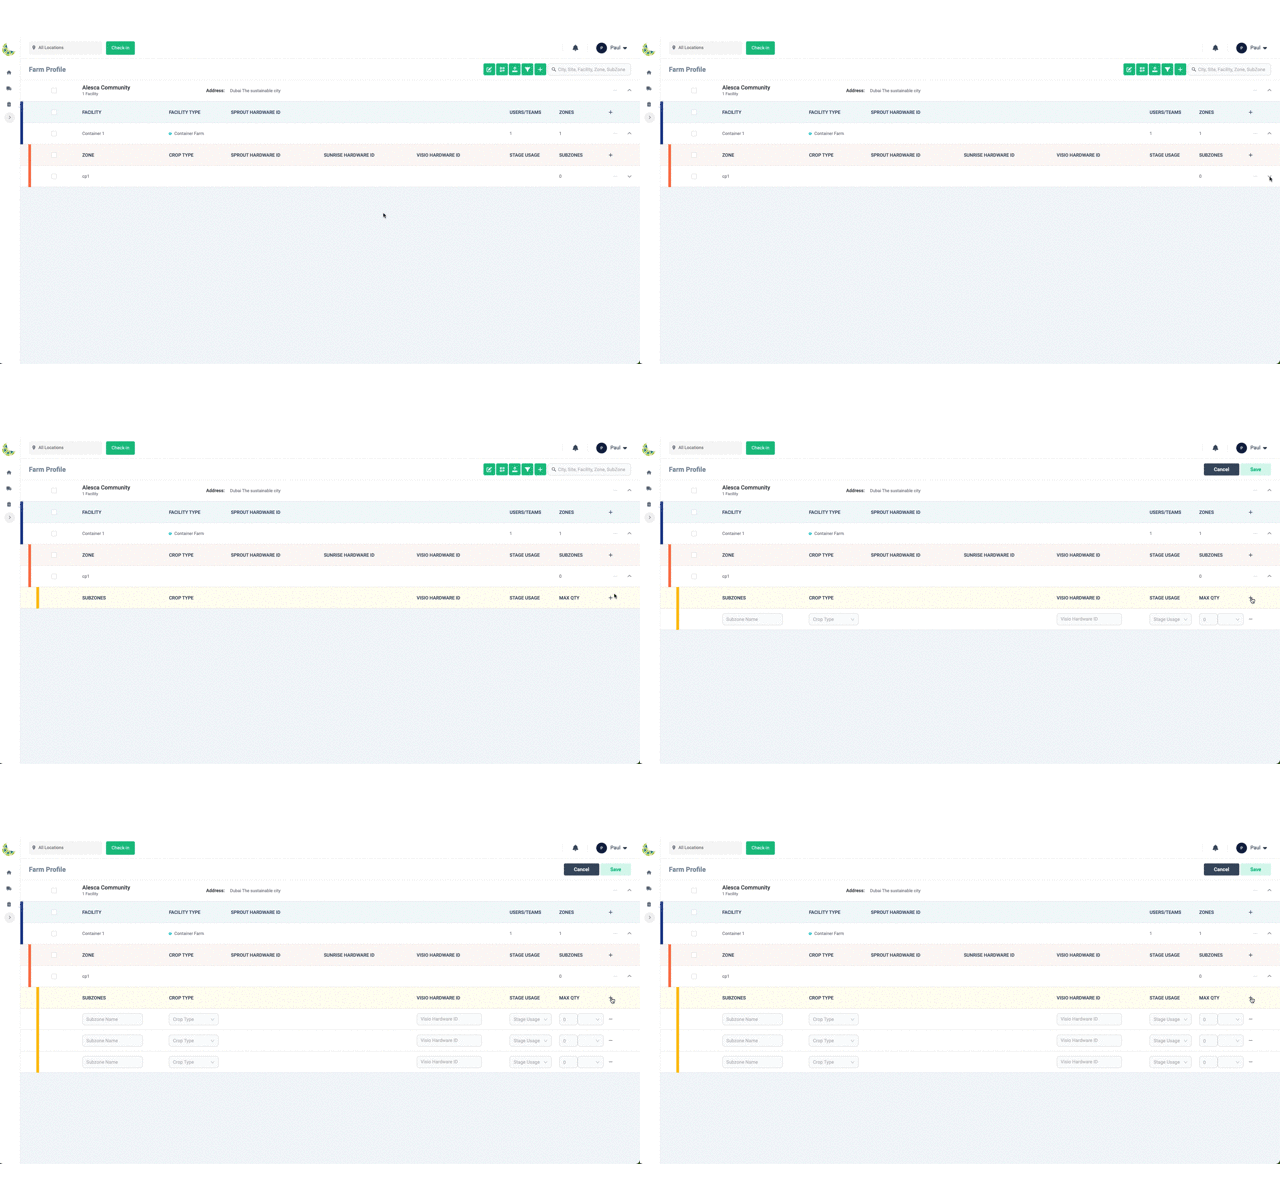
The last step is to register Subzone! Subzones are managed as if they belong to a zone. The registration procedure is the same as for facility and zone registration. In the subzone, you will register the types of vegetables you actually plan to grow, the purpose of the subzone, and the quantity of vegetables that can be grown. This information will be referenced when creating a grow plan, so be sure to register the correct values! Now, click the arrow down to the right of the zone record and click the "+" icon at the far right of the subzone header that appears. It is possible to register multiple subzones at once. Click the "+" button as many times as you want to register.

To register a subzone, SUBZONES, CROP TYPE, STAGE USAGE, and MAX QTY must be entered. Once all values have been entered, the "Save" button at the top right of the screen will be clickable.
Check that the entered values are correct and click the "Save" button. Subzone registration is now complete!
VISIO HARDWARE ID displays only the hardware ID provided by Alesca.
If a value is entered in the VISIO HARDWARE ID of the subzone, it means that Visio is installed on the C Pro or T Pro.
This completes the registration of farm information! Farm information is essential information when using Orion. Please make sure to always register correct information. For example, when you install a new container or change the type of vegetables grown in C Pro, we recommend that you also update the registered information in your farm profile!
- If you cannot find the crop you want to register, you will need to register a new one! Additions can be made at the time of registering the seed. Complete #Register your seeds.
- Registered farm profiles can be edited using the editing function! For details on how to use it, please check #Edit farm.